Using ScanDox
ScanDox is the customizable and primary manual method used to enter documents into DocuPhase. It is a completely customizable, unified scanning solution for efficient, accurate and distributed document/file capture.

NOTE
While most of our platform is contained within a web interface, ScanDox is one of the few applications that is installed separately on each workstation.
TIP
If you are asked to use ScanDox, check to make sure its installed on your local drive:
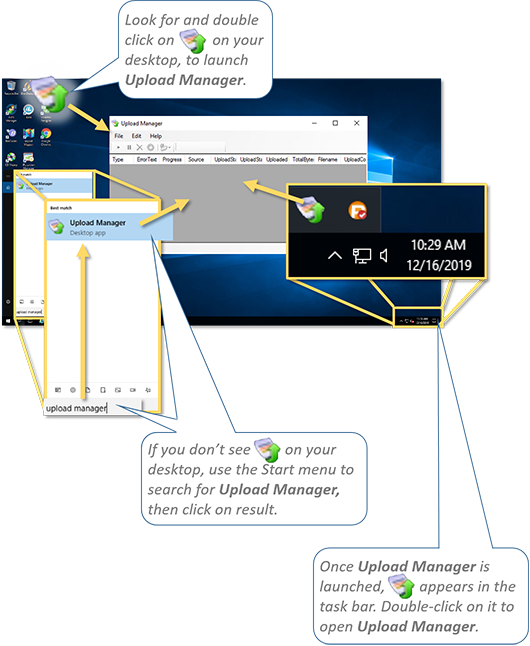
Look for the ScanDox icon (![]() ) on your desktop. Show me...
) on your desktop. Show me...

OR
Go to the Windows Search field, and enter ScanDox. Show me...

If you do not see ScanDox using any of these methods, contact your System Administrator or TPOC.
IMPORTANT!
Documents entered intoScanDox are specific to the workstation, not to the user logged into that system. Tell me more...
Tell me about...
ScanDox provides all of the following features:
- Uploading through Integration with a variety of scanning devices, as well as drag and drop functionality
- Document Indexing, manipulation, and annotation
- (User) Profiles that allow a customization through a combination of user, scanner*, and document settings for efficient document processing. Tell me more...
EXAMPLE
The Sales Department may capture documents differently from HR and/or Finance, HR and Finance may have their own, customized capture settings, etc.)
- AutoComplete and Lookup Functionality
- Add-Ins for Microsoft Outlook, Word, Excel and PowerPoint
- Keyboard shortcuts to accelerate the completion of routine Tasks.
- Scheduled processing functionality
- Image processing controls that allow you to check and optimize quality
*Not supported in ScanDox Lite.
When ScanDox is installed, there are three components that are downloaded and installed:
- ScanDox
The main component of ScanDoxis ScanDox itself: a user interface that allows you to perform the majority of tasks related to the Features described above. However, Upload Manager and Upload Services are required to allow ScanDox to interact with DocuPhase and external devices used for uploading of documents (e.g., scanners, etc.).
TIP
(![]() ) can be accessed from the Desktop. Show me...
) can be accessed from the Desktop. Show me...

- Upload Manager

Upload Manager enables the automated upload of Documents from ScanDox into DocuPhase: letting you monitor and manage (stop, pause, cancel, etc.) the upload queue (including configuration of Hot Folders and scheduled uploads).
TIP
Upload Manager can be accessed via the Start menu, desktop icon (![]() ), or from the Taskbar.Show me...
), or from the Taskbar.Show me...
- Upload Services

The Upload Services is the component that performs the actual transfer of data from ScanDox (through Upload Manager) into the DocuPhase Repository.
TIP
Upload Services can be accessed from the Services Window interface.Show me...

Upload Manager enables automated upload of Documents from ScanDox into DocuPhase, and allows you to do all of the following:
- View, select, and delete Documents in the queue as they are being processed
- Configure Hot Folders
- Schedule automated processing
The following ScanDox elements, tools, and options appear in the on the ScanDox screen.

![]() General Menus and Action Icons
General Menus and Action Icons
NOTE
If you see the "Request Target" icon (![]() ), it indicates that an iLink configuration has been completed. This means that you can use to bring Index data into ScanDox directly from other applications (e.g., QuickBooks). Tell me more...
), it indicates that an iLink configuration has been completed. This means that you can use to bring Index data into ScanDox directly from other applications (e.g., QuickBooks). Tell me more...


 can be used to display information that may help troubleshoot certain issues. For example, if a user can't find a document they just uploaded/scanned to ScanDox, you can view the list of HotFolders and their location to help locate the document in question.


 Tray
Tray


 Indexing
 Viewer


 Customizable Toolbar
These settings allow you to make general preference settings for the ScanDox Viewer.
NOTE
Any changes made to Annotation settings (as described below) are not applied to existing Annotations. You will only see changes when a new Annotation is added.
| Setting | Descripton |
|---|---|
| General Tab | |
| Log Level | Select the minimal setting you want included in the logs. You can also clear and view the log from this section of the General tab. |
| Cache | You can use the button here to clear cache for ScanDox |
| Downloading | Set a maximum file size for documents processed through ScanDox |
| Printing | |
| When printing include | Select whether/how you want Annotations and/or Redactions printed any time you print a document from within ScanDox. |
Format | Designate whether you want any printed document to be reduced to fit the size paper being used (e.g., a legal size document to be printed on letter size paper), or if you want the document printed in its actual size. |
Emailing | |
| When emailing include | Select whether/how you want Annotations and/or Redactions included any time you email a document from within ScanDox. |
| Annotations | |
Highlight | From a dropdown list, select the color of highlighting you want to use for documents in ScanDox. |
Note | From dropdown lists, choose the background color; whether or not (true or false) to add a shadow; font family, size, style, and color (i.e., ForeColor) to be used for any notes you add to a document within ScanDox. In addition, you can set the opacity of the background (i.e., the transparency level).
TIPChanging the opacity is useful for adding notes that allow any text under them to remain visible. Show me... |
Redaction | Choose the color you want to use for redacting text or items in a document. |
| Text | From dropdown lists, choose the background color; whether or not (true or false) to add a shadow; font family, size, style, and color (i.e., ForeColor) to be used for any text you add to a document within ScanDox. |

Any document or group of Documents are entered, processed in, and sent out of ScanDox as follows:
A) A document(s) is entered into ScanDox in any of several ways:
- Scanned from the main device
- Dragged and dropped from a local/cloud network or local device
- Downloaded from an Email attachment
- Uploaded from a multi-functional device
Once the document(s) appears in the Tray:
B) The User assigns the document to an Application, and enters the appropriate Index values.
- Documents can also be manipulated while in the Tray. Tell me more...
C) The document is submitted to the ScanDox Upload folder for passage into the DocuPhase system.
Once submitted:
D) A unique Batch Number is assigned, and the ScanDox Upload Service detects and picks up the associated xml component and moves Document into DocuPhase Repository.
- The XML component contains the Application and Index information entered by
the User in step B.
Once the Document passes into the DocuPhase system:
E) An Object ID is assigned to the Document, that is then "filed" into the DocuPhase repository.
If your organization is based on an Active Directory environment, DocuPhase most likely has activated single sign-on. This means instead of having to log into every component of the DocuPhase Platform, including ScanDox.
However, if single sign-on is activated, you need to sign into ScanDox for each session.
WARNING!!!
Closing ScanDox by clicking on the “X” in the top right corner will close the application, but you are still logged on. This means the next person to launch ScanDox will be active in ScanDox using your credentials.
BEST PRACTICE
To prevent another user from working in ScanDox under the your credentials, be sure you log off and exit ScanDox. Show me...

It is important to know that when you log off of ScanDox, any unsubmitted documents remaining in the tray stay in ScanDox: remaining available to anyone else logging into that workstation. This is because documents entered into ScanDox are specific to the workstation, not to the user logged into that system.
EXAMPLE
If "Person A" loads three documents into ScanDox, then logs off without submitting the documents, those same three documents will still be in ScanDox when “Person B” logs in. In other words, documents entered into ScanDox are specific to the workstation, not to the logged in user.
WARNING!!!
Closing ScanDox by clicking on the “X” in the top right corner will close the application, but you are still logged on. This means the next person to launch ScanDox will be active in ScanDox using your credentials.
BEST PRACTICE
To prevent another user from working in ScanDox under the your credentials, be sure you log off and exit ScanDox. Show me...
Not every user will see this, but if you see a Tools menu in the DocuPhase main header, it's there to allow you to download/install the latest version of ScanDox application on your/a local drive. Clicking it will download an "msi" file that you can use to install the ScanDox. Show me...

IMPORTANT!
Installation of any application on a local drive should be approved and/or performed by your System Administrator or TPOC.
- ScanDox Profiles are set up for Users - one User may have access to the same or different Profiles from other Users. Each Profile provides a collection of settings/permissions; generally, no two Profiles are/should be the same, and...
- are based on Application or Binders
- offer an additional layer of data security (via Index Controls) '
- can be used to submit document with different statuses
- allow Users the ability to add pages to existing documents
- are used to control the scanning device environment
- Lookup Profiles automatically retrieve specified information in associated databases: using the information to automatically and accurately Index documents for submission to an DocuPhase Application.
These Profiles define how this is to be done for each application and what Index fields are automatically filled, and which fields in the database(s) are used for that.
EXAMPLE
When a user enters an ID-number or an Account number into an Index fields, the Lookup Profile checks the corresponding databases (defined within the Profile) for other information related to that number, then automatically fills in remaining Index fields for that document: saving the user time, and avoiding human data entry errors.
Each ScanDox Profile provides an integrated set of configuration properties for each document capture and document manipulation job under a descriptive name that makes work setup convenient and efficient by simply selecting the relevant Profile. Tell me more...
This tab allows you to configure both Hot Folders (i.e., the Folders sub-tab), and additional settings that determine how documents are processed through the folders (i.e., Applications sub-tab). Tell me more...
The general rules for Documents submitted through ScanDox include the following:
- The first document that isn’t locked in the Hot Folder is pulled into the user’s scandox viewer for indexing
- Once it is in the user’s viewer, that item is LOCKED (see the previous point) and cannot be pulled by another user
- Upon submit, ScanDox grabs the next unlocked item from the Hot Folder
NOTE
Remember, what you see in the DocuPhase system is based on your security access/login credentials. If you think you should have access to something you don’t, or have issues with something you DO see, please contact your DocuPhase System Administrator or Technical Point of Contact (TPOC) for assistance.
| Element | Description |
|---|---|
| Folder Configuration - This tab allows you to configure Hot Folders to be used by the corresponding Profile. | |
| List of Hot Folders | This area contains the list of any Hot Folders that are currently associated with the selected Profile. In addition, you can add new or remove folders from the list. |
 / /  | Add new or remove selected folders. |
| Directory | View or change the local folder associated with the selected Hot Folder. M |
| Filter | You can enter characters that allow you to display only certain types or names of documents (e.g., if you enter *.pdf only PDF docs in a specific Hot Folder). |
| Enable | Automatically synchronize folders and their contents between the local folder and the ScanDoxHot Folder. |
| Single Document Processing | Set this to have ScanDox process documents one at a time. |
| DocuPhase Applications - This tab is used to setup Fetch functionality that retrieves documents from a DocuPhase Application. | |
Retrieve | You can use this option to retrieve documents for processing by their Status. Only documents with that assigned status are processed.NOTEIn order to prevent a Status Retrieval loop, you cannot select the same Status value used as the Retrieve By Status. BEST PRACTICEAs often happens, compound documents are uploaded into ScanDox. This generally means that someone then has to go back and split those documents: dividing them into the separate documents they were meant to be. If you are frequently dealing with compound documents, an easy way to keep track of compound documents that need to be split is to create a “Fetch-to-Split” profile, with the Retrive By Status set to “Fetch”. This allows you to quickly mark each compound document as needing to be split by updating its Status index to the “F-Fetch”. You can then go back to ScanDox, retrieve those documents by their status of Fetch, then split those items as a separate processing step. |
Original | When this setting is enabled ( In addition, you can assign the status that you want applied to any original document(s): making it easier to locate with Search. NOTES
|
Document | Allow you to “Skip” a document that has scanned at a low quality so that it needs re-scanning, or one that cannot be indexed for some reason. Skipping such documents allows the user to move efficiently through a batch of documents. In addition, you can assign the status that you want applied to any skipped document(s): making it easier to locate with Search. NOTEIn order to prevent a Status Retrieval loop, you cannot select the same Status value used as the Retrieve By Status. |
Non-Image | You can designated Non-Image Documents (e.g., Word, Excel, HTML, etc.) to be skipped if they cannot be split by ScanDox. In addition, you can assign the status that you want applied to any skipped document(s): making it easier to locate with Search. Finally, you can tell ScanDox that you any users associated with the selected profile to be notified (by email) if a Document was skipped, and what status has been assigned, if any. NOTEIn order to prevent a Status Retrieval loop, you cannot select the same Status value used as the Retrieve By Status. |
Prompt User | Notifies the user that they are about to Submit the “Split Documents” to DocuPhase and clear the ScanDox workspace. This prompt allows them to confirm or cancel the Submission of “Split Documents”. The User may want to stop a document from being submitted for a a number of reasons (e.g., indexing is incomplete, requires a second look for accuracy, a signatures is missing, etc.). While there are compound documents with the same matching Status value set in the “Retrieval & Split” Profile with this options set, the ScanDox user is presented with the next compound document to split each time the Submit button is pressed. |
Automatically | When enabled, this option adds an Auto Fetch Button ( |
Enabled | When this option is selected, it means that the associated profile is activated and available for use by any User with permissions to do so. |
The ToolsuConnections option provides access to network connections to SQL databases via Open Data Base Connectivity (ODBC) standards. These Connections are established to access databases that contain client business information which is used to efficiently supply some of the data needed to index documents without having to rely on manual input of values.
WARNING!!!
Changes to these configuration settings should only be made by your TPOC, System Administrator, or DocuPhase Technical Staff. If in appropriate changes are made, network connections could be made unavailable.
(Main) Connection Configuration Window


This window (or dialog) appears when you click on either the  or
or  from the Connection Configuration window (as described above).

Lookup Profiles can be defined to automatically retrieve specified information in associated databases: using the information to automatically and accurately Index documents for submission to an DocuPhase Application.
The Lookup Profiles define how this is to be done for each application and what Index fields will be automatically filled by which fields in the database(s).
EXAMPLE
Let's say you are indexing an updated I9 form for an employee. If a Lookup Profile has been set up for this information, you should be able to enter the person's social security number which triggers database information associated with that person (name, address, date of birth, etc.) to auto-populate the rest of the document
Lookup Profiles define how this is to be done for each application, and what Index fields are automatically filled by which fields from the database(s).

Set up via the Tools menu for ScanDox, and using a query to define it, Auto Complete ScanDox attempts to predict words and numbers as you type them based on the information that has already been entered into the DocuPhase database. The prediction(s) appears after the third keystroke, and allows you to choose the correct word or number if it appears in the list of options. However, the more characters (numbers or letters) you enter, the fewer the Auto Complete options appear in the list: thus, filtering the results to more closely match the result you want.
You can create a different query with associated settings for a category or Application (e.g., Claims might have different autocomplete settings than HR, etc.). Tell me more...
EXAMPLE
If you are entering the name "Franklin", as soon as you enter "fra", you might see a list of words containing those letters (e.g., Francis, Frank, Franklin, Fraser, etc.). Since your intention is to enter the name, "Franklin", you can select it from the list, and enter the word in one click rather than having to enter each letter. This saves time and helps maintain accuracy, as well as consistency.
NOTE
AutoCOMPLETE should not be confused with AutoFILL. Autofill uses the value you enter into one field to complete OTHER Index fields.
EXAMPLE
If you are entering values for an address, Autocomplete lets you choose the value based on a few characters for that specific field, while Autofill will use the value in the completed field to add values to other fields required for an address. Autocomplete only completes what is being typed in the current field and not multiple fields.
IMPORTANT!
If you want to set up a query, but no one in your organization is familiar with SQL Queries and querying datasets, please contact DocuPhaseTechnical Support for assistance. Tell me more...

Because the words that come up for autocomplete selection are based on the values stored in the DocuPhase database, it's a good idea to use the F5 (refresh) option on a regular basis.
This way, anything that appears for autocompletion is based on the most current data contained in the database.
You can use the right-click menu to change the way Documents appear in the Tray:

| View Style | Description |
|---|---|
| Card | Displays each page in a document in a uniform page (thumbnail) size in the thumbnail viewer. Show me...
|
| Displays pages in their original "aspect ratio" (ID card that is 2" x 3" appears differently than an 8.5" x 11") in
the thumbnail viewer. This means that pages scanned or
created with a different aspect ratio appear as different
sized thumbnails. Show me...
NOTEThumbnail sizes can occur within the same document, depending on how the page images were created (e.g., HR onboarding documents that include an 8.5' x 11" document with copies of ID and social security cards that are smaller in dimension). | |
| Shows each individual, multi-page document with the first page fully displayed with subsequent pages partially and horizontally shown behind it. Show me...
NOTEYou can move your mouse over the stacked pages to "scroll" through the pages of the document, then click on a highlighted page to display it in the Viewer. Show me...
| |
| Similar to Stacked View (as described above), except that there will be two separate documents displayed as stacked within the same row. Show me...
|


This is a function frequently used in ScanDox - particularly when you have a large number of documents for submission. It simply means that all documents currently in the Tray are submitted all at once - in one click, rather than having click a Submit button over and over to submit documents one at a time. Tell me more...
The Fetch feature is set up under the DocuPhase Applications tab within ScanDox Profile configuration,and is used to retrieve documents from a DocuPhase application, based on Status.
NOTE
In order to prevent a Status Retrieval loop, you cannot select the same Status value used as the Retrieve By Status.
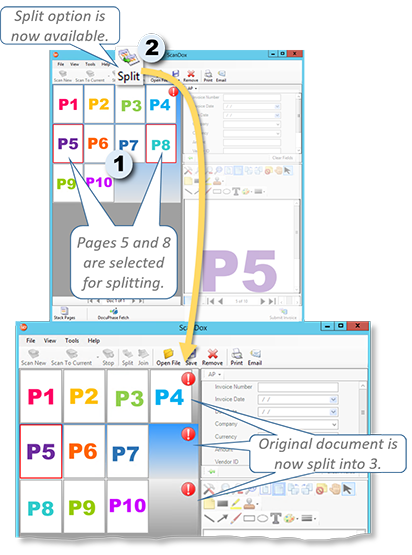
When using the Thumbnail view, you can divide and combine TIFF or PDF documents with two to three easy clicks. When splitting a document, you select the first page of the new document, and that's where the document is split; for joining, you select the last and first page of the places in each document you want to joig. Tell me more...
NOTE
Documents in other formats that are not TIFF or PDF (E.G., documents such as Word, Excel, JPEG, GIF, etc.) cannot be split or joined.
The Split option does not become available until at least 2 pages have been selected in a document.
TIP
The Split feature is a great way to quickly divide compound documents into individual documents.
BEST PRACTICE
As often happens, compound documents are uploaded into ScanDox. This generally means that someone then has to go back and split those documents: dividing them into the separate documents they were meant to be. If you are frequently dealing with compound documents, an easy way to keep track of compound documents that need to be split is to create a “Fetch-to-Split” profile, with the Retrive By Status set to “Fetch”. This allows you to quickly mark each compound document as needing to be split by updating its Status index to the “F-Fetch”. You can then go back to ScanDox, retrieve those documents by their status of Fetch, then split those items as a separate processing step.
EXAMPLEs
- Let's say you have a document that is 10 pages long, but you want to split it into 3 separate documents: the first document needs to be pages 1 through 4, the second document needs to be pages 5 through 7, and the third document is pages 8 through 10. To quickly split this document as noted here, you'd select pages 5 and 8, then click
 . the split occurs just before the selected page. Show me...
- To join the first two documents, you would then click on page 4 (the last page of the first document) and page 5 (now the first page of the second document), then click
 to join them. At that point you would have only 2 documents (consisting of pages 1through 7, and the other pages 8 through 10). Show me...

Once a document is in the Tray, you can right-click on it to display a list of options. From there, you can view metadata that includes identifying details for either a single page in a document, or the entire document for any document that appears in the ScanDoxTray. Show me...

TIPS
- You can access the Document Properties from either the right-click menu or from the Page Properties window.
- Click
 to display Document Properties in alphabetical order, or to display them by category.
Page Properties
- Page number
- BPP (Bits Per Pixel)
- Compression (File) Type (e.g., PDF) compression
- Page size in pixels and inches
- DPI (vertical and horizontally)
Document Properties
Document Information
- Application ID
- Who created it and when
- DocumentID
- Whether or not it's available for Full Text Search
- Whether or not the document has been modified since creation; if so, by whom
- Status (e.g., pending, entered, etc.)
File Information
- Date the document was created
- Date a modification was made to the document, if any
- Name of the file
- Number of total pages in the Document Management
- Total document size (e.g., 124kb)
Security restrictions (if any)
These properties tell you if the content can be copied, and/or if the document can be exported, modified, printed, or if it is password protected.
Version (only applies if the document is associated with source control)
- Name of person who checked out document (if any)
- Version checked out (if any)
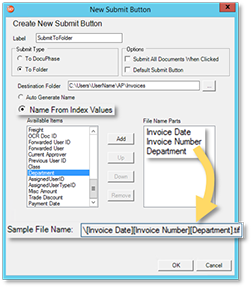
A default ‘Submit’ button already exists in ScanDox to allow you to complete the ScanDox capture processing of a document and indexing into the DocuPhase repository. However, you can change the indexing and status settings of the default Submit button for specific Profile configurations.
In addition, you can create Submit buttons that offer the ability to submit documents by either single or multiple steps by using different combinations of Submit button attributes as described below:
Creating a Submit to DocuPhase Button
Creating a Submit to Folder Button
This feature is accessed via the Help menu. Folders that appear in the Application Information contain various information used by ScanDox: including storage files residing in the ScanDox Tray, information used to communicate with DocuPhase, as well as for processing files regarding profiles, permissions, and Applications. Tell me more...
NOTE
The folders that appear in this list may vary depending upon how ScanDox is configured for your organization.
The most common issue for ScanDox users is that they don't see a submitted document in the DocuPhase Repository.
If You Are a System Admin or TPOC


IMPORTANT!
You MUST have access to SQL Server in order to view the Batches Table
Once a document is picked up from the Upload folder/directory by the Upload Service, it is sent to the SQL Batches Table within DocuPhase; this is where the Object ID is assigned.
This table allows you to see and verify the Profile used (i.e., to which Application a Document was sent), as well as its status, and other identifying information (see below). Tell me more...
TIP
If it the user sent one or more documents to the wrong Application, be sure that the Profile(s) used shows the location as appropriate, and/or that the User submitted Documents with the right Profile for this Application.

| Feature | Key Combination | Action |
|---|---|---|
| Viewer Area - One Page View Mode | ||
| Show One Page View* | Alt + 1 | Displays the selected Thumbnail page in the Viewer. Show me... |
| Viewer Area - Book View Mode | ||
| Show Book View* | Alt + 4 | Displays the selected Thumbnail page, as well as the page following it, in the Viewer, side-by-side. Show me... |
| Top to Bottom* | Alt + 5 | Displays 2 pages top to bottom (rather than side-by-side) in the Viewer. Show me... |
| Move Focus* | Tab Shift + Tab | Move focus to the right or bottom page (depending upon whether you are viewing pages side-by-side or top-to-bottom). |
| Any View | ||
| Move Index Focus** | Tab Shift + Tab | Moves cursor/focus down to the next Index field. Moves cursor/focus up to the previous Index field. |
| Fit Page | Alt + 6 | Changes the size of the document display in the Viewer so that the entire page shows at once. Show me... |
| Fit to With | Alt + 7 | When the initial (or zoomed in) view of a document exceeds the width of the Viewer, this shortcut reduces the displayed document down to a size that allows the entire width of the page to fit. Show me... |
Pan (scroll)
| → (right arrow) ← (left arrow) | When the initial (or zoomed in) view of a document exceeds the width of the Viewer, this let's you scroll to the right side of the displayed document without reducing its display size. When the initial (or zoomed in) view of a document exceeds the width of the Viewer, this let's you scroll to the left side of the displayed document without reducing its display size. Show me... |
| ↓ (down arrow) ↑ (up arrow) | When the initial (or zoomed in) view of a document exceeds the length/height of the Viewer, this let's you scroll to the right side of the displayed document without reducing its display size. | |
Rotate | Ctrl + - (plus) | Rotates the selected document to the left in the Viewer. Rotates the selected document to the right in the Viewer. Show me... |
Annotations | Ctrl + x (Cut) Ctrl + c (Copy) Ctrl + v (Paste) Del (Delete) | Remove the selected Annotation, that can then be pasted in another area. Make a copy of the selected Annotation, that can then be pasted. Add a copy of the cut/copied Annotation (repeat, as needed) Remove the selected Annotaion, without saving it to the clipboard for pasting later. WARNING!!!Use this deletion functionality with care. Once you delete something, it cannot be recovered: you will need to recreate it. |


*Click in the Viewer area before using this shortcut.
**Click in the Indexing area before using this shortcut.
The Lite version of ScanDox is used the same as the full version, except that it does not support scanners or Hot Folders. For all other functionality review the information provided here for the full version of ScanDox.
Tell me how to...
NOTE
Remember, User Permissions must be set to allow for you to be able to add or change ScanDoxProfiles.
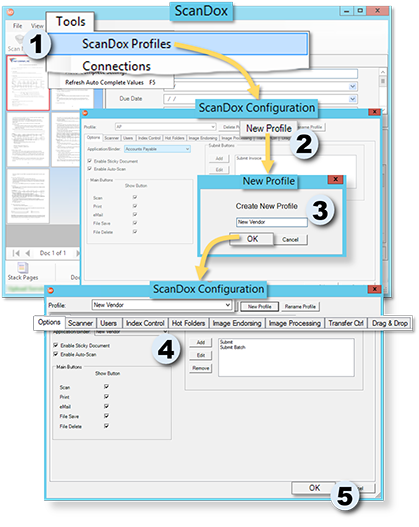
In the Tools menu of the main ScanDox window:
1) Select ScanDox Profiles to display the ScanDox Configuration window.
In the ScanDox Configuration window:
2) Click  to display the New Profile dialog.
In the New Profile dialog:
3) Enter a name for the Profile, then click  to close the window and return to the ScanDox Configuration window.
- The newly created name appears in the Profile field.
In the ScanDox Configuration window:
4) Make settings under each tab, as needed. Tell me more...
When all settings are complete:
5) Click to save the new Profile.
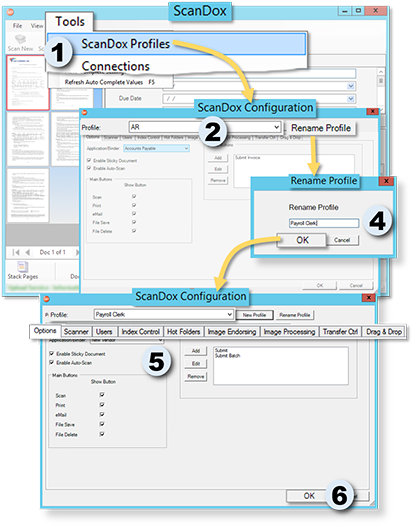
NOTE
Remember, User Permissions must be set to allow for you to be able to add or change ScanDoxProfiles.
In the Tools menu of the main ScanDox window:
1) Select ScanDox Profiles to display the ScanDox Configuration window.
In the Profile field of the ScanDox Configuration window:
2) Select the Profile you want to rename.
2) Click  to display the Rename Profile dialog.
In the Rename Profile dialog:
3) Enter a name for the Profile, then click to close the window and return to the ScanDox Configuration window.
- The Profile appears in the Profile field under its new name.
In the ScanDox Configuration window:
4) Make changes to the settings under each tab, as needed. Tell me more...
When all settings are complete:
5) Click to save the new Profile.
WARNING!!!
Use this deletion functionality with care. Once you delete something, it cannot be recovered: you will need to recreate it.
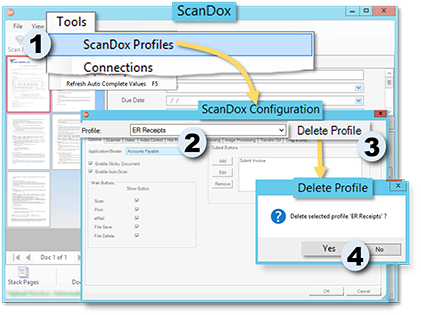
NOTE
Remember, User Permissions must be set to allow for you to be able to add or change ScanDoxProfiles.
In the Tools menu of the main ScanDox window:
1) Select ScanDox Profiles to display the ScanDox Configuration window.
In the Profile field of the ScanDox Configuration window:
2) Select the Profile you want to delete.
3) Click  to display a confirmation prompt.
In the Confirmation prompt:
4) Click  to delete the selected Profile.
- The Profile no longer appears in the Profile drop down.
Part of configuring Profiles is to assign one or more scanners to each Profile. If you don't see the scanner you want in the list of Available Scanners, you can add it to the list (if you have permissions to do so).
From the Profiles Scanner tab:
1) Click  to display the New Scanner Profile dialog.
From the New Scanner Profile dialog:
2) Enter a name for the scanner being added (e.g., Training Scanner).
3) Enable (![]() ) the Use ISIS Drivers settings option if you to use them.
) the Use ISIS Drivers settings option if you to use them.
AND/OR
4) Click to display the Scanner Selection dialog.
From the Scanner Selection Dialog:
5) Select the device option (PixTwain or Import Drivers) that corresponds to the device you are configuring.
TIP
You can enable (![]() ) the Show All Connected Scanners option to add all possible devices to the list for selection.
) the Show All Connected Scanners option to add all possible devices to the list for selection.
6) Click OK to display the Configure Device Settings dialog.
From the Configure Device Settings dialog.
7) Select the device from the drop-down list.
8) Click to add the selected device to the Available List.

This men\thod allows you to upload one document at a time so that you can Index and manipulate documents as they are opened in ScanDox.
In the Menu ribbon, at the top of the ScanDox window:
1) Click to display the Open (browser) window.
In the Open browser window:
2) Find and select the document you want uploaded.
3) Click  to close the browser window, and add the document to the ScanDox tray.
NOTE
Depending upon the size of the document (either because of page count or content, such as images), it may take a few moments for the document to appear in the tray.
Once the document is uploaded:
4) Enter Index values, and/or add annotations.
- You can either upload additional documents for Indexing or annotating before submitting them to DocuPhase all at once, or you can submit each document as it is uploaded and prepared. You can also Save (
 ) or Remove (
 ) a selected Document in the tray.
 - The method of submission to DocuPhase may vary depending upon the Submit buttons (available in the Customizable Toolbar at the bottom of the window) via the currently selected Profile . Tell me more...
NOTE
5) Submit the document(s) to the DocuPhase repository.
Repeat these steps for each document you want to upload.

You can use the process described below to split (divide) a single multi-page TIFF or PDF document into multiple documents or single pages. You can also (re)Join a TIFF or PDF split document or Join two separate document of the same format (PDF or TIFF) to make them one. Tell me more...
NOTE
Only documents of the same format can be joined (i.e., you cannot join a PDF with a TIFF).
To Split a Multi-page PDF or TIFF Document
In the Thumbnail view of the ScanDox tray:
1) Click to select the pages you want to extract (to create a separate document) from the existing document.
- To select multiple, consecutive items in a list by either of the following methods: holding the Shift key, and clicking on items; or click on the first item you want selected, hold the Shift key, then click on the last item in the list you selected.
- Select multiple, non-consecutive or consecutive items by holding the Shift key, and clicking on items.
TIP
In the toolbar:
2) Click ![]() to create a new file with the selected page.
to create a new file with the selected page.
- The existing document appears with the extracted pages removed.
To Join A Split Document
In the Thumbnail view of the ScanDox tray:
1) Click to select the pages from each document you want to to use to create a new document.
- To select multiple, consecutive items in a list by either of the following methods: holding the Shift key, and clicking on items; or click on the first item you want selected, hold the Shift key, then click on the last item in the list you selected.
- Select multiple, non-consecutive or consecutive items by holding the Shift key, and clicking on items.
TIP
In the toolbar:
2) Click ![]() to create a new file with the selected page.
to create a new file with the selected page.
- The existing document appears with the extracted pages removed.
In the Thumbnail view of the Tray:
1) Right-click on the selected page you want to rotate to display a menu of options.
TIP
To select two or more pages for rotation, press and hold Ctrl, while selecting pages. Once pages are selected, continue to press Ctrl and right click to display a menu of options, and go to step 2 below.
In the menu of options:
2) Select Rotate Left to rotate the selected pages counter-clockwise.
OR
Select Rotate Right to rotate the selected pages clockwise.
Repeat step 2 until the page(s) are in the position you want them.

To Copy and Paste pages
In the Thumbnail view of the Tray:
1) Click on the page you want to copy to select it.
TIP
To select two or more pages to copy, press and hold Ctrl, while selecting pages to copy. Once pages are selected, continue to press Ctrl and right click to display a menu of options (as described in step 2), and go to step 3 below.
2) Right-click on the selected pages to display a menu of options, then click Copy.
In the Tray:
3) Right-click on a page to again display the menu of options, then select Paste, and choose a paste option (i.e., after or before selected/current page, as last or first page of the document):

To Delete pages
In the Thumbnail view of the Tray:
1) Right-click on the selected page you want to delete to display a menu of options.
TIP
To select two or more pages for deletion, press and hold Ctrl, while selecting pages. Once pages are selected, continue to press Ctrl and right click to display a menu of options, and go to step 2 below.
In the menu of options:
2) Select Delete to display a confirmation prompt.
In the Confirmation prompt:
3) Click to close the prompt and delete the pages.

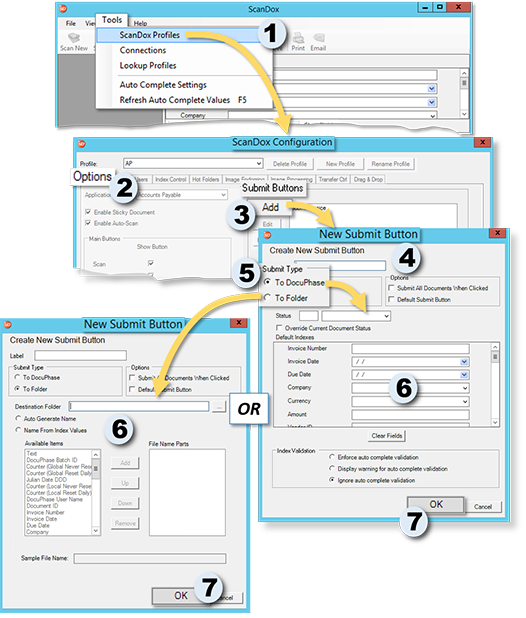
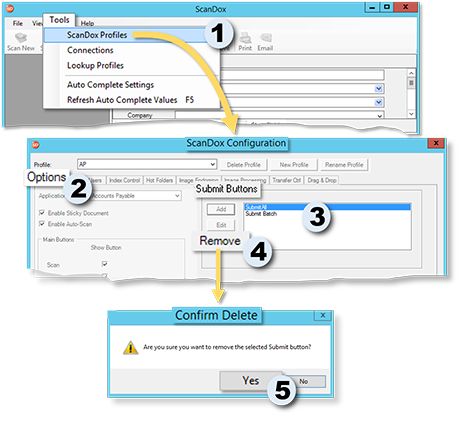
You can create submit buttons that perform in very specific ways to send documents to DocuPhase.
NOTE
Remember, User Permissions must be set to allow for you to be able to create or edit ScanDoxSubmit buttons.
In the Tools menu of the main ScanDox window:
1) Select ScanDox Profiles to display the ScanDox Configuration window.
In the ScanDox Configuration window:
2) Make sure  is selected.
In the Submit Buttons section under the Options tab:
3) Click  to display the New Submit Button window.
In the New Submit Button window:
4) Enter a name/label and set the Options for the button you want to create.
5) Select the Submit Type you want to assign to the new button (i.e., To DocuPhase or To Folder)
NOTE
The fields below the Submit Type correspond to the Submit Type selection. The default is the To DocuPhase setting; however, if you chose the To Folder setting, you'll notice that the fields below it change. Tell me more...
6) Make settings as they apply to the selected Submit Type. Tell me more...
When all settings are complete:
7) Click to save the button.
You can edit submit buttons in order to change the way they function when sending documents to DocuPhase. You can also remove buttons that are no longer needed.
NOTE
Remember, User Permissions must be set to allow for you to be able to edit or remove ScanDoxSubmit buttons.
In the Tools menu of the main ScanDox window:
1) Select ScanDox Profiles to display the ScanDox Configuration window.
In the ScanDox Configuration window:
2) Make sure is selected.
In the Submit Buttons section under the Options tab:
3) Select the button you want to edit or remove.
To Edit the Button
4) Click  to display the Edit a Submit Button window.
In the Edit a Submit Button window:
5) Make changes to any of the settings, as needed. Tell me more...
NOTE
The fields below the Submit Type correspond to the Submit Type selection. Tell me more...
When all changes are complete:
6) Click to save the button.
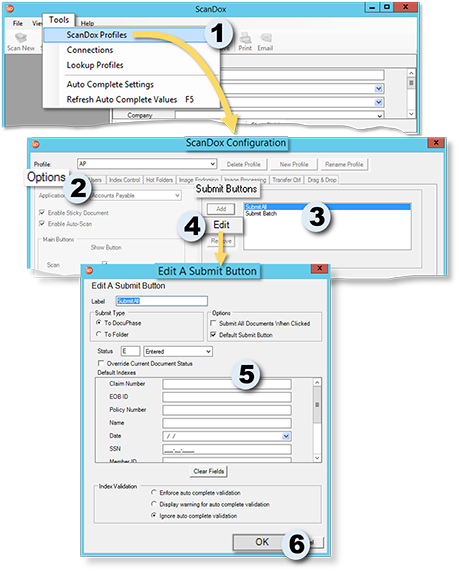
OR
To Remove a Button
4) Click  to display a confirmation prompt.
In the Confirmation Prompt:
5) Click  toclose the prompt and delete the selected button.
From the ScanDox Tools menu:
1) Select Lookup Profiles to display the Application Lookup Profiles window, with the Query tab selected.
Under the Application Lookup Profiles Query tab:
2) Make settings, as needed (including the addition or editing of the Query).
AND/OR
3) Click  to make sure the configuration of the query is entered correctly, and make any corrections, as needed.
Under the Application Lookup Profiles Mapped Fields tab:
4) Click  to display the Add Lookup Map window. Tell me more...
5) Connect fields as appropriate, then click to return to the Mapped fields tab.
Under the Application Lookup ProfilesApplication Lookup Profiles Options tab:
6) Make settings, as needed.
When all settings are complete:
7) Click to save the settings, and close the Lookup Profiles window.

1) Select Auto Complete Settings to display the corresponding window.
In the Auto Complete Settings window:
2) Make settings, as needed (including the addition or editing of the Query).
When all settings are complete:
3) Click to save the settings, and close the Lookup Profiles window.

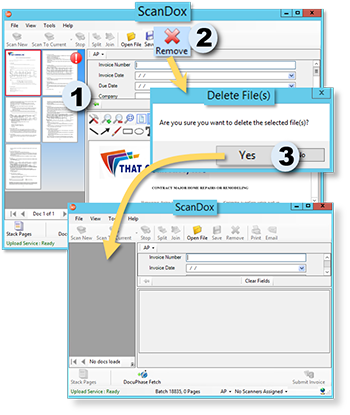
In the ScanDox Tray:
1) Select the document you want to save or remove.
To save the document:
In the ribbon at the top of the ScanDox window:
2) Click ![]() to display the Save Options window.
to display the Save Options window.
In the Save Options window:
3) Make settings, as appropriate, and click to save the settings, and display the Save As browser window.
In the Save As window:
4) Navigate to the location in which you want to save the selected document.
5) Enter a name for the document, and click  to store the document in the designated location, and close the Save As window.

OR
To remove the document:
WARNING!!!
Use this deletion functionality with care. While the document isn't deleted from its original location, it is removed from the Tray and cannot be recovered; if you inadvertently remove the document from the Tray, you'll have to upload it again.
In the ribbon at the top of the ScanDox window:
2) Click ![]() to display a confirmation prompt asking if you are sure you want to delete the document.
to display a confirmation prompt asking if you are sure you want to delete the document.
In the prompt:
3) Click to close the prompt and remove the selected document from the Tray.
IMPORTANT!
You MUST have access to SQL Server in order to view the Batches Table
You can access the Batches Table via the SQL Server Management Studio:
1) Open and connect to SQL Server to display the Object Explorer.
In the Object Explorer:
2) Go to Server NameuTables to find the dbo.Batches table
3) Right-click on dbo.Batches to display a list of options.
In the List of Options:
4) Click on Select Top 1000 Rows to display the Batches Table.
In the Batches Table:
5) Review as needed.

If a submitted document does not appear in the either the Tray or the Upload Service directory, it likely means that ScanDox and the Repository don’t have the correct authentication required for connection. Both the UploadManager.exe.config and UploadService.exe.config files contain an Authentication URL.
Use the steps below to make sure the URLs are working:
WARNING!
Always open configuration files with Notepad++ (or any XML editor); opening it with regular Notepad saves configuration file in .txt format (rather than its “config” format): resulting in broken configuration.
1) Go to < C:\Program Files (x86)\ DocuPhase \ScanDox\ *.
2) Locate and use Notepad ++ open the UploadManager.exe.config and UploadService.exe.config files.
3) Review the authentication for both and make any corrections necessary.
NOTE
The front end of the authentication URL will always be the URL for our platform (minus the /isynergy or /docuphase) and therefore could be http or https. The authentication will always end with “applicationserver/authenticationservice.asmx”
4) Test the URL by copying and pasting the URL in a browser.
IMPORTANT!
Anything that appears other than the Authentication Service screen is likely to be a 404 or http error: indicating an issue with connection to the server. Please review the steps above on the previous page to make sure the correct URL is being used.
Otherwise, you may need to contact the DocuPhase Support Team for assistance
