Understanding and Navigating the DocuPhase System
As a DocuPhase User, you likely spend the majority of your time moving between a few specific areas within the platform. Let’s take a look at these areas to provide you with an initial understanding of where things are, as well as when/why you might use them.
Tell me about...
When setting up or when resetting your password, be sure to follow the requirements shown below:
BEST PRACTICE
Use the guidelines below to create a strong password:
- This should include all of the following:
- decent length (the longer the better)
- a mix of upper and lower case letters (upper and lower case)
- numbers
- symbols (e.g., #,$,%,!)
- It should not include any of the following:
- association/similarity to your personal information
- words found in the dictionary
- passwords you already use for other systems or programs
EXAMPLE
- An example of a strong password might be: P@ssw0rdoo7!
- An example of a weak password might be: lindafeb12
BEST PRACTICE
When creating or setting a new password, be sure to set a strong password that's easy for you to remember, but difficult for others to guess.
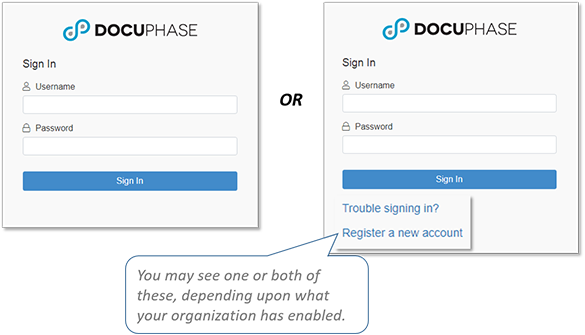
Whether or not you access DocuPhase via the DocuPhase Sign In window depends upon whether or not your organization has implemented Single Sign-On (SSO) Technology. If they have, you may never see the Sign In window.
However, If a Sign In window does appear, you can enter your name and password to log into the DocuPhase platform; in addition, the Sign In window may be additional options available, depending upon the options (if any) your organization may have chosen to put in place (see NOTES below):
- Trouble signing in?
Use this link if you have forgotten your password. Tell me more...
- Register new account
Use this link if you are a new user to DocuPhase, but do not yet have an account that allows you to have access to the system. Tell me more...
NOTES
Login Time-out
To add a layer of security and/or keep unused licenses from being tied up, your organization may set a limit to the amount of time any account can remained signed in, but inactive.
EXAMPLE
Let's say your organization has set accounts to be signed out after 10 minutes of inactivity. This means, when sign in and begin working, but then walk away to go to a meeting, you will be signed out if your absence exceeds 10 minutes.
Possible Options on the Sign In window
Additional options you may see on the Sign In window are the reset password (via Trouble signing in? link), and/or request an account (via link Register a new account link) option.
If you have forgotten your password or if you need to register as a new user, and you don't see those options on the Sign In window, contact your TPOC or System Administrator for assistance.you can simply enter your user name and password to access.Show me...
Depending upon the options set by your organizaiton, there may be two reasons your account could be locked: preventing you from signing in.
You've exceeded the maximum number of login attempts allowed
Depending upon your organization's security policies and settings made within DocuPhase, there may be a limit to the number of unsuccessful login attempts a you are allowed to make. In other words, if you try to log in, and (for whatever reason - such as entering the wrong user name and/or password) the login is unsuccessful, you may be limited to the number of tries you can make to login. Once this limit has been reached, your account is locked: preventing you from wasting time continuing to try to login, unsuccessfully.
When you are locked out of your account, a prompt appears to let you know that the number of unsuccessful attempts has been reached, and confirms your account is locked. Once this occurs, the prompt advises you of how to unlock your account; this could mean waiting a specific length of time (e.g., 15 mins, 24 hours, etc.) before trying to sign in again. However, rather than a time limit, it may be that the System Administrator must unlock it.
If the prompt indicates that you need a System Administrator to intervene, or if you are still unsuccessful at logging in after the specified time, try resetting your password, or contact your System Admin or TPOC for assistance.
Your password has expired
As an added security measure most organizations set User passwords to expire within a particular number of days or months. Most commonly, passwords are set to expire in 90 days. However, if your organization chooses to use this process, it may be set to a short a time as a few hours to. This setting requires you to change your password on a regular basis (e.g., most commonly, every 90 days). If this feature has been implemented by your organization, a prompt appears when your password has expired, and provides a link to go to the Password Reset window to create a new password
The DocuPhase header (as shown below) is available from any screen within the DocuPhase Document Management Application. Review the information below to familiarize yourself with how to get to the various components, features, and functions available for your Documents and Work Items.
NOTE
Remember, the information on (and appearance of) the various screens and windows within DocuPhase may vary from what is shown in the online help. What you see (and how you see it) in the system depends upon access level settings and interface customizations made to the system by your organization. Please contact your System Administrator or DocuPhase Technical Point of Contact (TPOC) for more information.
The elements shown below appear in the main header of the DocuPhase interface.

| Element | Use it to... | |
|---|---|---|
| 1 | "Navigational Landmark" | identify an at-a-glance marker of the page/component of the platform currently being utilized/displayed (e.g., Search, Workflow, Upload, etc.). |
| 2 |
|
access the associated webpage/website (e.g., your company website) as determined by your organization. |
| 3 |
|
display the searchable, page-level, context-sensitive help system (i.e., the help that appears when you click on this icon relates directly to the screen of the system that is displayed). Tell me more... |
| 4 |
|
navigate to a webpage (e.g., contact information for your company) or Documentation as determined by your organization. |
| 5 |
|
view the User name of the person currently logged into the system (see items 6 and 7 as described below). |
| 6 |
|
displays User Preferences that include options to change your password, set search preferences, set the starting screen you want displayed upon login, and more. |
| 7 |
|
log out of the DocuPhase system. This also releases the license being used, as well as unlocks any Documents you are using: making them available for another User. |
| 8 | Global Search | search every Document in every Application for specific keywords entered in this field.
NOTESWhile a Global Search can be very useful, it requires more system resources than other search methods; therefore, it is not DocuPhase Best Practice for searching. If you know the Application in which the Document resides, you can do a much quicker search in the Application itself. To do this, from the main header as shown above, go to Search>Application, then select the Application containing the Document in question. Tell me more... |
| 9 | Menu tabs* | hover over each of these tabs, a corresponding menu appears from which you can make selections depending upon the objective or activity you want to perform.
|
*The tabs that appear when you log in may differ from those of other Users. The appearance and access to various components of the system are dependent upon the permissions and security settings associated with your log in information. If you do not have access to something you think you should, contact your TPOC for assistance and information.
**Separate licensing is required for access to the Analytics Designer that allows Users to create custom data cubes for reporting.
The following are some of the most common elements and conventions that you will see/use throughout the system.
| What it looks like... | Use it to... | ||||||||||||||||||
|---|---|---|---|---|---|---|---|---|---|---|---|---|---|---|---|---|---|---|---|

(Annotation) |
begin making annotations on the currently displayed Documents. select specific settings or options to indicate that you can select and/or enable (or disable) more than one option at a time. Tell me more... | ||||||||||||||||||
|
(unselected/disabled) (selected/enabled)
|
select specific settings or options to indicate that you can select and/or enable (or disable) more than one option at a time.
EXAMPLE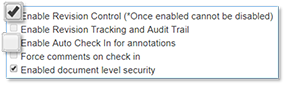 |
||||||||||||||||||
|
(Configuration) |
identify when there are special configurations associated with the corresponding item (e.g., Application Configurations). | ||||||||||||||||||
|
(Delete) |
delete all selected items.
NOTESRemember, the information on (and appearance of) the various screens and windows within DocuPhase may vary from what is shown in the online help. What you see (and how you see it) in the system depends upon access level settings and interface customizations made to the system by your organization. Please contact your System Administrator or DocuPhase Technical Point of Contact (TPOC) for more information.
|
||||||||||||||||||
(File Type) |
display the corresponding Document in the Viewer. Tell me more...
TIPS
|
||||||||||||||||||
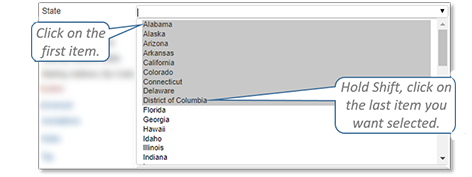
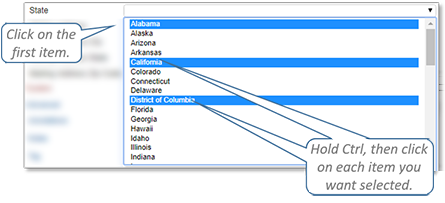
|
(drop-down arrow) |
display a list of options for selection.
EXAMPLE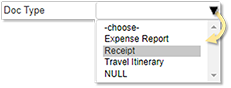 TIPSSome drop-down lists allow you to select multiple sequential and non-sequential items:
|
||||||||||||||||||
|
(Edit Last Query) |
return to the Search criteria screen after you perform an initial search(i.e., return to the screen that still contains the criteria you just used). You can then make changes to that criteria and perform the search again BEST PRACTICEThis is great for complex searches that need refining; adding more criteria to the search reduces the results returned: making it easier to find specific items. EXAMPLE
Let’s say you are searching for a Doc Type called “Invoices” with a CreateDate range of 2/13/2016 to 8/13/2016. However, this criterion may result in a list of invoices too long to quickly find a specific item; you can use |
||||||||||||||||||
|
(Email Selected Documents) |
to attach selected Documents to an email. | ||||||||||||||||||
|
(Print Event History) |
print a report (audit ) for selected Documents on the Search Results screen. It provides a list of details about the actions tracked with regard to who did what to which Document, and exactly when those things were done.
NOTES
|
||||||||||||||||||
|
(View Event History) |
display a "timeline history" for a selected Documents on the Search Results page.
NOTES
|
||||||||||||||||||
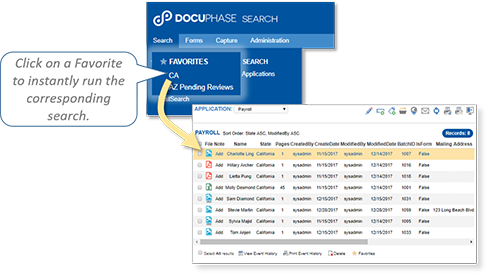
(Favorite - Query) |
designate a saved a query as a “Favorite”: allowing you to run the query instantly without first having to go to Saved Query area at the bottom of the screen. Any query you designate as Favorite appears when you mouse-over the Search menu at the top of the screen. Show me...
|
||||||||||||||||||
|
(Expand Area) (Collapse Area) |
expand ( |
||||||||||||||||||
|
(Export Files) |
export files for importing into DocuPhase or Microsoft Excel, to be used as data files (CSV or XML), and/or viewed (as in the case of image files). Tell me more... | ||||||||||||||||||
|
(Display Fields) |
view a list of Indexes used in the selected Application. You can then enable (
EXAMPLEUn-checking "department" hides that Index from available search criteria and from any search results. |
||||||||||||||||||
(Clear Fields) |
removes any/all current search criteria: allowing you to start a new search. | ||||||||||||||||||
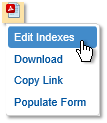
|
(Indexes) |
edit the Index values on selected Document(s). Tell me more...
NOTES
TIPYou can perform this same function by right-clicking on the Document file type. Show me... |
||||||||||||||||||
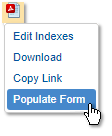
|
(Populate from Selected Document) |
populate (fields) from an Forms Template. When you click on this icon, a sub-menu appears with the name(s) of available templates (e.g., ‘Expense Report Form’) you can select. The selected template appears in Viewer with Index field values mapped to corresponding Form Template fields, as shown below.
EXAMPLEThis comes in handy if you are filling out monthly expense forms. Instead of having to type in the exact information (e.g., your name, contact information, title, department, etc.) month after month, you can use a previous expense form to populate the new form so that all you have to do is fill in the current information such as your actual expenses. TIPYou can perform this same function by right-clicking on the Document file type. Show me... |
||||||||||||||||||
|
(Print Search Results) (Print Selected Documents) |
print any displayed results after a search.
print one or more selected Documents from the list of search results. |
||||||||||||||||||
|
(Refresh Current Search) |
remain on the current screen, but refresh the returned search result(s). | ||||||||||||||||||
|
(Save) |
Use this icon to save the currently displayed item, edits, and/or settings. | ||||||||||||||||||
|
(Search - Global) |
initialize a search for Documents based on any search criteria (one or more alphanumeric characters) you enter. | ||||||||||||||||||

(Send to ScanDox) |
move Documents from the DocuPhase Viewer to ScanDox: allowing you to utilize the more advanced Document and page manipulation features (e.g., re-arranging, rotating, splitting, or merging Documents, etc.) within ScanDox. Tell me more... | ||||||||||||||||||
|
(Tag Selected Documents) (Apply Tag) |
quickly relate two or more Documents with each other: indicating associations between Documents that may be held in the same or in different Applications. In addition, you can view and select tags that have already been added to records: allowing you to re-use the same tags in order to maintain consistency and accuracy. You can either select and tag Documents in a list, or apply a tag to a currently displayed Document.
EXAMPLES
|
||||||||||||||||||
|
(text field) |
enter information into fields that appear throughout the DocuPhase platform, and can vary in maximum character length (from 10 to 200+ characters). These fields can be customized so that they automatically "control" the information entered.
EXAMPLEText fields can be set up in multiple ways; some of them being as follows:
|
||||||||||||||||||
|
(Toggle Full Screen) |
switch your view by extending or reducing the Application Pane for Search results (i.e., the extended screen allows you to view more information at one time). |
| Concept/ Function |
What it does... /How it works... | ||||||||||||||
|---|---|---|---|---|---|---|---|---|---|---|---|---|---|---|---|
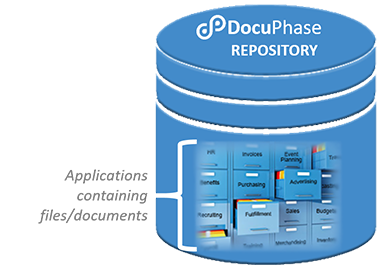
| Applications | In the DocuPhase Platform, an Application can be thought of as a electronic filing cabinet. Each Application holds its own set of Documents within the Repository (e.g., Invoices, Purchase Orders, New Hire, Bills of Lading, etc.). When you search or view a Document, you are doing so from within its assigned Application.Show me... | ||||||||||||||
|
Cores and Components |
These may be a terms you hear frequently (or never) with regard to the DocuPhase Platform. And depending upon what functionality your organization has chosen for using DocuPhase, there may be only a few Cores and Components, or there may be several. A Core within DocuPhase is basically a major area of features and functionality such as the Databases, Document Management, Workflow, etc.). Components are those elements within each Core that support various features and functions (for example, within the Database Core, components provide support for DocuPhase, Progression/Workflow, and/or Forms). There can be a variety of combinations of Cores and Components installed in your system - all depending upon the requirements of your organization. |
||||||||||||||
| Delete: Soft vs Hard |
A "Soft Delete" removes the Document from processes and search results, yet the Document and its meta data are maintained within the repository: making them available for future use. A "Hard Delete" removes the Document and all of its meta data from the repository. However, prior to performing a Hard Delete, you need to perform a Soft Delete of the same item. A confirmation prompt always appears as soon as you attempt to delete an item. This gives you the chance to complete the deletion or to cancel it without making changes.
WARNING!!!Use this deletion functionality with care. Once you perform a HARD DELETE, the Document and its metadata cannot be recovered. If you inadvertently delete a Document, you'll need to re-Capture and perform any Indexing as needed.
NOTE
|
||||||||||||||
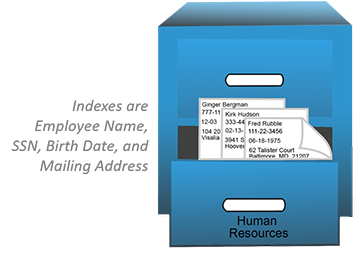
| Indexes | The storage and retrieval of Documents within DocuPhase rely on Indexes since in DocuPhase, Indexes provide information specific to Documents within an Application. Index fields and Values generally describe a Document or elements within a Document (e.g., Name, Address, Department, etc.): helping to organize, then find information and Documents.
EXAMPLEIn a Human Resources Application, paper Documents may be stored and retrieved according to ‘Employee Name’. In this case then, ‘Employee Name’ is an example of an Index within the Human Resources Application. Other Indexes in such an Application might be Social-Security Number (SSN), Birth Date, Mailing Address, etc. Show me... |
||||||||||||||
| Permissions | For the most part, everything you see in the DocuPhase system (or its components) is based on the access (Permissions) given to you by your organization. While you have a certain Permissions to access some Documents, data, functionality, this may differ from what someone in a similar job to you has. All Permissions are determined on an as-needed basis. Tell me more...
EXAMPLEIn a medical setting, the Billing Department may have access to all patient information such as personal identification information (e.g., social security number, driver's license number, street address, etc.), while Lab Technicians have access to any medical results or conditions of patients, yet not to patients' personal identification information. In a Human Resource department, one HR Generalist can have permissions to view contact information on a resume, while another HR Generalist may only have permissions to view candidate names and qualifications. |
||||||||||||||
| Revision Control | Use this feature to force the checking in and checking out of Documents: providing the ability to manage multiple versions of a Document contained within an Application. This setting forces Users to check out a Document for editing: preventing more than one User from making simultaneous changes to a Document. In addition, the last checked in Document (edits) supersedes any previously checked in versions. Tell me more... | ||||||||||||||
| Revision Control: Non-Destructive Editing | In most cases, because the DocuPhase Platform is based on "non-destructive" editing; and, because the original files are maintained, any/all edits made to a Document are always reversible. Therefore, you can work on Documents without fear of losing the source (original) Documents. This applies to Soft Deletion of Documents as well (see above). | ||||||||||||||
| Revision Control: Tracking and Audit Trail* | Use this functionality to keep track of every change to a file (kept in Revision Control), over time, so that earlier versions can be restored, if/when necessary. In Audit Trail, information about what changes were made, and by whom is maintained as separate revisions. Tell me more... Documents that have been checked out by you or someone else, or that have been sent to Send to ScanDox can by identified by the following icons next to the file type:
|
||||||||||||||
| Status | There are two types of Statuses within DocuPhase:
|
||||||||||||||
| Values | Values are the actual contents that are entered or selected in an Index field.
EXAMPLEIf an Index is named "Birth Date," the value might be February 13, 1982 or 02/13/1982 or 02-13-1982 or 1982-02-13: depending upon how the field is formatted in your system for the Index called "Birth Date." |
||||||||||||||


*Only applies to Document Manager.
**Only applies when Revision Control is enabled.
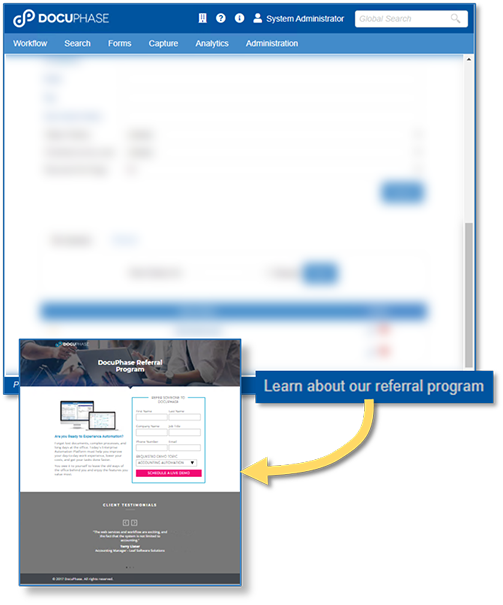
If your organization has chosen to implement this feature, a link appears (in the footer of every DocuPhase screen) that takes you to the Referral Program page of the DocuPhase website.
NOTE
This link can be enabled or disabled from within System Options in DocuPhase. Tell me more...
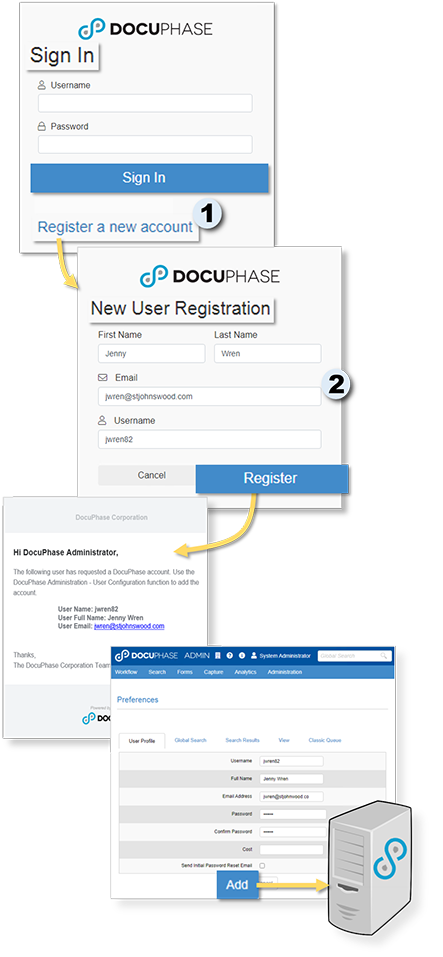
If you are asked to use DocuPhase, but for some reason you don't have a DocuPhase, you can use the Request a new account link on the Sign In screen to register for such an acount. Once a request has been submitted, the System Administrator creates the account within DocuPhase. Tell me more...
NOTES
- Not all organizations implement this feature. Therefore, if you need an account, but don't see the Request a new account link, contact your TPOC or System Administrator.
- Any organization that implements this feature, must also decide what process takes place once you have requested an account (e.g., the time frame allowed for creation of an account, whether or not you are notified that the account has been created, and/or how you are notified, etc.). Please contact your TPOC or System Administrator for more information about what happens once an account has been requested.
Tell me how to...
NOTE
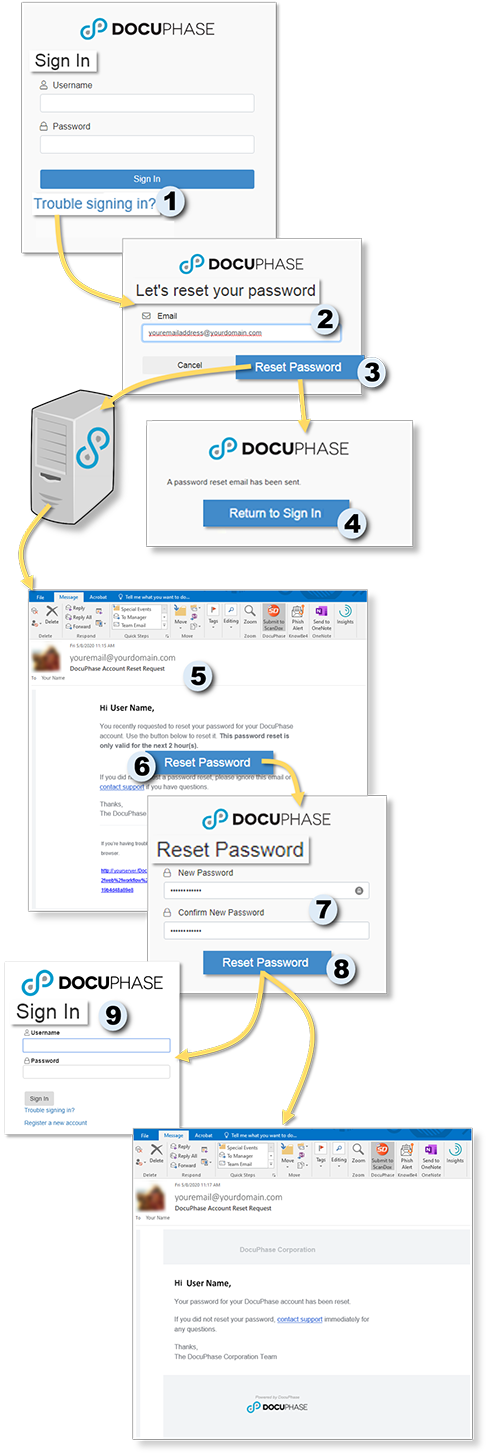
If your organzation has chosen to enable "self-service" password reset, you can use the following steps to use that feature. However, if you do not see the options as described below, contact your TPOC or System Administrator for assistance with your password.
On the DocuPhase Sign In window:
1) Click the Trouble Signing In? link to display the Let's reset your password window.
In the Let's reset your password window:
2) Enter your email address.
3) Click  to display the Return to Sign In window, and send a password reset email to the address you entered above.
4) Click 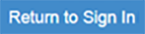 to close the window, and display the Sign In window.
In your email:
5) Find and open the Reset Password email.
- If you do not see the email in your inbox, check Spam and Trash folders. If you still don't find the email, contact your TPOC or System Administrator.
In the body of the email:
6) Click to display the Reset Password window.
In the Reset Password window:
7) Enter a new password (using the Password Rules described above), then enter it again to confirm that you've entered it correctly.
8) Click to close the window, display the DocuPhase Sign In window, and trigger the system to send you a password reset confirmation email.
In the Sign In window:
9) Log into DocuPhase using your new password.
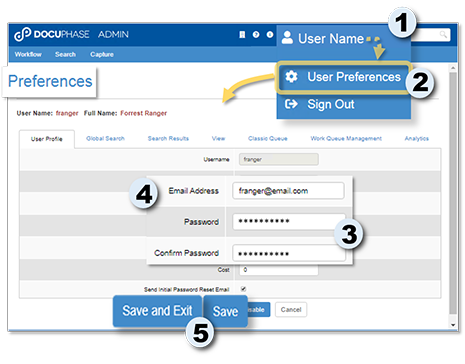
If you need to change your password or email, once you are logged in, follow the steps below.
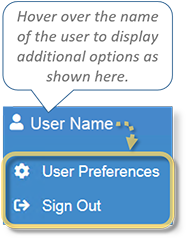
From the upper right corner of the DocuPhase main header:
1) Roll your mouse over your user name to display a short menu of options.
2) Click  to display your User Preferences screen.
Under the User Profile tab on the Preferences screen:
To reset your password:
In the Password and Confirmation fields:
3) Enter the new password.
- If you have completed the changes, skip to step 5.
- If you want to change your email address, go to step 4.
- You must enter the exact same password in both the Password and Confirmation fields in order to successfully change your password.
- Review Best Practices for setting a strong password, as described above.
NOTES
AND/OR
To Change your email address
In the Email Address field:
4) Enter your new email address.
When you have completed your settings:
5) Click  to save the settings and return to the previous screen.
OR
Click  to save the settings and remain on the User Profile tab of the Preferences screen.
- You can now make changes to settings under other Preferences tabs. See TIPS above.
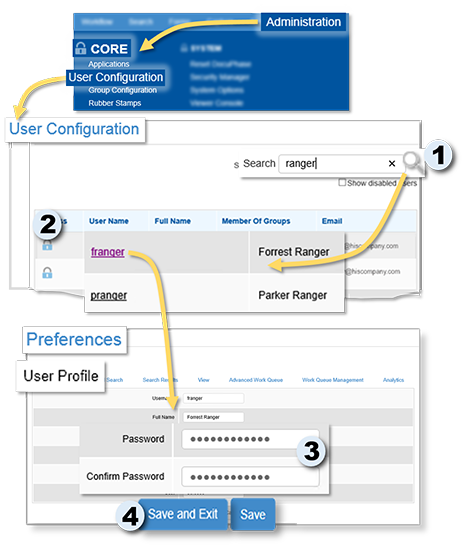
If a User has forgotten their password, they may ask you, as an Administrator, to reset one or the other.
On the User Configuration screen:
1) Find and click on the name of the User to display the corresponding Preferences screen.
On the User Preferences screen:
In the Password and Confirmation fields:
2) Enter the new password.
- You can also make changes to the User's user name, full name, email, and cost level on the User Preferences screen. Tell me more...
From your Email Service:
3) Send an email to the User to give them their temporary password (set in step 2 above), and recommending that they use it to log in, then (for security purposes) immediately reset it to a unique password (as per Best Practices).
When you have completed your settings:
4) Click to save the settings and return to the previous screen.
OR
Click to save the settings and remain on the User Profile tab of the Preferences screen.
- You can now make changes to settings under other Preferences tabs. See TIPS above.
NOTES
- Not all organizations implement this feature. Therefore, if you need an account, but don't see the Request a new account link, contact your TPOC or System Administrator.
- Any organization that implements this feature, must also decide what process takes place once you have requested an account (e.g., the time frame allowed for creation of an account, whether or not you are notified that the account has been created, and/or how you are notified, etc.). Please contact your TPOC or System Administrator for more information about what happens once an account has been requested.
On the Sign In screen:
1) Click the Request a new account link do display the New User Registration window.
2) Enter the user name you want associated with the account, as well as the full user name, email, and a password.
3) Click  to send the information via email to the System Administration for creation of the account.