Configuring ScanDox Profiles
Each ScanDox Profile provides an integrated set of configuration properties for each document capture and document manipulation job under a descriptive name that makes work setup convenient and efficient by simply selecting the relevant Profile.
Tell me about...
Click on the links below to learn more about each of the tabs that contain the properties available for creating and/or editing Profiles.
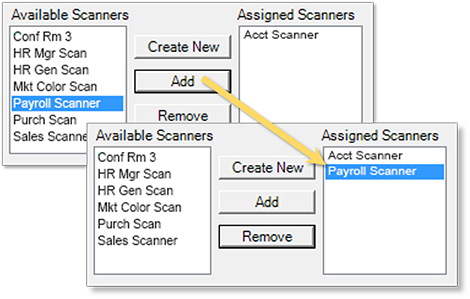
 to add a new scanner to the
This tab allows you to configure both Hot Folders (i.e., the Folders sub-tab), and additional settings that determine how documents are processed through the folders (i.e., Applications sub-tab). Tell me more...
The general rules for Documents submitted through ScanDox include the following:
- The first document that isn’t locked in the Hot Folder is pulled into the user’s scandox viewer for indexing
- Once it is in the user’s viewer, that item is LOCKED (see the previous point) and cannot be pulled by another user
- Upon submit, ScanDox grabs the next unlocked item from the Hot Folder
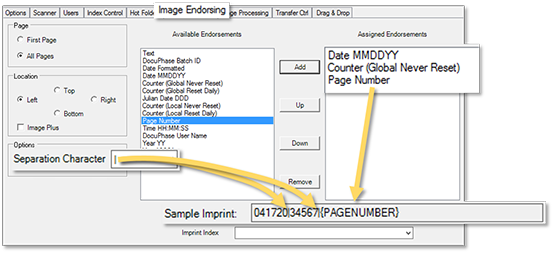
| Element | Description |
|---|---|
| Folder Configuration - This tab allows you to configure Hot Folders to be used by the corresponding Profile. | |
| List of Hot Folders |
This area contains the list of any Hot Folders that are currently associated with the selected Profile. In addition, you can add new or remove folders from the list. |
 / /  |
Add new or remove selected folders. |
| Directory | View or change the local folder associated with the selected Hot Folder. M |
| Filter | You can enter characters that allow you to display only certain types or names of documents (e.g., if you enter *.pdf only PDF docs in a specific Hot Folder). |
| Enable | Automatically synchronize folders and their contents between the local folder and the ScanDoxHot Folder. |
| Single Document Processing |
Set this to have ScanDox process documents one at a time. |
| DocuPhase Applications - This tab is used to setup Fetch functionality that retrieves documents from a DocuPhase Application. | |
|
Retrieve |
You can use this option to retrieve documents for processing by their Status. Only documents with that assigned status are processed.NOTEIn order to prevent a Status Retrieval loop, you cannot select the same Status value used as the Retrieve By Status. BEST PRACTICEAs often happens, compound documents are uploaded into ScanDox. This generally means that someone then has to go back and split those documents: dividing them into the separate documents they were meant to be. If you are frequently dealing with compound documents, an easy way to keep track of compound documents that need to be split is to create a “Fetch-to-Split” profile, with the Retrive By Status set to “Fetch”. This allows you to quickly mark each compound document as needing to be split by updating its Status index to the “F-Fetch”. You can then go back to ScanDox, retrieve those documents by their status of Fetch, then split those items as a separate processing step. |
|
Original |
When this setting is enabled ( In addition, you can assign the status that you want applied to any original document(s): making it easier to locate with Search. NOTES
|
|
Document |
Allow you to “Skip” a document that has scanned at a low quality so that it needs re-scanning, or one that cannot be indexed for some reason. Skipping such documents allows the user to move efficiently through a batch of documents. In addition, you can assign the status that you want applied to any skipped document(s): making it easier to locate with Search. NOTEIn order to prevent a Status Retrieval loop, you cannot select the same Status value used as the Retrieve By Status. |
|
Non-Image |
You can designated Non-Image Documents (e.g., Word, Excel, HTML, etc.) to be skipped if they cannot be split by ScanDox. In addition, you can assign the status that you want applied to any skipped document(s): making it easier to locate with Search. Finally, you can tell ScanDox that you any users associated with the selected profile to be notified (by email) if a Document was skipped, and what status has been assigned, if any. NOTEIn order to prevent a Status Retrieval loop, you cannot select the same Status value used as the Retrieve By Status. |
|
Prompt User |
Notifies the user that they are about to Submit the “Split Documents” to DocuPhase and clear the ScanDox workspace. This prompt allows them to confirm or cancel the Submission of “Split Documents”. The User may want to stop a document from being submitted for a a number of reasons (e.g., indexing is incomplete, requires a second look for accuracy, a signatures is missing, etc.). While there are compound documents with the same matching Status value set in the “Retrieval & Split” Profile with this options set, the ScanDox user is presented with the next compound document to split each time the Submit button is pressed. |
|
Automatically |
When enabled, this option adds an Auto Fetch Button ( |
|
Enabled |
When this option is selected, it means that the associated profile is activated and available for use by any User with permissions to do so. |


EXAMPLE
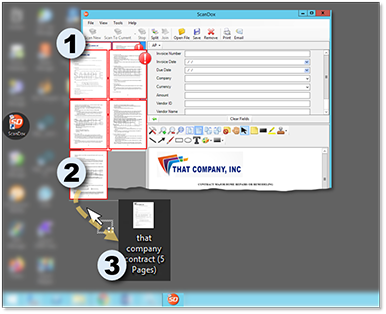
Let's say you have a stack of 30 pages, but these are made up of 3 documents of 10 pages each. When you scan, the scanner doesn't really know that there are 3 separate documents: only that there are 30 pages. This is how compound documents are entered into ScanDox.
BEST PRACTICE
As often happens, compound documents are uploaded into ScanDox. This generally means that someone then has to go back and split those documents: dividing them into the separate documents they were meant to be. If you are frequently dealing with compound documents, an easy way to keep track of compound documents that need to be split is to create a “Fetch-to-Split” profile, with the Retrive By Status set to “Fetch”. This allows you to quickly mark each compound document as needing to be split by updating its Status index to the “F-Fetch”. You can then go back to ScanDox, retrieve those documents by their status of Fetch, then split those items as a separate processing step.
A default ‘Submit’ button already exists in ScanDox to allow you to complete the ScanDox capture processing of a document and indexing into the DocuPhase repository. However, you can change the indexing and status settings of the default Submit button for specific Profile configurations.
In addition, you can create Submit buttons that offer the ability to submit documents by either single or multiple steps by using different combinations of Submit button attributes as described below:
Creating a Submit to DocuPhase Button
Creating a Submit to Folder Button
The Fetch feature is set up under the DocuPhase Applications tab within ScanDox Profile configuration,and is used to retrieve documents from a DocuPhase application, based on Status.
NOTE
In order to prevent a Status Retrieval loop, you cannot select the same Status value used as the Retrieve By Status.
BEST PRACTICE
As often happens, compound documents are uploaded into ScanDox. This generally means that someone then has to go back and split those documents: dividing them into the separate documents they were meant to be. If you are frequently dealing with compound documents, an easy way to keep track of compound documents that need to be split is to create a “Fetch-to-Split” profile, with the Retrive By Status set to “Fetch”. This allows you to quickly mark each compound document as needing to be split by updating its Status index to the “F-Fetch”. You can then go back to ScanDox, retrieve those documents by their status of Fetch, then split those items as a separate processing step.
When using the Thumbnail view, you can divide and combine TIFF or PDF documents with two to three easy clicks. When splitting a document, you select the first page of the new document, and that's where the document is split; for joining, you select the last and first page of the places in each document you want to joig. Tell me more...
NOTE
Documents in other formats that are not TIFF or PDF (E.G., documents such as Word, Excel, JPEG, GIF, etc.) cannot be split or joined.
The Split option does not become available until at least 2 pages have been selected in a document.
TIP
The Split feature is a great way to quickly divide compound documents into individual documents.
BEST PRACTICE
As often happens, compound documents are uploaded into ScanDox. This generally means that someone then has to go back and split those documents: dividing them into the separate documents they were meant to be. If you are frequently dealing with compound documents, an easy way to keep track of compound documents that need to be split is to create a “Fetch-to-Split” profile, with the Retrive By Status set to “Fetch”. This allows you to quickly mark each compound document as needing to be split by updating its Status index to the “F-Fetch”. You can then go back to ScanDox, retrieve those documents by their status of Fetch, then split those items as a separate processing step.
EXAMPLEs
- Let's say you have a document that is 10 pages long, but you want to split it into 3 separate documents: the first document needs to be pages 1 through 4, the second document needs to be pages 5 through 7, and the third document is pages 8 through 10. To quickly split this document as noted here, you'd select pages 5 and 8, then click
 . the split occurs just before the selected page. Show me...
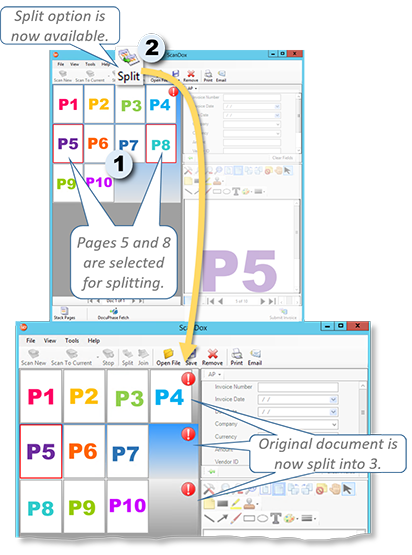
- To join the first two documents, you would then click on page 4 (the last page of the first document) and page 5 (now the first page of the second document), then click
 to join them. At that point you would have only 2 documents (consisting of pages 1through 7, and the other pages 8 through 10). Show me...

Tell me how to...
NOTE
Remember, User Permissions must be set to allow for you to be able to add or change ScanDoxProfiles.
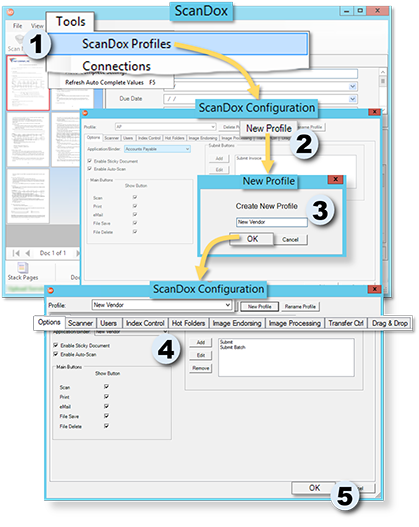
In the Tools menu of the main ScanDox window:
1) Select ScanDox Profiles to display the ScanDox Configuration window.
In the ScanDox Configuration window:
2) Click  to display the New Profile dialog.
In the New Profile dialog:
3) Enter a name for the Profile, then click  to close the window and return to the ScanDox Configuration window.
- The newly created name appears in the Profile field.
In the ScanDox Configuration window:
4) Make settings under each tab, as needed. Tell me more...
When all settings are complete:
5) Click to save the new Profile.
NOTE
Remember, User Permissions must be set to allow for you to be able to add or change ScanDoxProfiles.
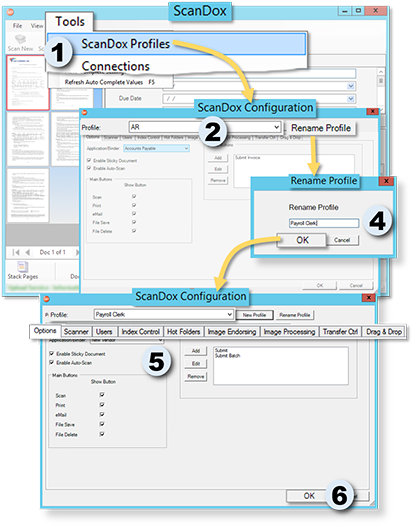
In the Tools menu of the main ScanDox window:
1) Select ScanDox Profiles to display the ScanDox Configuration window.
In the Profile field of the ScanDox Configuration window:
2) Select the Profile you want to rename.
2) Click  to display the Rename Profile dialog.
In the Rename Profile dialog:
3) Enter a name for the Profile, then click to close the window and return to the ScanDox Configuration window.
- The Profile appears in the Profile field under its new name.
In the ScanDox Configuration window:
4) Make changes to the settings under each tab, as needed. Tell me more...
When all settings are complete:
5) Click to save the new Profile.
WARNING!!!
Use this deletion functionality with care. Once you delete something, it cannot be recovered: you will need to recreate it.
NOTE
Remember, User Permissions must be set to allow for you to be able to add or change ScanDoxProfiles.
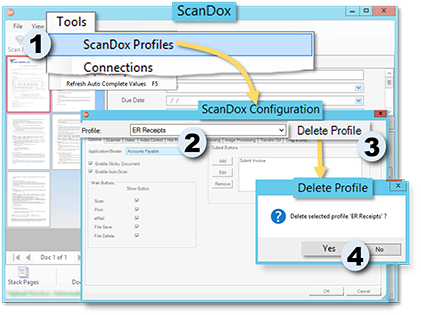
In the Tools menu of the main ScanDox window:
1) Select ScanDox Profiles to display the ScanDox Configuration window.
In the Profile field of the ScanDox Configuration window:
2) Select the Profile you want to delete.
3) Click  to display a confirmation prompt.
In the Confirmation prompt:
4) Click  to delete the selected Profile.
- The Profile no longer appears in the Profile drop down.
As described above, you can designate Documents to be transferred from ScanDox to DocuPhase at a specific time, on a specific date, on weekends, and/or at night.
Under the Transfer Ctrl tab in ScanDox Configuration:
1) Select (![]() )the Scheduled option to make the Schedule area and options available for editing.
)the Scheduled option to make the Schedule area and options available for editing.
In the Schedule area:
2) Click on a day/time, then click  to confirm the selected time.
- The selected area turns green once it's confirmed.
Repeat for all times/days you want transfers to occur.
AND/OR
Under Allow Transfers:
3) Enable Nightly (7pm-7am) to have transfers occur overnight.
- As soon as you choose this option, you'll see the hours in the Schedule area turn green to show that they are now scheduled.
AND/OR
Under Allow Transfers:
4) Enable All Weekend to have transfers occur over the weekend.
- As soon as you choose this option, you'll see \Saturday and Sunday sections of the Schedule area turn green to show that they are now scheduled.
When all settings are complete:
5) Click to save the settings and close the ScanDox Configuration dialog.
In the Tray:
1) Find the document you want to drag onto your desktop (or network).
2) Click and drag the document to the location in which you want to store it.
- Complete document: click on the first page of the document, then hold Shift, then click on the last page of the document, and drag it onto the desktop/network. This procedure also works if you simply want to select only a section of sequential pages (e.g., pages 1-10 of a 50 page document.
- Single page: click and the page onto the desktop/network.
- Multiple non-squential pages: click on the one of the pages that you want to copy, then hold Ctrl, as you click on any other pages. As you click on the last page you want to copy, continue to press Ctrl and drag the selected pages onto the desktop/network. You can select sequential or non-sequential pages using this method.
TIP
You can drag and drop individual pages or an entire document using the methods described below:
Once you have dragged to a spot on your desktop:
3) Double-click to place a copy of the document in that spot.
- Any previously set properties (e.g., file format, black & white, etc.) for the ScanDox profile being used are applied to the document as it is copied over to the new location.
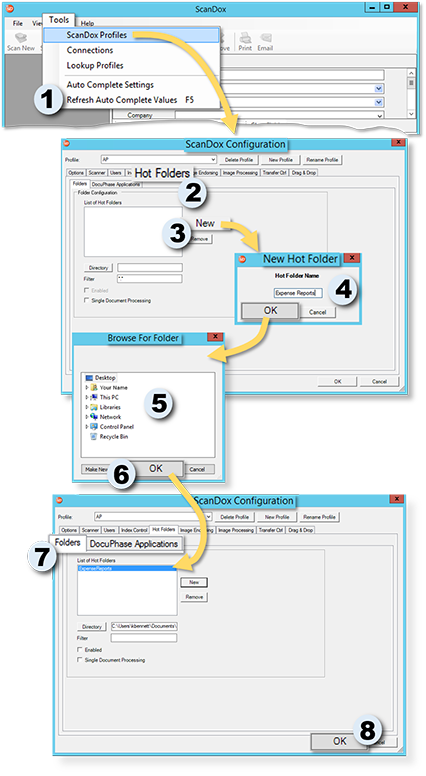
In the Tools menu of the main ScanDox window:
1) Select ScanDox Profiles to display the ScanDox Configuration window.
In the ScanDox Configuration window:
2) Click  to display the Folders sub-tab.
In the Folders subtab:
3) Click to display the New Hot Folder dialog.
4) Enter a name for the new Hot Folder, then click to close the window display the Browse for Folder window.
In the Browse for Folder window:
5) Find and select the local or network folder where you want documents for capture to be placed.
Once you have chosen the folder:
6) Click to save the location for the new Hot Folder, and return to the Folder sub-tab window.
- The name of the newly created folder appears in the List of Hot Folders.
WARNING!!!
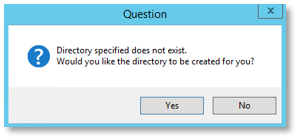
If the selected local/network folder is renamed or deleted, a prompt appears when you select the associated Hot Folder. The Hot Folder cannot be used until a matching folder is created and reassociated with it. You can click in the prompt to re-recreate an associated folder. Show me...
In the ScanDox Configuration window:
7) Make settings under each tab, as needed. Tell me more...
When all settings are complete:
8) Click to save the new Hot Folder.
WARNING!!!
Use this deletion functionality with care. Once you delete something, it cannot be recovered: you will need to recreate it.
NOTE
Remember, User Permissions must be set to allow for you to be able to delete Hot Folders..
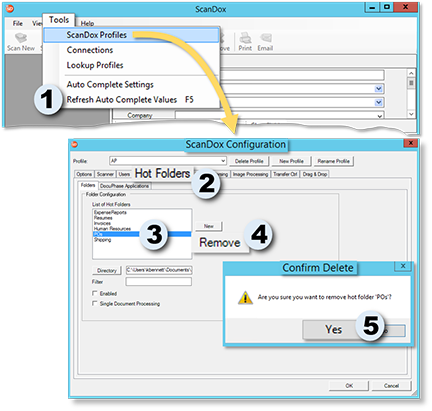
In the Tools menu of the main ScanDox window:
1) Select ScanDox Profiles to display the ScanDox Configuration window.
In the ScanDox Configuration window:
2) Click to display the Folders sub-tab.
In the List of Hot Folders under the Folders subtab:
3) Select the Hot Folder you want to delete.
2) Click  to display a confirmation prompt.
In the Confirmation prompt:
3) Click to delete the selected Hot Folder.
- The Hot Folder no longer appears in the Profile drop down.
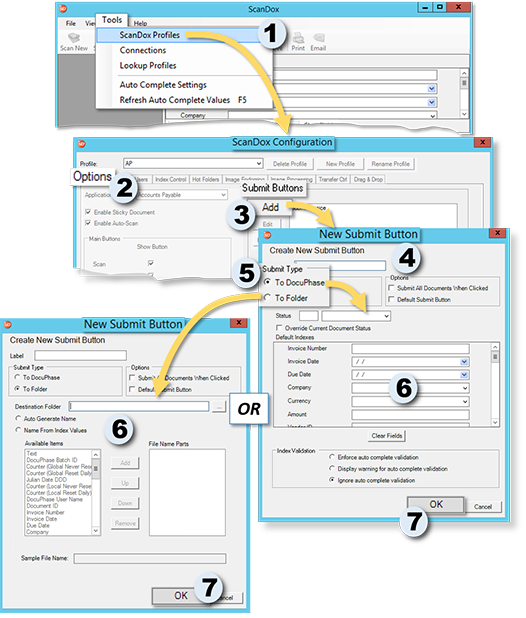
You can create submit buttons that perform in very specific ways to send documents to DocuPhase.
NOTE
Remember, User Permissions must be set to allow for you to be able to create or edit ScanDoxSubmit buttons.
In the Tools menu of the main ScanDox window:
1) Select ScanDox Profiles to display the ScanDox Configuration window.
In the ScanDox Configuration window:
2) Make sure  is selected.
In the Submit Buttons section under the Options tab:
3) Click  to display the New Submit Button window.
In the New Submit Button window:
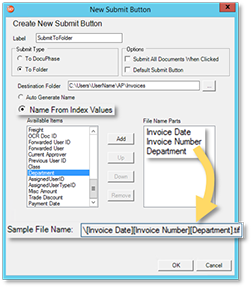
4) Enter a name/label and set the Options for the button you want to create.
5) Select the Submit Type you want to assign to the new button (i.e., To DocuPhase or To Folder)
NOTE
The fields below the Submit Type correspond to the Submit Type selection. The default is the To DocuPhase setting; however, if you chose the To Folder setting, you'll notice that the fields below it change. Tell me more...
6) Make settings as they apply to the selected Submit Type. Tell me more...
When all settings are complete:
7) Click to save the button.
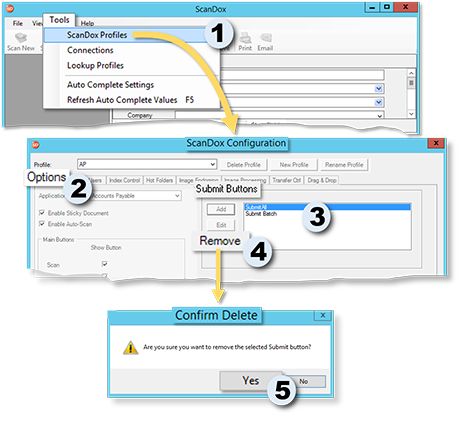
You can edit submit buttons in order to change the way they function when sending documents to DocuPhase. You can also remove buttons that are no longer needed.
NOTE
Remember, User Permissions must be set to allow for you to be able to edit or remove ScanDoxSubmit buttons.
In the Tools menu of the main ScanDox window:
1) Select ScanDox Profiles to display the ScanDox Configuration window.
In the ScanDox Configuration window:
2) Make sure is selected.
In the Submit Buttons section under the Options tab:
3) Select the button you want to edit or remove.
To Edit the Button
4) Click  to display the Edit a Submit Button window.
In the Edit a Submit Button window:
5) Make changes to any of the settings, as needed. Tell me more...
NOTE
The fields below the Submit Type correspond to the Submit Type selection. Tell me more...
When all changes are complete:
6) Click to save the button.
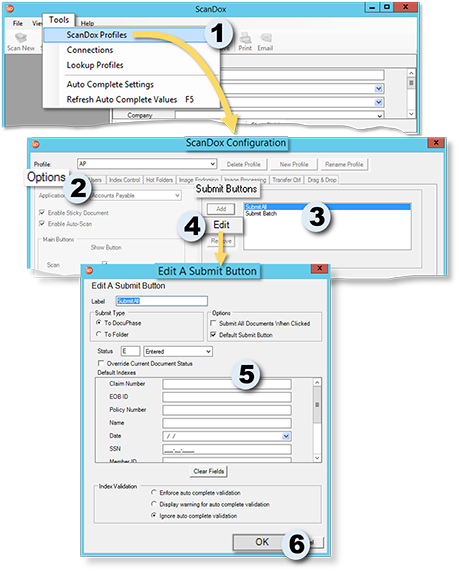
OR
To Remove a Button
4) Click to display a confirmation prompt.
In the Confirmation Prompt:
5) Click  toclose the prompt and delete the selected button.