Creating/Editing Third-Party Application and Web Links
The Application Linker allows you to create links between a "targeted" third-party application (e.g., Dynamics GP or MS Excel) or web page and DocuPhase Components (i.e., DocuPhase, ScanDox, and BarCoder). You can also configure Hot Keys (i.e., keyboard shortcuts) that allow you to search for data within the third-party application or web page. In other words, iLink allows you to pair the power of DocuPhase with third-party applications and web pages.
Additionally, you can configure specific Indexes and "transfer" (update/extract) information between a "target" third-party application or web page and a DocuPhase component. By doing so, you can use updated information in the third-party Indexes to update the corresponding Indexes within DocuPhase.
By enabling Users to stay in their current application or a web page, iLink eliminates the hassle of having to hunting through directories in order to copy a file or cut-and-paste. By sharing the power of iSynergy with other applications, iLink helps to deliver the promise of the paperless enterprise.
In the context of iLink, a link is a transparent "window" (also referred to as a form) of sorts that maintains its position and size to match the linked application window: displaying buttons that hover over the linked target. However, because of its transparency, iLink appears to be fully integrated with the target application or web page.
IMPORTANT!
- In order for a User to see/access the Update functionality, he/she must gave the appropriate User or Group Permissions set. Tell me more...
- iLink must be running in the background for buttons to show in target window.
NOTES
- iLink only works for 16 or 32 bit processes.
- You can change the color of existing buttons at any time. Tell me more...
- If your organization is utilizing ScanDox, and depending uponhow iLink is configured, a "Request Target" icon (
 ),appears in the Toolbar of the ScanDox interface. The appearance of this icon in ScanDoxmeans that you can use it to bring Index data into ScanDox directly from other applications (e.g., QuickBooks), as per the iLink configuration. Tell me more...
Tell me about...
- Target
The active window of the application or web page you are linking to a DocuPhase component (i.e., DocuPhase, ScanDox, or BarCoder.
- Link button
A button that displays in a target window and is used to execute a specific action (e.g., query, scan, update, etc.) when clicked.
- Link field
A text field or other supported field used to extract information, then updated corresponding DocuPhase Index.
- Link
Defined using the Link Form Editor; and consists of the link between a DocuPhase component and a target: including all link buttons and related fields. Link forms are.
- Application Linker
This is the main window that appears as soon as you log in. It lists all links, and allows Users to enable, disable, add, edit, and remove links.
- Link Editor
The part of iLink that allows viewing and editing of link elements and properties.
- Link Form
This is a reference that you can set as a basic element within a target window to which you can associate buttons and anchors.
- Anchor
This is a reference that you can set within an existing Link Form in a target window that links a designated DocuPhase Application and/or Index with a specific area of a window (e.g., a field).
- Anchor Groups
This feature provides a way to categorize and organize set Anchors.
- Button
A button in iLink is a reference that you can create within an existing Link Form in a target window: allowing you to configure and perform an action (i.e., query, scan, barcode, etc.) on the designated DocuPhase component (i.e., DocuPhase, ScanDox, BarCoder)without having to leave the target window.
IMPORTANT!
iLink must be running in the background for buttons to show in target window.
- Field
As with any software program, you use fields to enter data as it relates to data and other elements within a program. When you set a reference (e.g., Smart Field) within a target window, you must associate it with an existing Application and Index from DocuPhase.
If you need to extract or update information from a target Application or Web Page to a DocuPhase component, you will do so by configuring and using Smart Fields. A Smart Field tells the system how to extract single field values from the target Application or Web Page, then automatically populate corresponding Index fields for a Document within DocuPhase.
Additionally, Smart Field links can be configured for basic, advanced, or Screen Reader capture, as well as Field Option Filter Types.
Hot Keys allow you to quickly search DocuPhase for specific information contained in a desktop application or web page; once set up, you can highlight a value shown in a desktop application or web page, then use the keyboard shortcut assigned to a DocuPhase application and Index to launch and search that DocuPhase application. Tell me more...
NOTES
- Only one target (combined Application and Index) can be set for each Hot Key combination.
- By default, hotkeys are saved locally. However, if you have administrator rights for the associated DocuPhase application, you can save a Hot Key to a server: making the Hot Key available to all iLink Users. Tell me more...
EXAMPLE
Let's say you create a hot key in iLink (e.g., Ctrl+Q) that is associated with the Account Number Index in an Application called "Accounts Payable."
You can go to a desktop application like Dynamics GP, select/highlight an account number, then enter the hot key combination (i.e., Ctrl+Q) to launch DocuPhase and display results associated with the designated application and Index.
You can create an Update button (![]() ) in a desktop application or web page that allows its active window to communicate with the designated DocuPhase component to automatically update Index values.
) in a desktop application or web page that allows its active window to communicate with the designated DocuPhase component to automatically update Index values.
IMPORTANT!
iLink must be running in the background for buttons to show in target window.
NOTE
This functionality is available in conjunction with Microsoft Dynamics Dynamics GP accounting software only.
EXAMPLE
Let's say you add an Update button in iLink for an inventory value in Quick Books. Because hourly rates can easily change, instead of having to that is associated with the Account Number Index in an Application called "Accounts Payable."
Tell me how to...
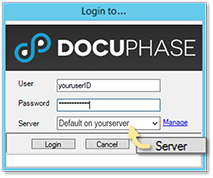
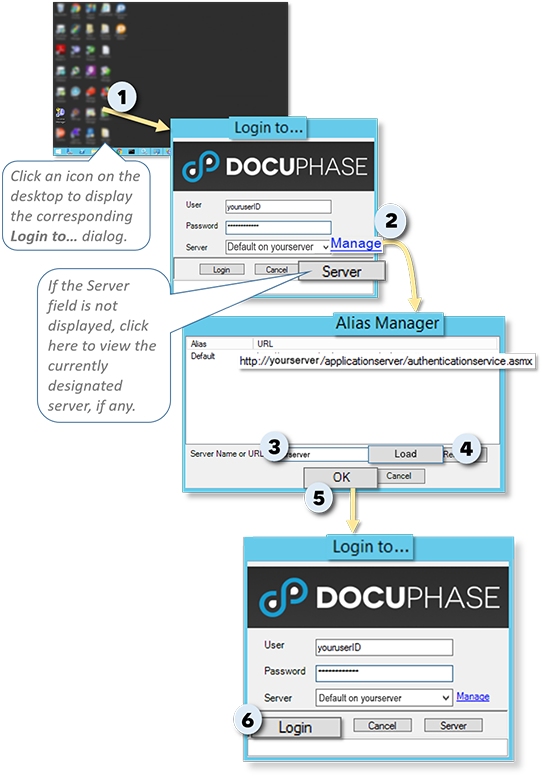
Generally, when you access a tool (e.g., License Manager, iLink, iAlerts, Full Text Manager, etc.) to display the Login dialog, the server is already designated. However, if this has not been set up, you can do so by following the TIPS and steps below:
TIPS
- If the Server field is not visible, click
 to display it.
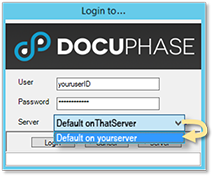
- If multiple Servers are available for the License Manager, and one has already been designated, you can change that server by clicking on the Server drop-down menu for a list of configured servers.
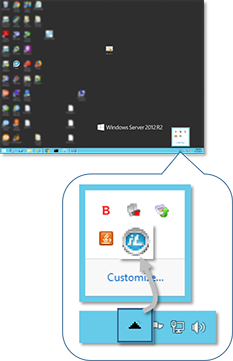
On your desktop:
1) Double-click the appropriate icon (e.g., ![]() or
or ![]() , etc.) to display the corresponding Login to... dialog .
, etc.) to display the corresponding Login to... dialog .
If the Server field is empty:
2) Click Manage to display the Alias Manager window.
In the Server Name or URL field of the Alias Manager window:
3) Enter the name of the server on which the designated tool currently resides.
4) Click  to add it to the list of Servers in the list.
5) Click  to return to the Sign In window.
On the Sign In window:
6) Enter your User ID and password, then click  to display the first page of the designated tool on the designated server.
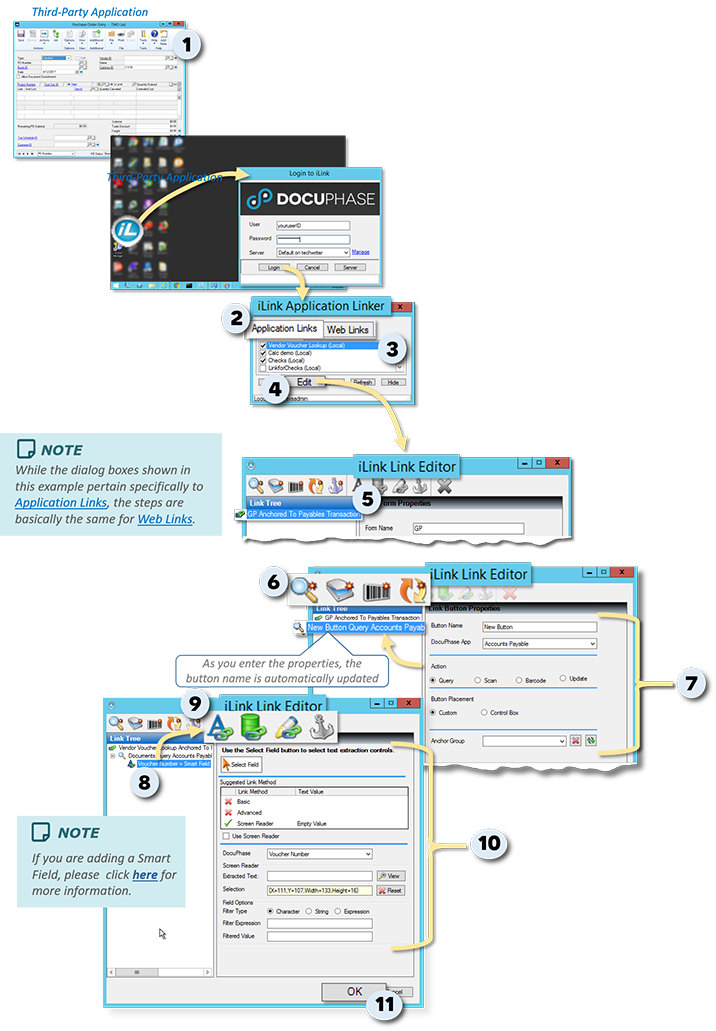
The procedure described below allows you to set the main link to a target Application or web page. This basically sets an overall framework in which you can begin adding buttons and fields, as needed.
On your desktop:
1) Open the target window in which you want to link DocuPhase(e.g., QuickBooks, Dynamics GP, MS Word, etc.).
In the Application Linker dialog of iLink:
2) Select the tab that corresponds to the link you want to add (i.e., Application vs Web).
At the bottom of the dialog:
3) Click  to display the Link Editor dialog.
TIP
You can also access the Link Editor dialog by clicking theNew (Application/Web) Link from the Edit menu at the top of the Application Linker dialog of iLink:
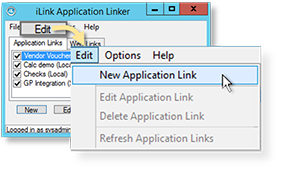
In the Link Editor dialog:
In the Form Properties pane:
4) Enter a name for the new Link.
On your desktop:
5) Click on the target Application window (you opened in step 1) to make the window active.
In the Link Editor dialog:
In the Form Properties pane:
6) Click and drag  to the corner of the target window to create the Link Form between that target and DocuPhase.
7) Complete the settings for the new Link Form, Tell me more...
When all settings are complete:
8) Click to store the settings, close the Editor, and return to the Linker window.
TIP
You can now edit the new Link(e.g., add buttons, etc.) as needed. Tell me more...

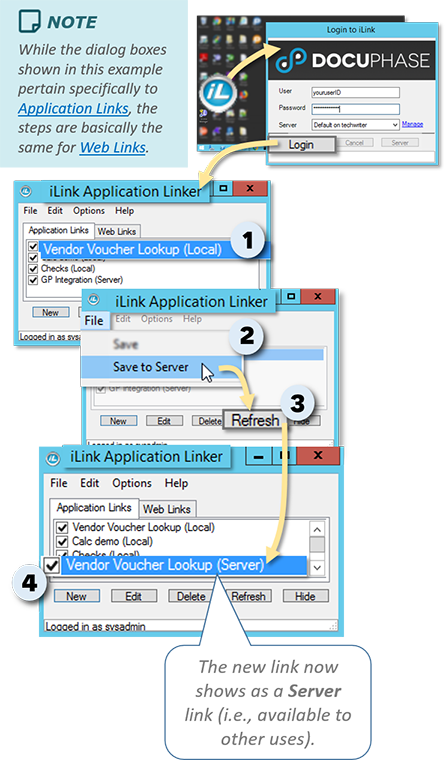
In the iLink Application Linker window:
1) Highlight the Link you want to make available to other Users.
In the File menu:
2) Select Save to Server.
At the bottom of the Application Linker window:
3) Click  to update the list of links and display the new link.
- A copy of the selected link from step 1 appears at the bottom of the list with the word "Server" next to it: indicating that this link can now be made available to other Users (see step 4).
In the list of Links:
4) Enable ![]() the Server link(s) you want to make available to all Users.
the Server link(s) you want to make available to all Users.
NOTE
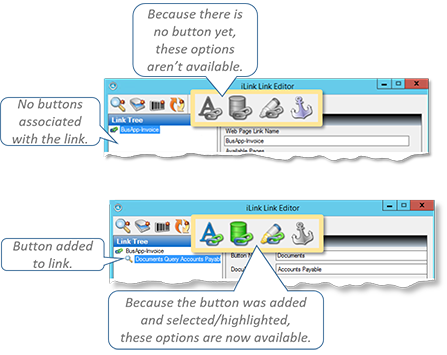
- Before attempting to add a button (Query, Scan, Barcode, or Update), field (i.e., Smart Field, Default Field, Highlight Field), and/or Anchor Group (with/without Anchors) to a target window, you must create the initial Link Form. Tell me more...
- Before you add a field to a link, you must first add a button. Field tools in the toolbar are not available until you create, then select a button.
On your desktop:
1) If it isn't already, open the target Application or web page already associated with the link to which you want to add buttons or fields.
In the Application Linker dialog of iLink:
2) Select the tab that corresponds to the link to which you want to add elements (i.e., Application vs Web).
In the list of links:
3) Select/Highlight the link to which you want to add elements.
At the bottom of the dialog:
4) Click  to display the Link Editor dialog.
In the Link Editor dialog:
In the Link Tree:
5) Select/Highlight the existing Form Link.
From the Toolbar:
6) Click on the button you want to add to the Link Tree (e.g., ![]() ).
).
In the Link Button Properties pane:
7) Enter/Select button properties, as appropriate. Tell me more...
- As you enter it, the button name is automatically updated in the Link Tree.
In the Link Tree:
8) Select/Highlight the button to which you want to add (or change) elements (e.g., fields).
From the Toolbar:
9) Click on the field you want to add to the button (e.g.,![]() ).
).
In the Properties pane:
10) Enter/Select properties, as appropriate for any of the following:
Repeat steps 5 through 8 for each button and its elements you want to add to the currently displayed Link Form.
When all settings are complete:
11) Click to store the settings, close the Editor, and return to the Linker window.
NOTE
Only one target (i.e., combined Application and Index) can be set for each Hot Key combination.
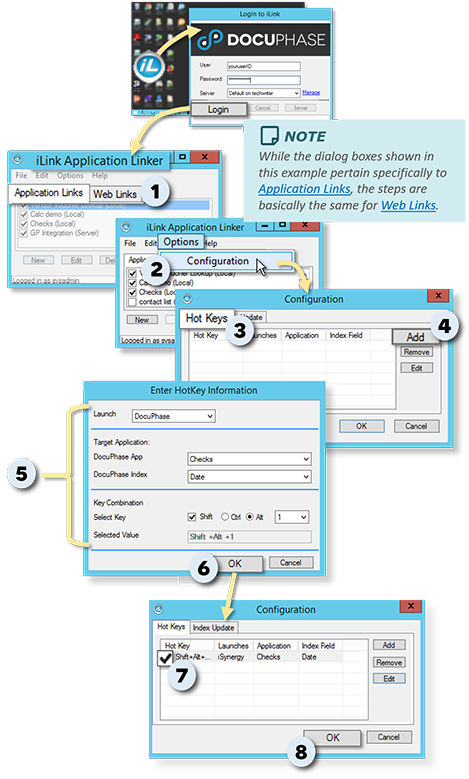
On the Application Linker dialog of iLink:
1) Select the tab that corresponds to the Hot Key you want to add (i.e., Application vs Web).
From the Options menu:
2) Select Configuration to display the corresponding dialog.
In the Configuration dialog:
3) Make sure the Hot Keys tab is selected.
4) Click  to display the Hot Key Information dialog.
5) Select information in the fields as described below:
| In this field: | Select... |
|---|---|
| Launch | the DocuPhase Platform component you want searched when using this Hot Key (i.e., DocuPhase, ScanDox, or BarCoder. |
| TARGET APPLICATION | |
| DocuPhase App | the Application containing the Index you want to use for search purposes. |
| DocuPhase Index | the Index you want to use to search for the selected value. |
| KEY COMBINATION | |
| Select Key | the combination of keys on the keyboard you'd like to assign to the Target Application settings. |
| Selected Value | READ-ONLY field - displays the selected key combination. |
When all settings are complete:
6) Click to store the new Hot Key, close the dialog. and return to the Configurationwindow.
Repeat steps 4 through 6 to add additional Hot Keys.
and/orWhen you have added all the currently required Hot Keys:
In the Configuration window:
7) Enable ![]() the Hot Keys you want to have available when using iLink.
the Hot Keys you want to have available when using iLink.
8) Click to close the Configuration, and return to the iLink Application Linkerwindow.
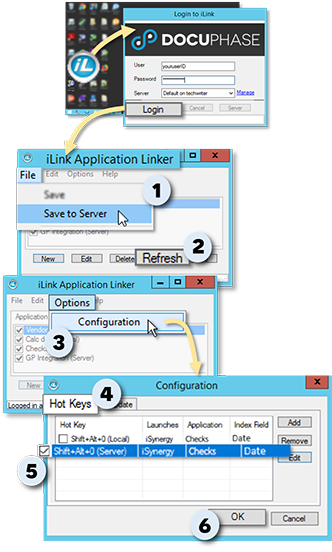
From the iLink Application Linker window:
In the File menu
1) Select Save to Server.
At the bottom of the Application Linker window:
2) Click to update the setting.
From the Options menu:
3) Select Configuration to display the corresponding dialog.
In the Configuration dialog:
4) Make sure the Hot Keys tab is selected.
- A copy of the newly added Hot Key combination appears in the list with the word "Server" next to it: indicating that this combination can be made available to all Users (see step 5).
5) Enable ![]() the Hot Keys you want to make available to all Users.
the Hot Keys you want to make available to all Users.
6) Click to store the setting(s).
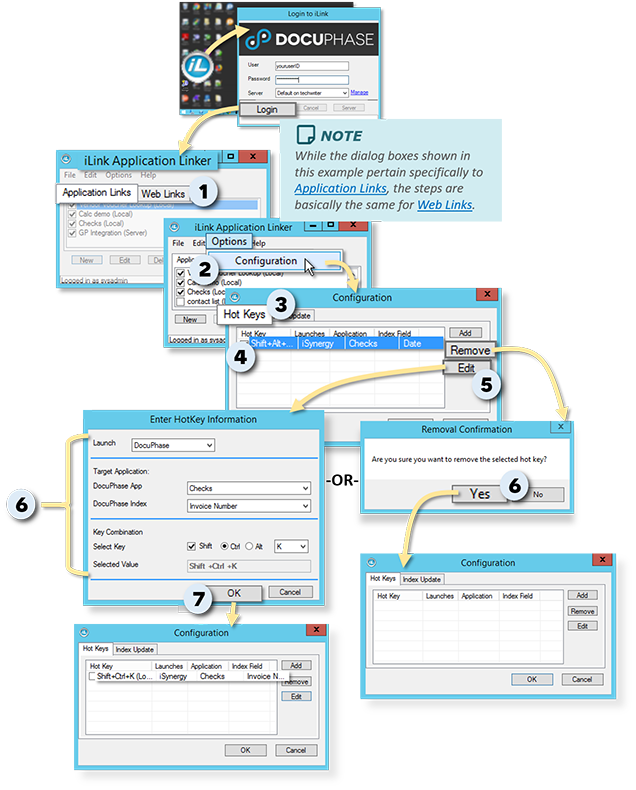
WARNING!!!
Use this deletion functionality with care. Once you delete an item from this list, you cannot recover it. If you inadvertently delete an item, you will need to re-add it.
On the Application Linker dialog of iLink:
1) Select the tab that corresponds to the Hot Key you want to edit or delete (i.e., Application vs Web).
From the Options menu:
2) Select Configuration to display the corresponding dialog.
In the Configuration dialog:
3) Make sure the Hot Keys tab is selected.
4) Select/Highlight the Hot Key you want to edit or delete.
To Edit the Hot Key:
5) Click to display the Hot Key Information dialog for the selected key.
6) Change information in the fields, as needed:
| In this field: | Select... |
|---|---|
| Launch | the DocuPhase Platform component you want searched when using this Hot Key (i.e., DocuPhase, ScanDox, or BarCoder. |
| TARGET APPLICATION | |
| DocuPhase App | the Application containing the Index you want to use for search purposes. |
| DocuPhase Index | the Index you want to use to search for the selected value. |
| KEY COMBINATION | |
| Select Key | the combination of keys on the keyboard you'd like to assign to the Target Application settings. |
| Selected Value | READ-ONLY field - displays the selected key combination. |
7) Click to store the settings, close the dialog, and return to the Configuration window.
- The changes are now displayed in the list.
or
To Delete the Hot Key:
5) Click  to display a confirmation prompt asking you to make sure you want to remove the selected Hot Key.
6) Click  to delete the selected Hot Key, close the prompt, and return to the Configuration window.
- The deleted Hot Key combination no longer appears in the list.
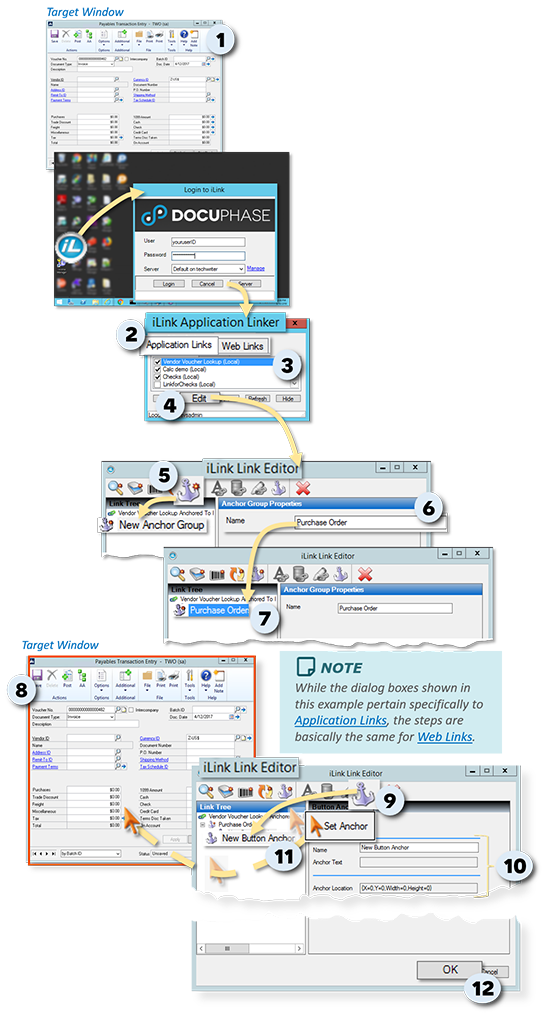
On your desktop:
1) Open the third-party Application or web page for which you want to create an anchor Group.
In the Application Linker dialog of iLink:
2) Select the tab that corresponds to the link to which you want to add the Anchor Group (i.e., Application vs Web).
In the list of links:
3) Highlight the link to which you want to add elements.
At the bottom of the dialog:
4) Click to display the Link Editor dialog.
In the Link Editor dialog:
From the Toolbar:
5) Click ![]() to add an Anchor Group to the Tree Link pane and display the Anchor Group Properties pane.
to add an Anchor Group to the Tree Link pane and display the Anchor Group Properties pane.
In the Anchor Group Properties pane:
6) Enter a unique but descriptive name for the new Anchor Group.
In the Tree Link pane:
7) Select/Highlight the Anchor Group to which you want to now add Anchors.
On your desktop:
8) Click on the target Application window (you opened in step 1) to make the window active.
In the Link Editor dialog:
In the Toolbar of the Editor window:
9) Click ![]() to add an Anchor to the selected Group in the Link Tree.
to add an Anchor to the selected Group in the Link Tree.
10) Select/Enter Anchor Properties, as appropriate.
11) Click and drag ![]() to the location in the target window at which you want the Anchor to be.
to the location in the target window at which you want the Anchor to be.
Repeat steps 7 through 11 for each Anchor you want to add to the selected Group.
Repeat steps 5 through 11 for each Anchor Group you want to add to the Link Form.
When all the settings are complete:
12) Click to save the settings.
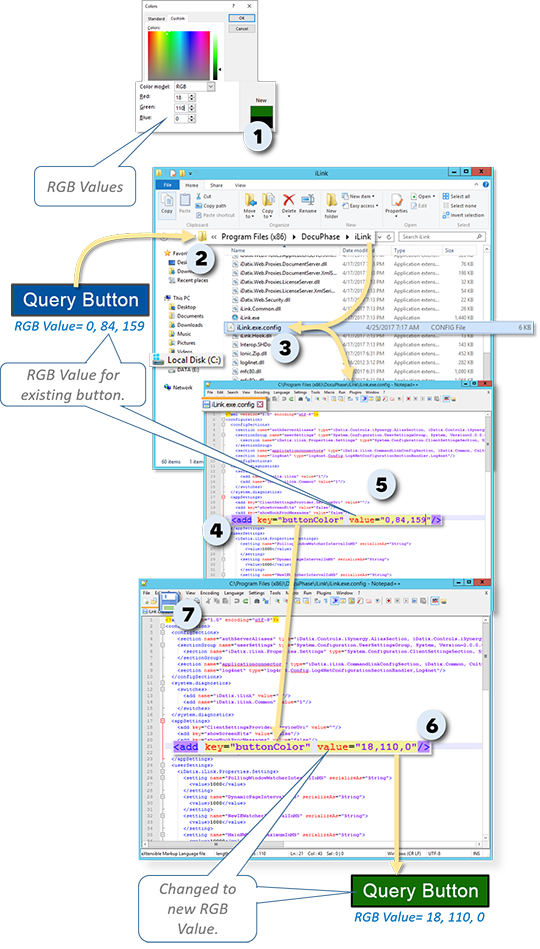
You can change the color of a button via the iLink Config file:
1) Find the RGB values for the color you want the button to be.
In Windows Explorer:
2) Go to C:\Program Files (x86)\DocuPhase\iLink.
3) Find and open the iLink.exe.config.
IMPORTANT!
Be sure to open this file using a pure text application (e.g., Notepad or Notepad++). Editing a configuration file in any other type of application could prevent the configuration file from working properly.
In the iLink.exe.config file:
4) Find the button color reference.
In the line of code for the button color:
5) Look for three, comma-separated values that appear after the value= reference.
6) Replace the numbers with the numbers that correspond to the RGB color you want the button to be.
7) Save the file to store the settings and change the color of the button as defined.