Routing Documents (Non-Progression Users Only)
The process of routing allows a User to "re-associate" a Document from one destination to another while it remains in the Repository (e.g., from an Application to an Inbox).
IMPORTANT!
This feature is not available if your organization is using Progression (Workflows) as this functionality is handled via Progression.
WARNING!!!
Documents with existing Index values for one Application are lost if/when they are routed to a new destination Application that does not have the same Indexes defined. If this occurs, you need to re-Index the Document from within the appropriate Application.
BEST PRACTICE
When routing a Document between Applications with differing Indexes, you need to re-Index the Document once it has been routed. You can use the Send for Re-Indexing option to change/create Index values that need to now correspond with the Indexes in the Application in which the document now resides.
There are two ways of routing Documents:
- Pre-Sort General Capture is the "area" within the General Capture Application where Documents are stored until they are routed to various destinations (i.e., Applications or Inboxes) for manual Indexing. General Capture is basically a Document-filing Application that serves as the general point of capture for non-Indexed Documents entering the DocuPhase system.
Because they have no Index values assigned yet, Documents held in General Capture are not yet associated with a specific Application. When a Document resides within the General Capture Application, you can move the Document to another Application (for manual Indexing); or to an Inbox where it can be stored temporarily until the assigned User or Group can assign and Index it for the appropriate Application.
- Inbox gives you the ability to route Documents to a specific individual or Group Inbox, or to an Application.
Tell me how to...
TIP
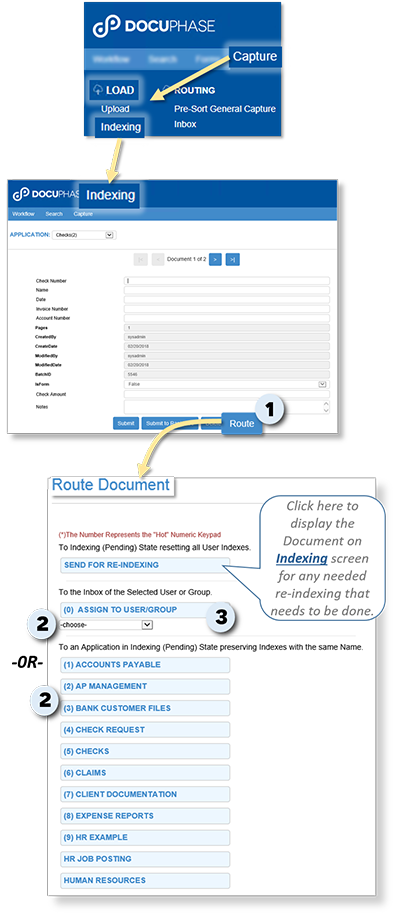
You can access the Indexing screen as soon as you upload a Document, from the main header via Capture![]() LOADIndexing; or from the Route Document screen, click on Send for Re-Indexing
LOADIndexing; or from the Route Document screen, click on Send for Re-Indexing
At the bottom of the Indexing screen:
1) Click  to display the Route Document screen.
On the Route Document screen:
TIP
You can use the Send for Re-Indexing option to return to the Indexing screen.
In the User or Group drop-down list:
2) Select the name of the User or Group to whom you want to assign this Document (e.g., for Indexing).
3) Click Assign to User/Group to complete the setting and route the Document to the selected Inbox.
OR
From the list of Applications:
2) Click on the Application in which you want this Document to reside.
- This automatically associates the Document with the selected Application.
TIP
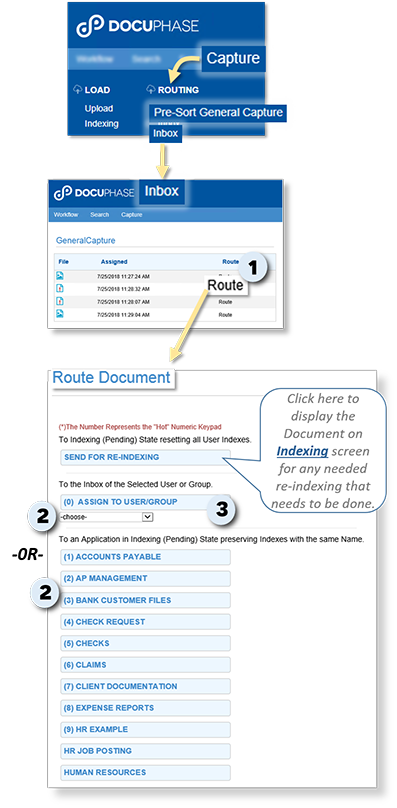
To get to an Inbox for routing, from the main header: Go to Capture ![]() ROUTINGInbox.
ROUTINGInbox.
On the Inbox screen:
1) Click Route next to the Document you want to route to display the Route Document screen.
On the Route Document screen:
TIP
You can use the Send for Re-Indexing option to return to the Indexing screen.
In the User or Group drop-down list:
2) Select the name of the User or Group to whom you want to assign this Document (e.g., for Indexing).
3) Click Assign to User/Group to complete the setting and route the Document to the selected Inbox.
OR
From the list of Applications:
2) Click on the Application in which you want this Document to reside.
- This automatically associates the Document with the selected Application.