Working in Upload Manager
Upload Manager is designed to enable the automated upload of documents from ScanDox into DocuPhase. Upload Manager provides organized control of the upload process, allowing you to initiate, pause, and cancel data uploads. You can also use Upload Manager to configure scheduled uploads, create hot folders, and view work in progress.
Tell me about...
| Element | Description |
|---|---|
| Menus | |
| File | Access the close option to close Upload Manager. |
| Edit |
Contains the options to delete documents from the process: Delete (a single document before it is processed), Delete All Completed documents (after they are processed), and/or Delete All documents (before they are processed). You can even access the Configuration dialog from this menu, just as you can using the configuration icon (
WARNING!Use this deletion functionality with care. Once you delete an item, it cannot be recovered: you will need to re-add it. |
| Help | Use the About option to see details about the version of Upload you are using, as well as access log files by clicking  . . |
| Toolbar Icons | |
|
|
Starts upload of documents (or continues after Pause). |
|
|
Stops the upload in progress; use the Start icon (described above) to continue the upload after a Pause. |
| Delete the upload: including all documents.
WARNING!Use this deletion functionality with care. Once you delete an item, it cannot be recovered: you will need to re-add it. |
|
| Open the configuration dialog that allows you to create settings for a Transfer Schedule and/or edit Hot Folders | |
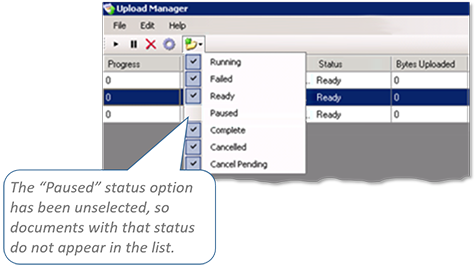
| Use this to choose which statuses you want to show in the list and which you don't. Show me... |
|
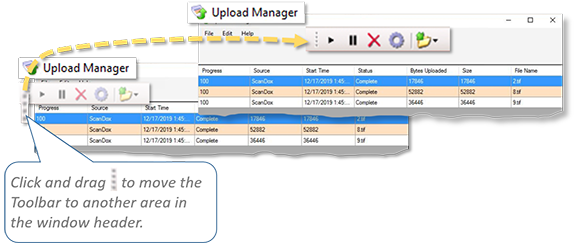
| You can click and drag on this icon to move the Toolbar around within the header of the Upload Manager window. | |
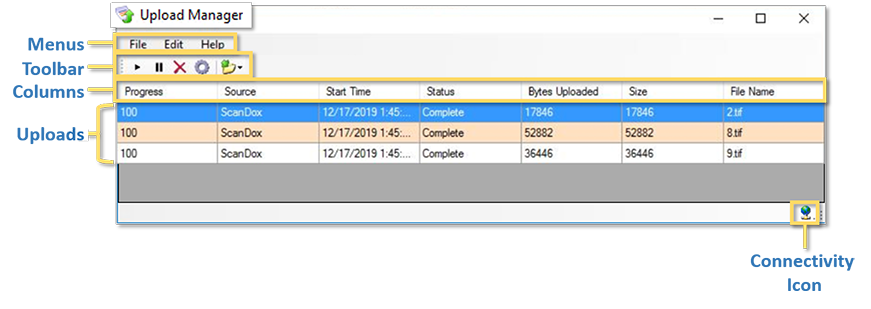
| Columns | |
| Provides you with an update of where (as a percentage) the document is in the upload process (100 = 100% complete).. | |
| Shows the device by which the document was uploaded into Upload Manager. | |
| This is the date and time that the document was uploaded. | |
| Provides the point to which a document has reached in the system (e.g., Complete vs. Failed vs. Paused, etc.). | |
| Show the number of bytes as a document is loaded: increasing as more of the document is uploaded (coinciding with the changes in Progress column). | |
| Displays the total size of the document in bytes at the completion of upload. | |
| Let's you be able to see which document is doing what within the process. | |
TIP
You can use the Connectivity icon (![]() ) to confirm that ScanDox/Upload Manager is connected to the system.
) to confirm that ScanDox/Upload Manager is connected to the system.
Each document processed through Upload Manager has an associated status. Documents can be filtered by these statuses as well. The following is a list of a possible statuses you might see, as well as what they mean.
You can use the Transfer Schedules to automatically transfer documents from Upload Manager to DocuPhase at a designated time and frequency. These options allow Document transfers during and/or outside of regular business hours.
TIP
If a large number of Documents are generally transferred, scheduling transfers for outside of regular business hours and/or weekends may prevent any slowdown of the system for anyone using the system during a regular workday.
| Option/Setting | Use it to... |
|---|---|
| Profile | select the ScanDox Profile you want to associate with the Document transfer being scheduled. |
| Continuous | transfer Documents for the selected Profile any time ScanDoxis active and concurrently with ScanDox operations whenever there is a live connection between ScanDox and DocuPhase. |
| Scheduled | the time(s) that you want file transfers to occur. Schedule designation can be made using the Allow Transfers options or by choosing specific time(s) from the Schedule grid.IMPORTANT!If no transfer schedule is defined when the Scheduled option is selected, documents remain queued (without being processed) until a schedule is configured or the Continuous option is selected. |
| Allow Transfers |
*Both of these options can be set together, |

|
schedule transfers at the designated time(s). Tell me more... |
A Hot Folder is basically a network directory folder used by ScanDox as a "holding area" to store files for submission to DocuPhase. These folders are created as an element of a ScanDox profile. Tell me more...
Some Basic Facts about Hot Folders:
- Because Hot Folders exist within a network environment, mutliple users may have access to them, based on their network persmissions.
- There must be a matching Folder on the local device. This is where Documents can be placed for use in Hot Folders used within ScanDox or Upload Manager.
- They can be specific to Profiles, and are used when uploading documents from a multi-functional device.
- Documents in the Hot Folder also appear in the ScanDox Tray once all documents are submitted to the Hot Folder when you select a Profile associated with that folder. However, a Single Document Processing option can be enabled: allowing the Tray to be populated as each Document is submitted.
- The contents of a Hot Folder are not checked by ScanDox until all Documents in the Tray are submitted to DocuPhase
- These folders can be configured within Upload Manager (
 ) or from the Profiles window in ScanDox; with the latter offering a few more options.
NOTES
If a Hot Folder is needed for capturing documents, but does not yet exist, a prompt appears to offer you the chance to create a new folder on your desktop .
Hot folders are not available in ScanDox Lite.
Hot Folders Tab
This tab allows you to configure Hot Folders regarding what (and how) documents are processed through the folder/system.
| Element | Description |
|---|---|
| Folder Configuration | This area contains the list of any Hot Folders that are currently associated with the selected Profile. In addition, you can add new or remove folders from the list. |
 / /  |
Add new or remove selected folders. |
| Directory | View or change the local folder associated with the selected Hot Folder. M |
| Filter | You can enter characters that allow you to display only certain types or names of Documents (e.g., if you enter *.pdf only PDF docs in a specific Hot Folder). |
| Object Status | Choose the system status you want automatically assigned to any documents placed in this the selected Hot Folder. |
| Enable | Automatically synchronize folders and their contents between the local folder and the Hot Folder. |
| Profile | Select the Profile you want to associate the documents that will be placed in the Hot Folder. |
| Read-Only Field - Auto-fills with the Application associated with the selected Profile. | |
Once you choose a Profile, this area auto-populates with any/all oof the enabled Indexes associated with that Profile's Application . You can select/enter information in any of the Indexes that you want to have auto-filled on the documents that are added to the Hot Folder.TIPAdding values at this point may make help make the processing of documents more efficient. |
|
|
|
This button clears any information that has been selected/entered into the Indexes, as described above. |
Tell me how to...
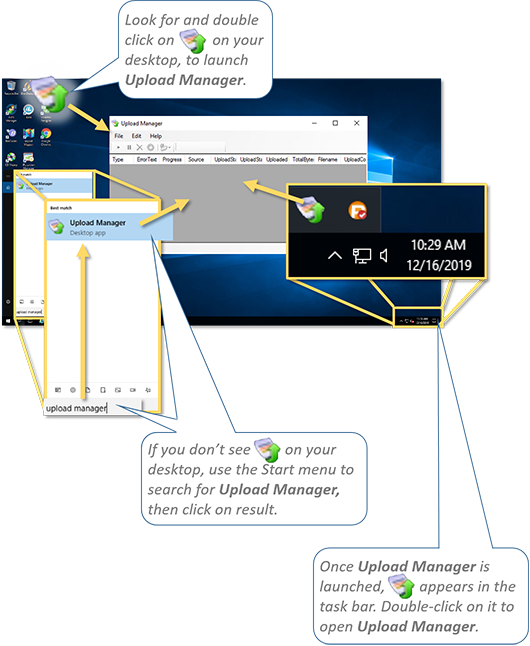
There are 3 ways to launch and/or open Upload Manager:
A) Find and double-click on ![]() .
.
B) Use the Start Menu to find, then click on the Upload Manager option.
If Upload Manager has been launched but is minimized on your desktop:
C) Use ![]() from the Task Bar to open it.
from the Task Bar to open it.
TIP
You can also look for the icon on the Task Bar to make sure Upload Manager is running. If you do not see the icon, then you'll need to use methods A or B (as described above) to launch Upload Manager.
Schedule Automatic Document Transfers
This feature automatically transfesr documents from Upload Manager to DocuPhase at a designated time and frequency. Tell me more...
In Upload Manager:
1) Go to EdituConfiguration to display the Configure Upload Manager dialog.
Under the Transfer Schedule tab:
2) Select the Profile associated with documents you want to schedule for processing.
3) Select the Scheduled option.
To Use the Nightly and/or all weekend options
In the Allow Transfers section:
4) Make the appropriate settings, depending upon whether you want processing to occur outside of normal business hours and/or weekends
AND/OR
TO SCHEDULE TRANSFERS DURING SPECIFIC AND DESIGNATED HOURS
In the Schedule window:
5) Select any other hour you want to schedule, then click to add the hour to the schedule.
Repeat step for any other hours you want to specify that aren't included by the other options.
IMPORTANT!
If no transfer schedule is defined when the Scheduled option is selected, documents remain queued (without being processed) until a schedule is configured or the Continuous option is selected.
NOTE
You can use all available settings: Nightly, and/or All Weekend, and/or specific, selected times.
When all settings are complete:
6) Click  to save the schedule, and close the Configure Upload Manager window.
To Add a hot Folder
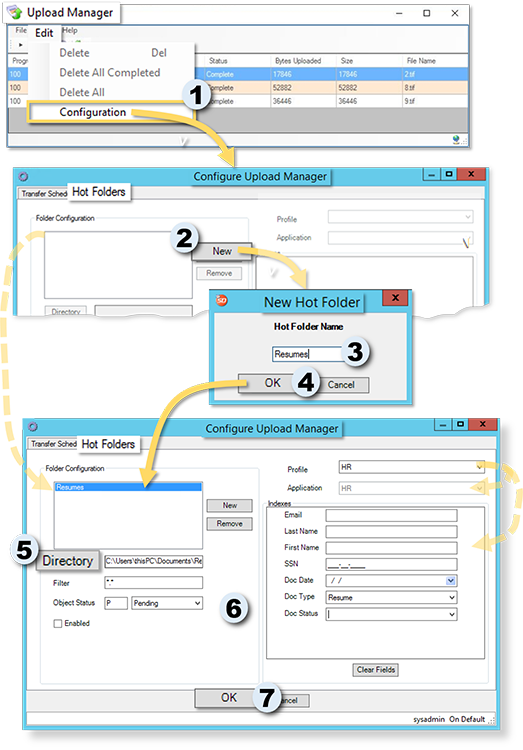
In Upload Manager:
1) Go to EdituConfiguration to display the Configure Upload Manager dialog.
Under the Hot Folders tab:
2) Click to display the New Hot Folder dialog.
3) Enter a name for the Hot Folder.
4) Click to add the new folder to the list.
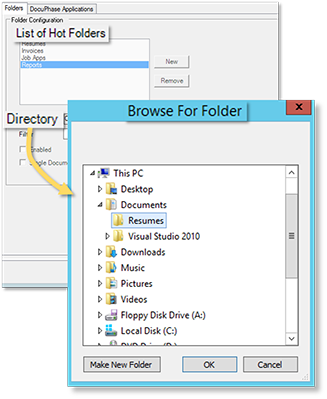
5) Click  to display the Browse for Folderdialog, and browse to, and select the local folder that corresponds to the Hot Folder you just added.
TIP
You can change the local folder for a Hot Folder by clicking under the List of Folders to open the Browse window, then finding and selecting the new folder.
6) Make settings, as appropriate, for this Hot Folder. Tell me more...
When all the settings are complete.
7) Click to save the new Hot Folder.
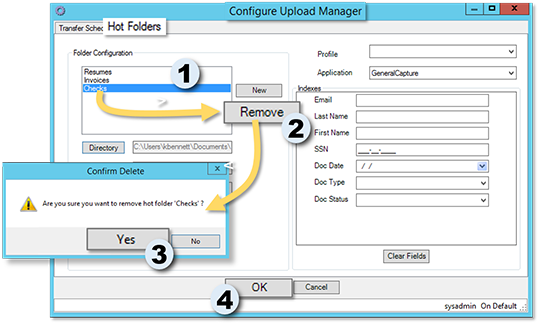
TO REMOVE A hot FOLDER
WARNING!!!
Use this deletion functionality with care. Once you delete something, it cannot be recovered: you will need to recreate it.
In the List of Hot Folders
1) Select the folder you want to delete.
2) Click to display a confirmation prompt.
In the confirmation prompt:
3) Click to delete the selected folder.