 Setting User and Group Permissions
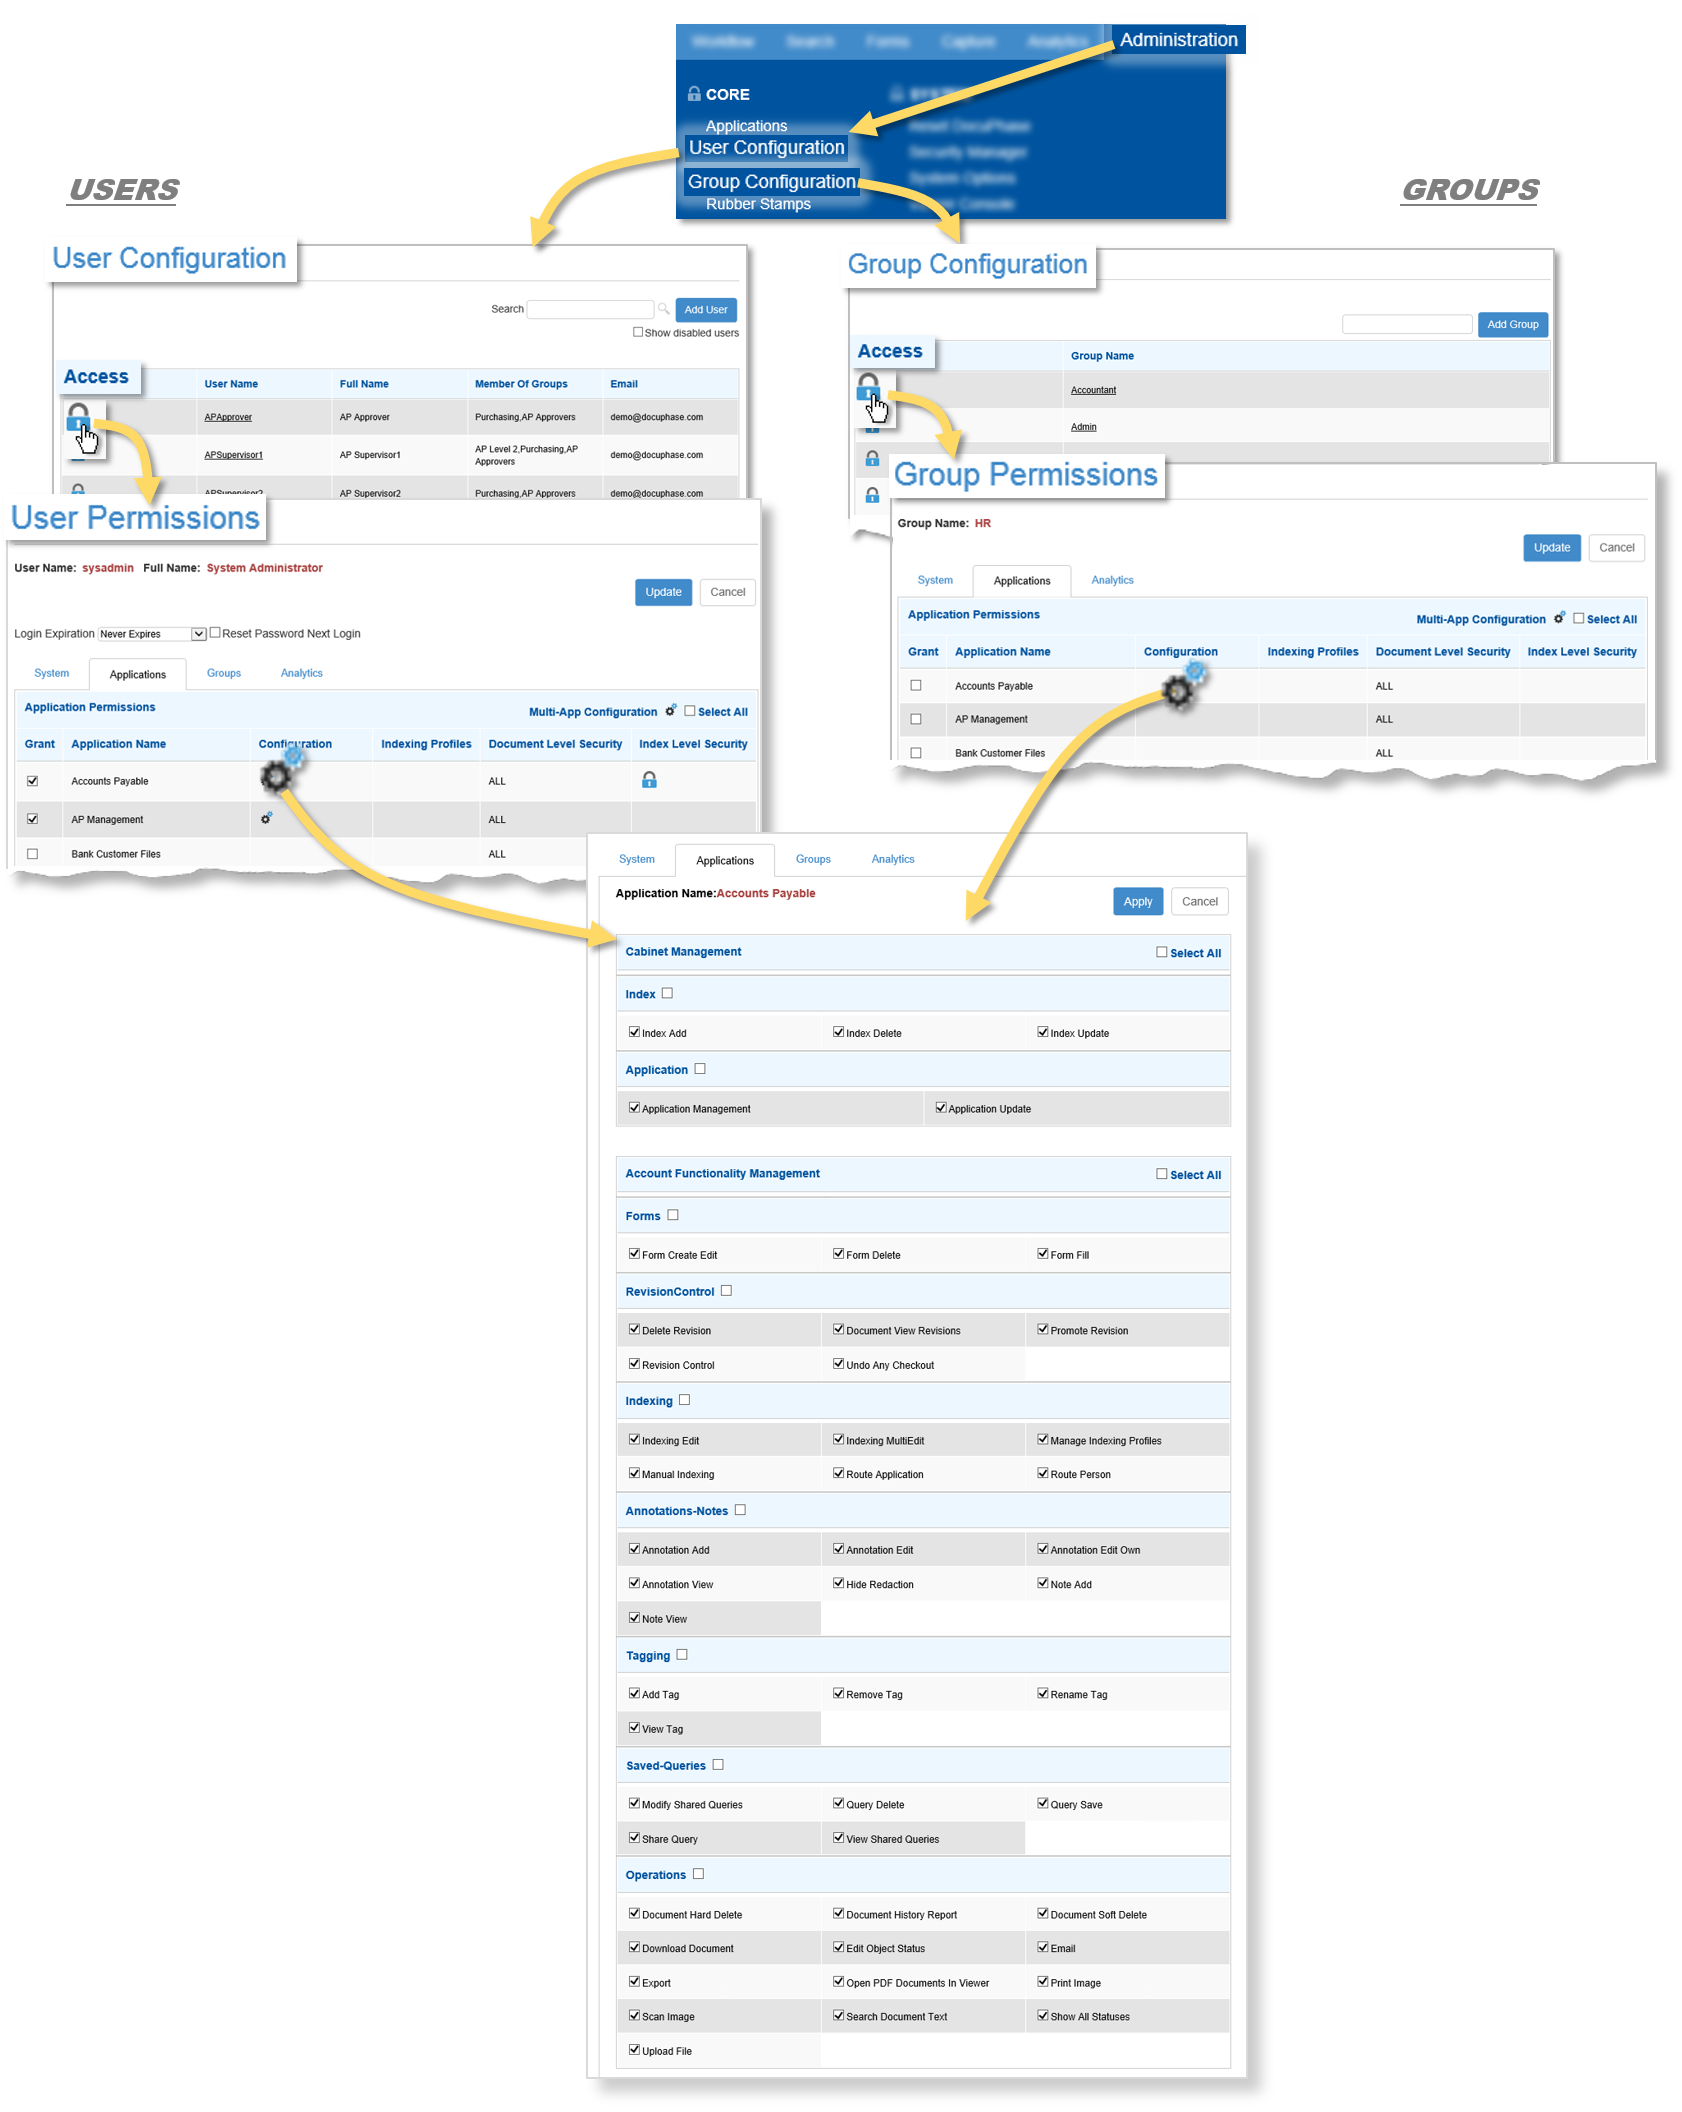
The configuration of permissions for both Users and Groups provides an efficient method to securely manage and intricately specify who has access to Documents, Indexes, Applications, and other system functionality: determining what actions/information a User or members of a Group can do with which resources, and under what conditions.
TIP
To access the User Permission settings: from the main header, go to Administrationu COREuUser Configuration u User Permisionsu![]() .
.
OR
To access the User Permission settings: from the main header, go to Administrationu COREuGroup Configuration u Group Permisionu![]() .
.
IMPORTANT!
Be aware that the priority of any Configuration settings is not based on whether or not it's enabled for an individual User or for an entire Group. Instead, the settings that take priority (overriding any opposite settings) are those that have a status of enabled.
EXAMPLES
- The Office Manager in a Medical Practice may belong to the Lab Technicians Group. The Lab Technicians Group, does not have permission to view Documents within the Billing Application; however, as an Individual User, the Office Manager has permissions to view billing Documents. In this case, the Office Manager has access to the Billing Documents because it's enabled under her User Configuration.
- Another example might be that the Lab Technicians Group has permissions to view all Medical Results that come into the office; while the Office Manager's User Configuration does not allow her to access the Medical Result Documents, her membership in a Group that DOES have access, also allows her to view those Documents as well.
BEST PRACTICE
It is also recommended that permissions be set up by Group rather than by Individual. This is not always possible (e.g., dealing with secure or privacy information), but if Group permissions are set, then everyone in that Group can access the Application; whereas when permissions are set on an individual basis, only that person can use the Application or any related Tasks. That means if that one person is not available, a "log jam" of Tasks processes belonging to that Application can occur.
Tell me about...
You can make the following settings for a User Account. Tell me more...
-
To increase the security of your system and Documents, you can force a password to automatically, and regularly expire after a certain number of days/weeks/months.
or -
Set a password to Never expire (e.g., for an Admin or TPOC) so that the User's password doesn't ever have to be reset.
or - Reset a password which then requires the associated User to change the password the next time he/she logs into the system.
These settings apply to major areas of the DocuPhase Platform rather than to specific areas such as Applications, Users, Groups, etc. In addition, the settings can either be set for Users (via AdministrationuCoreuUser Configuration as shown below) or Groups (via AdministrationuCoreuGroup Configuration as shown below) The following permission sets are included under this tab:
Click the links below to learn more about System Permissions:
Controls iLink and ScanDox functionality as they relate to the Capture of data, Documents, and files.

The Applications tab on both the User and Group Permissions screens provides a way for you to do four things:
- give access to Applications to specific Users or Groups
- see and set Application permissions for specific Users or Groups
- add Document security
- set Index security
TIP
To protect the most sensitive Documents (such as financial or protected health information) you can combine both Document and Index Level security settings. Tell me more...
| Element | Use it to... |
|---|---|
| Multi-App Configuration | make simultaneous configuration settings for two or more Applications. In this way, if you have Users and/or Groups that require the same sets of permissions, you can make them all at one time, rather than having to set them one at a time. |
| Select All | select ( |
| Grant | allow access by the designated User or Group. |
| Application Name | see a list of the names of all available Applications to which you can grant access. |
| Configuration ( |
identify Applications available for Permissions Configuration for the designated User or Group. |
| Document Level Security ( |
view which Index fields and values a User or Group can access. This allows your organization to apply a higher level of security to Documents contained within an Application.
|
| Index Level Security ( |
review and/or edit (if allowed) settings for Application(s) that have restricted access to very specific information within a Document (i.e., Indexes); users still have access to the Document- as well as the Application in which it resides, but may not have access to certain information contained there.
|

When the ![]() icon appears in the Configuration column on the it Application tab, it indicates that the Application is available for Permissions Configuration for the designated User or Group. The following settings appear on that screen:
icon appears in the Configuration column on the it Application tab, it indicates that the Application is available for Permissions Configuration for the designated User or Group. The following settings appear on that screen:
WARNING!
- Be sure to use these permissions carefully as too many Users with too many permissions for an Application can lead to a complicated and disorganized use of an Application.
- Use deletion functionality with care. Once you delete an item, it cannot be accessed or recovered; you will need to recreate it.
TIP
To protect the most sensitive Documents (such as financial or protected health information) you can combine both Document and Index Level security settings. Tell me more...
Click the links below to learn more about Application Permissions:
These settings Allow you to specify what a User or group of Users can do with regard to an Application and its Indexes.
Account Functionality Management Set
Use these to choose from a multitude of options that allow the specified User or Group to make settings related to the following:
 ).
). The function of this Group tab on the User Configuration screen is to list any Groups to which this particular User belongs. Since Users ‘Inherit’ permissions from the Groups to which belong, you can use this tab to better assess ALL of a specific User's permissions.
NOTE
- You need to use the Group Configuration screen via the Administration menu in order to make changes to a Group or its members. The tab you see via the User Configuration screen is basically meant for configuration of the designated member only.
- The permissions available on this tab are the same as those available to be set for Group configuration.
The tabs shown on the Group Permissions screen provide the same System and Application settings as they do for individual Users, except that the settings apply to the entire Group and are inherited by its members.
NOTES
- You need to use the Group Configuration screen via the Administration menu in order to make changes to a Group or its members. The tab you see via the User Configuration screen is basically meant for configuration of the designated member only.
- The permissions available on this tab are the same as those available to be set for Group configuration.
This tab allows you to give access to individual Users and/or groups of Users (depending upon which Configuration level you've selected from the Administrative menu).
| Permission Setting | When enabled ( |
|---|---|
| Databases | access to one more databases used for producing Analytical data. |
| Grant | access available databases for running Analytics. |
| Cube | access Cube columns available in the corresponding database. |
| Folders* | access to one more folders (used for producing Analytical data. |
| Folder | access to a Folder. |
| Write | update the corresponding Folder. |
Tell me how to...
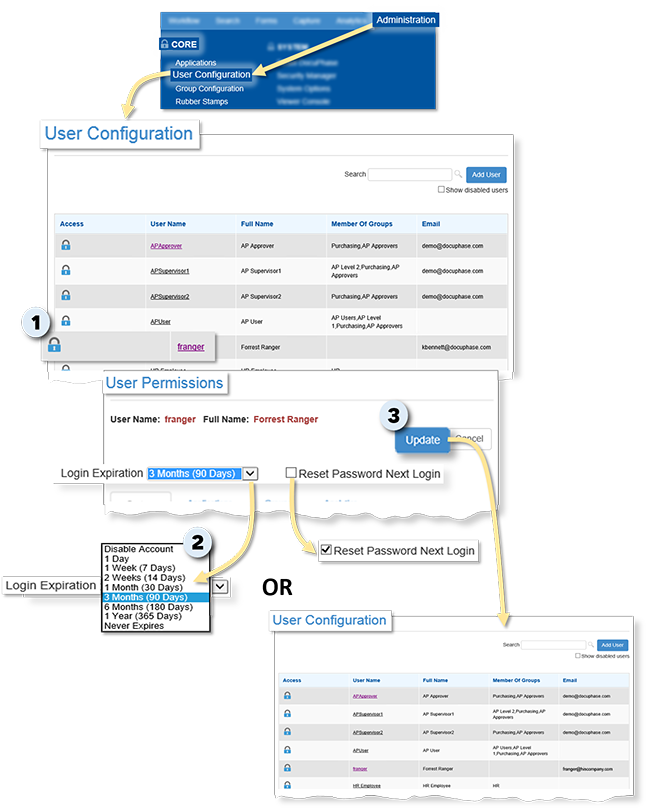
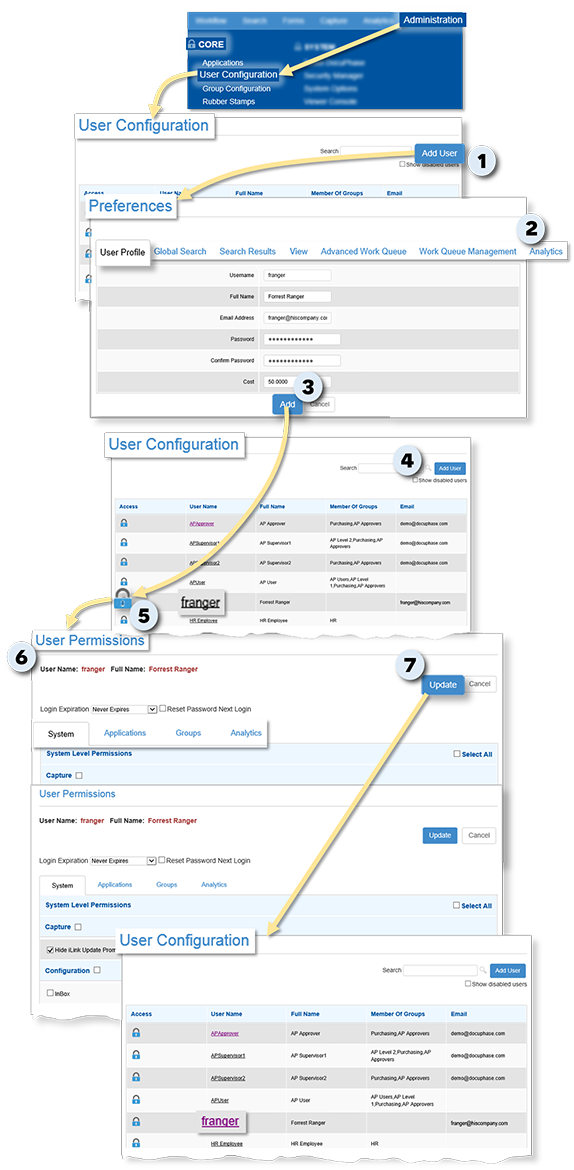
On the User Configuration screen:
1) Find and click ![]() next to the name of the User Account for which you want to change the Login Expiration or Reset the Password to display the corresponding User Permissions screen.
next to the name of the User Account for which you want to change the Login Expiration or Reset the Password to display the corresponding User Permissions screen.
To Set an Expiration time for the User Account Password:
In the Login Expiration drop-down list at the top-left of the User Permissions screen:
2) Select one of the available Login Expiration time options or the Never Expires option, as appropriate, and go to step 3 below.
TIP
For security purposes, it is recommended that you set passwords to expire (requiring creating a new password) on a regular basis such as 3 months (90 days) for at least most Users.
or
To Reset a User Account Password (effective upon the User's next login):
2) Enable (![]() ) the Reset Password Next Login option: requiring the designated User to change his/her password at the time of the next login.
) the Reset Password Next Login option: requiring the designated User to change his/her password at the time of the next login.
TIP
This feature is generally used to reset a User's password when he/she cannot remember the current one, or if a User feels that his/her password has been compromised in some way.
When the setting is complete:
3) Click  to save the settings and return to the User Configuration screen.
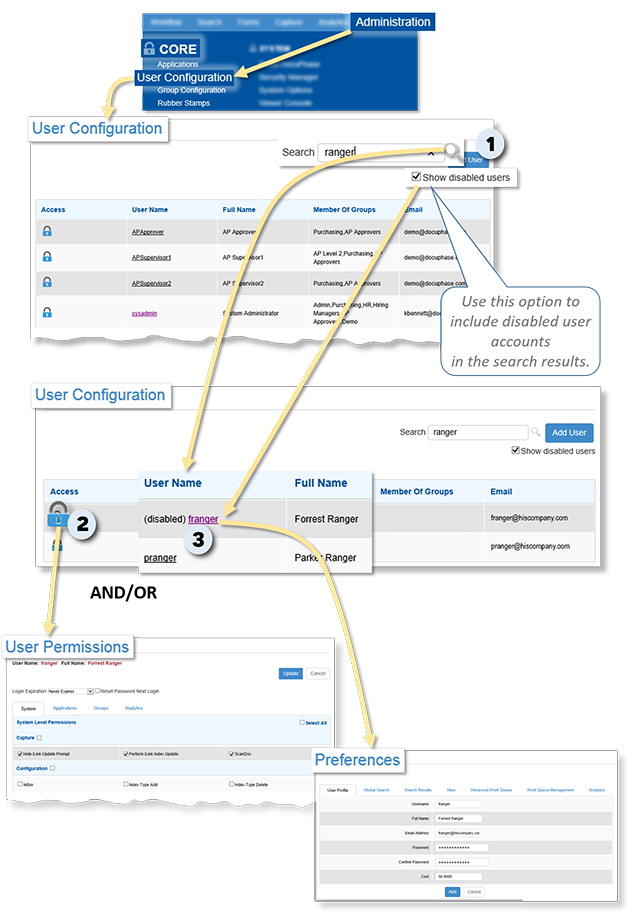
In the Search field on the User Configuration screen:
1) Enter a name or partial name, then click to display corresponding results (if any).
TIP
Remember, you can use the Show disabled Users option to find all Users that fit your search criteria.
If you see the User for whom you searched:
2) Click ![]() next to the User name to display the User Permissions settings for that User. Tell me more...
next to the User name to display the User Permissions settings for that User. Tell me more...
and/or
3) Click on the User name to display the Preferences settings for that User. Tell me more...
On the User Configuration screen:
1) Click  to display the Preferences screen.
2) Set User Preferences on each tab, as appropriate. Tell me more...
On the User Profile tab of the Preferences screen:
3) Click  to complete the User settings and return to the User Configuration screen.
- The new User now appears in the list.
On the User Configuration screen:
4) Find the name of the newly added User in the list.
5) Click ![]() next to the name to display the User Permissions screen for that User.
next to the name to display the User Permissions screen for that User.
On the User Permissions screen:
6) Set User Permissions on each tab, as appropriate. Tell me more...
When settings are complete:
7) Click to save the settings and return to the User Configuration screen.
NOTE
Remember, disabled accounts are never deleted from the system. User account information is always maintained and stored safely order to maintain the integrity of any past audit trail references to activities performed while the account was active.
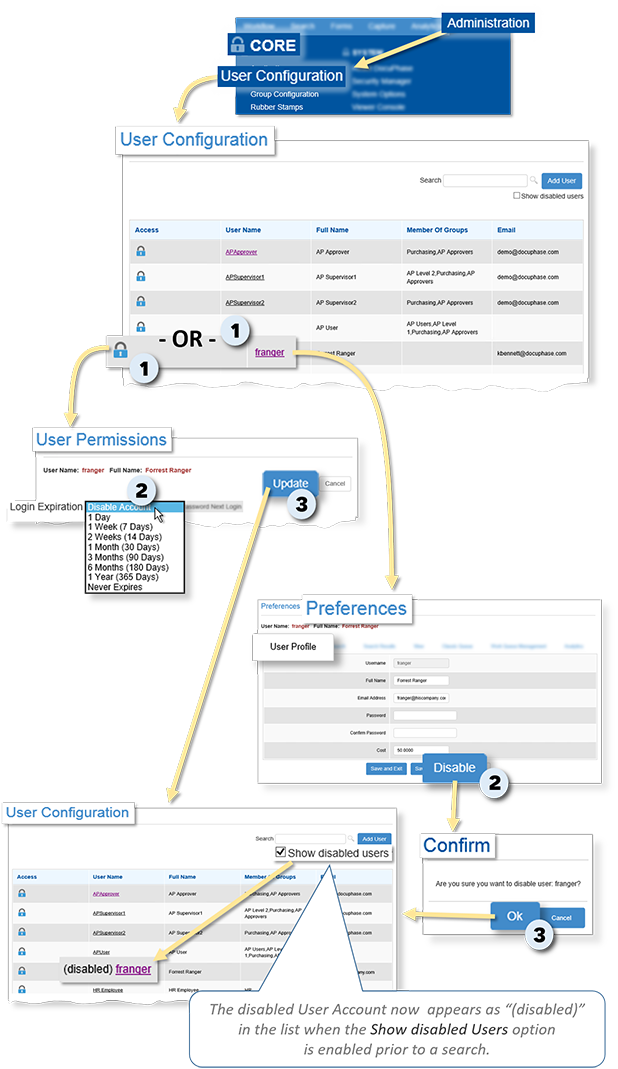
To make changes to User Permissions:
On the User Configuration screen:
1) Click ![]() next to the name to display the User Permissions screen for that User.
next to the name to display the User Permissions screen for that User.
2) Set User Permissions on each tab, as appropriate. Tell me more...
3) Click to save the changes and return to the User Configuration screen.'
AND/OR
To make changes to User Preferences:
On the User Configuration screen:
1) Find and click on the name of the User to display the corresponding Preferences screen.
On the User Preferences screen:
2) Make changes to User Preferences on each tab, as needed. Tell me more...
Once changes are complete:
3) Click  to save the changes and remain on the current tab;
or
Click  to save the changes and return to the User Configuration screen.

NOTE
Remember, disabled accounts are never deleted from the system. User account information is always maintained and stored safely order to maintain the integrity of any past audit trail references to activities performed while the account was active.
To disable a User Account from the Preferences screen:
On the User Configuration screen:
1) Search for (as shown above), find, and click on the name of the User Account you want to disable to display the Preferences screen.
On the User Profile tab of the Preferences screen:
2) Click  to display a confirmation prompt asking you if you are sure you want to disable the User.
3) Click  to disable the User and return to the User Configuration screen.
- The User no longer appears in the list of Users on the User Configuration screen unless the Show disabled Users option is enabled (
 ).
).
or
To disable a User Account from the User Permissions screen:
On the User Configuration screen:
1) Search for (as shown above), find, and click ![]() next to the name of the User Account you want to disable to display the Permissions screen.
next to the name of the User Account you want to disable to display the Permissions screen.
In the Login Expiration field at the top of the User Permissions screen:
2) Select Disable Account.
3) Click to disable the User and return to the User Configuration screen.
- The User Name no longer appears in the list of Users on the User Configuration screen unless the Show disabled Users option is enabled ().
To re-enable a disabled User Account:
On the User Configuration screen:
1) Enable (![]() ) the Show disabled Users option to display disabled User account in the list: designated as "(disabled)."
) the Show disabled Users option to display disabled User account in the list: designated as "(disabled)."
2) Search for (as shown above), find, and click ![]() next to the name of the User Account you want to disable to display the Permissions screen.
next to the name of the User Account you want to disable to display the Permissions screen.
In the Login Expiration field at the top of the User Permissions screen:
3) Select any Login Expiration time (other than Disable Account) or Never Expires to re-enable the User Account.
4) Click to save the setting and return to the User Configuration screen.
- The re-enabled User account name now re-appears in the list of Users on the User Configuration screen.

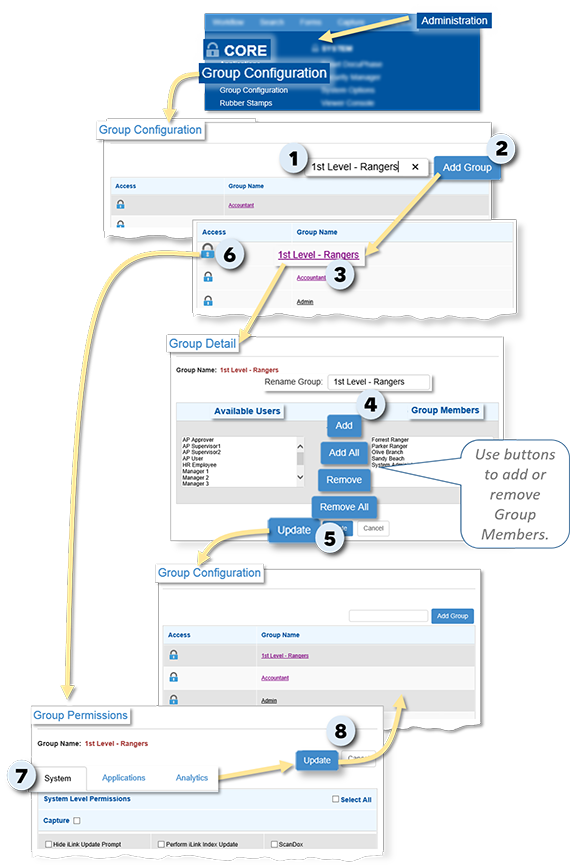
To create the Group:
In the field at the right top portion of the Group Configuration screen:
1) Enter a name for the Group you want to create.
2) Click  to add the new Group name to the list on the Group Configuration screen.
IMPORTANT!
You must use the procedures below to add Members/Users to the Group, and also to set Group Permissions in order for the Group to be able to access and use Applications and other functionality within the DocuPhase system.
To set Group Details:
On the Group Configuration screen:
3) Find and click on name of the new Group to display the Group Detail screen. Tell me more...
On the Group Detail screen:
4) Make settings as needed (i.e., change the Group name, add/remove members, etc.).
- Adding and Removing Users:
- Add Users to a Group: click on the User(s) in the Available Users column, then click to move the selection(s) to the Group Members column.
- Remove Users from a Group: click on the User(s) in the Group Members column, then click
 to move the selection(s) to the Available Users column.
 - Add All Users to a Group: click
 to move ALL Available Users to the Group Members column (i.e., adding all Users to the Group without first needing to select them).
 - Remove All Users from a Group: click
 to move ALL Group Members to the Available Users column (i.e., removing all Members from the Group without first needing to select them).
 - Selecting Multiple Items at Once:
- Select multiple, consecutive items in a list by either of the following methods: holding the Shift key, and clicking on items; or click on the first item you want selected, hold the Shift key, then click on the last item in the list you selected.
- Select multiple, non-consecutive or consecutive items by holding the Shift key, and clicking on items.
TIPS
5) Click to save the settings and return to the Group Configuration screen.
To set Group Permissions:
On the Group Configuration screen:
6) Find and click ![]() next to the Group to display the corresponding Group Permissions screen.
next to the Group to display the corresponding Group Permissions screen.
On the Group Permissions screen:
7) Set Group Permissions on each tab, as appropriate. Tell me more...
When settings are complete:
8) Click to save the settings and return to the Group Configuration screen.
To change the Group Details (i.e., change Group Name, add/remove members):
On the Group Configuration screen:
1) Find and click on name of the Group to which you want to make changes to display the Group Detail screen. Tell me more...
On the Group Detail screen:
2) Change settings as needed (i.e., change the Group name, add/remove members, etc.).
3) Click to save the settings and return to the Group Configuration screen.
To Change Group Permissions:
On the Group Configuration screen:
4) Find and click ![]() next to the Group to display the corresponding Group Permissions screen.
next to the Group to display the corresponding Group Permissions screen.
On the Group Permissions screen:
5) Set Group Permissions on each tab, as appropriate. Tell me more...
When settings are complete:
6) Click to save the settings and return to the Group Configuration screen.

WARNING!!!
Use this deletion functionality with care. Once you delete a Group, it cannot be recovered.
If Progression is in use, keep in mind that Groups are tied to assignments and assignment rules within Progression; therefore, if you delete a Group, any/all associated assignment(s) rules are also deleted.
NOTE
Deleting a Group DOES NOT delete the User Accounts for Members. User Accounts stand independently, and are maintained even when a Group to which they belong is deleted.
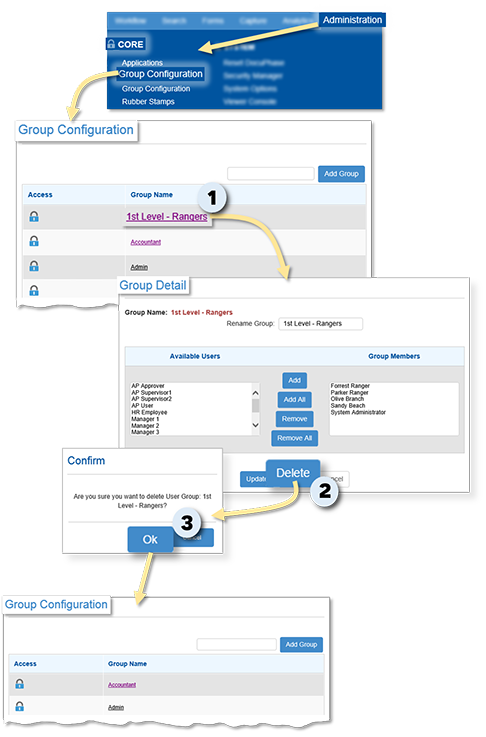
On the Group Configuration screen:
1) Find and click on name of the Group you want to delete to display the Group Detail screen. Tell me more...
On the Group Detail screen:
2) Click  to display a confirmation prompt asking if you are sure you want to delete the Group.
3) Click to delete the Group and return to the Group Configurationscreen.
- The Group no longer appears in the list of Groups.
IMPORTANT!
- Don't forget to give yourself access to an Application so that you can make Application configurations. Make sure you make all configurations (as described below) for your self before you make them for other Users or Groups.
- In order for a User or Group to have access to an Application, you must update the configurations.
TIP
If/when a User can't access or even see an Application on their system, these are the first settings that should be reviewed to Troubleshoot such issues.
On the User or Group Configuration screen:
1) Click ![]() next to the User or Group to which you want to give access to display the corresponding Permissions screen.
next to the User or Group to which you want to give access to display the corresponding Permissions screen.
TIP
Since, the System tab appears by default, it's a good idea to make sure System Level Permissions settings are correct.
In the Grant column under the Applications tab:
2) Enable (![]() ) the Application(s) to which you want the designated User or Group to have access.
) the Application(s) to which you want the designated User or Group to have access.
IMPORTANT!
If you want to remove a User's or Groups access to an Application, just make sure that there is no check in the check box : click on an enabled (![]() ) check box to disable (
) check box to disable ( ![]() ) it.
) it.
TIP
Refer to Multi-App Configuration settings (described here).
On the User or Group Configuration screen:
3) Click to complete and save the settings.
