Working with Document Search Results
Once you perform a search for a Document, you can use the functionality described below to enhance and/or optimize search results.
TIP
Once you perform a document Search of any kind, the Results screen appears.
Tell me about...
You can use any of the following when performing either an Application Search or a Global Search.
| Function/Feature | Use it to... |
|---|---|
| identify the name of the Application in which the corresponding Documents reside. Tell me more... | |
|
|
recognize when other versions exist. Click this icon to show/hide them. Tell me more... |
|
|
select ( |
|
|
display the corresponding Document in the Viewer. Tell me more...
TIP
|
| add new/ view existing notes about that Document. Once a note has been added to a Document,
TIPNotes can also be added to a Document from the Indexing screen. Tell me more... |
|
|
(Tags) |
add one or more keywords (tags) to any Document. Because each Document can hold multiple tags, tagging can be used to create relationships and common search phrases across otherwise unrelated Documents.
EXAMPLEPerhaps a medical practice wants to keep track of how many geriatric patients it has, and how many of those geriatric patients require financial assistance, as well as those who have a living will in place. That practice may want to pull all types of files related to those patients, such as billing, insurance information, as well as family information. The staff could add tags to the Documents associated with such patients (e.g., geriatric, medicaid, will). A search could then be performed using those tags (in any combination) for search criteria to display all related Documents. NOTEThis is a system-assigned Index included in every Application: making it available in every Document. |
|
(Edit Last Query) |
return to the Search criteria screen after you perform an initial search(i.e., return to the screen that still contains the criteria you just used). You can then make changes to that criteria and perform the search again BEST PRACTICEThis is great for complex searches that need refining; adding more criteria to the search reduces the results returned: making it easier to find specific items. EXAMPLE
Let’s say you are searching for a Doc Type called “Invoices” with a CreateDate range of 2/13/2016 to 8/13/2016. However, this criterion may result in a list of invoices too long to quickly find a specific item; you can use |
|
(Print Search Results) |
print the list of displayed results (as opposed to the actual document) after you perform a Search. |
|
(Print Selected Documents) |
print one or more selected Documents from the list from a printer set up on the server being used by DocuPhase. |
|
(Refresh Current Search) |
remain on the current screen, but refresh the returned search result(s). |
|
(Toggle Full Screen) |
switch your view by extending or reducing the Application Pane for Search results (i.e., the extended screen allows you to view more information at one time). |
|
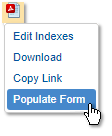
(Populate from Selected Document) |
populate (fields) from an Forms Template. When you click on this icon, a sub-menu appears with the name(s) of available templates (e.g., ‘Expense Report Form’) you can select. The selected template appears in Viewer with Index field values mapped to corresponding Form Template fields, as shown below.
EXAMPLEThis comes in handy if you are filling out monthly expense forms. Instead of having to type in the exact information (e.g., your name, contact information, title, department, etc.) month after month, you can use a previous expense form to populate the new form so that all you have to do is fill in the current information such as your actual expenses. TIPYou can perform this same function by right-clicking on the Document file type. Show me... |
|
(Email Selected Documents) |
attach one or more selected Documents to an email.NOTEThis email feature differs from the one in the Viewer: from the Search Results, email is controlled by the server configured within DocuPhase by the System Administrator or TPOC ; whereas when emailing from the Viewer, the local email client is used. In addition, multiple documents can be selected and emailed at the same time from the Search Results screen; in Viewer, only the currently displayed document can be emailed. |
|
(Export Files) |
export files for importing into DocuPhase or Microsoft Excel, to be used as data files (CSV or XML), and/or viewed (as in the case of image files). Tell me more... |
|
(Indexes) |
edit the Index values on selected Document(s). Tell me more...
NOTES
TIPYou can perform this same function by right-clicking on the Document file type. Show me... |
see the total number of lines of results (i.e., the number of items) for each Application included in the returned search. TIPEach line of results in the Search Results list is known as a "Record". |
|
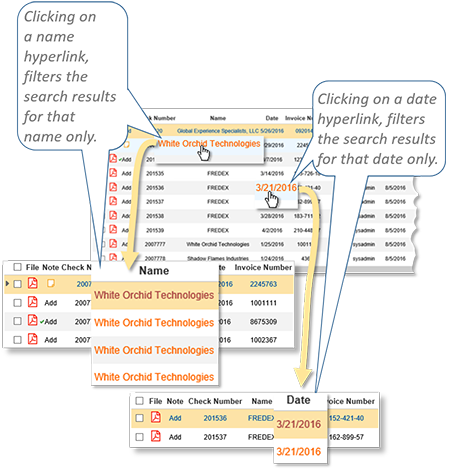
| display additional/related informationfrom across all Applications to which you have access. When you hover over search result values, and the text changes color, you know that this is a link you can use to filter search results. Clicking on any such value filters the results by that value found within the current Applications, as well as any others to which you have access. This is known as Dynamic Linking or Cross-Query Searching. Show me...
TIPIf you press Shift, then clickon a value only results from within the currently designated Application are filtered (that is, the feature no longer searches across Applications for selected values). |
|
| See Dynamic Linking (described above). | |
| Viewer | |
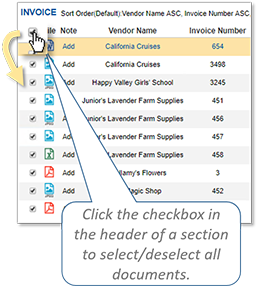
| Select/Unselect All Results (unselected) (selected) |
select all displayed search results for deletion, set all results as Favorites, and/or view/print Event History for all results. |
|
(Print Event History) |
print a report (audit ) for selected Documents on the Search Results screen. It provides a list of details about the actions tracked with regard to who did what to which Document, and exactly when those things were done.
NOTES
|
|
|
display a "timeline history" for a selected Documents on the Search Results page.
NOTES
|
|
|
delete all selected items.
NOTESRemember, the information on (and appearance of) the various screens and windows within DocuPhase may vary from what is shown in the online help. What you see (and how you see it) in the system depends upon access level settings and interface customizations made to the system by your organization. Please contact your System Administrator or DocuPhase Technical Point of Contact (TPOC) for more information.
|
|
|
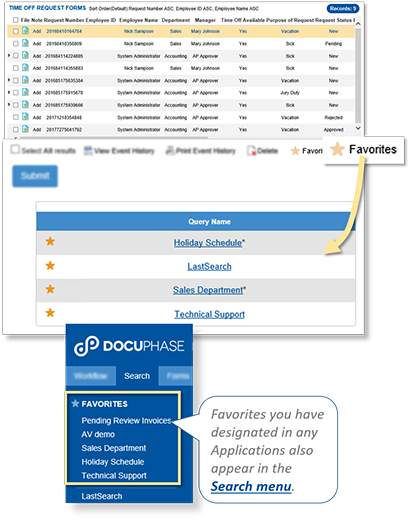
display the list of your Favorite saved queries (if any) on the Results page without having to return to the Search page or use the main menu Search tab to launch a Favorited query. Tell me more... |
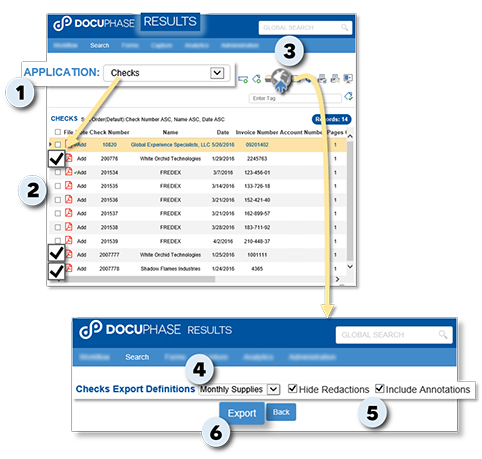
This information applies only to the screen that appears once you have transferred/exported Documents.
NOTE
The terms "Export" and "Transfer" are used interchangeably in this context.
| Field/Function | Use it to... |
|---|---|
| Job ID | view the a unique, system-generated number to help identify sets of data or Documents that have been transferred/exported to a local drive or network, or to an FTP site. |
| User Name | identify the name of the User who initiated the associated transfer/export of data. |
| Delete | delete the corresponding data.
WARNING!!!Use this deletion functionality with care. Once you delete something, it cannot be recovered: you will need to recreate it. |
| Application Name | identify the Application FROM which the data was transferred. |
| Export Name | see the Export Name given to the configuration prior to transfer of data. Tell me more... |
| Directory | view the path to the folder/directory into which the data was transferred. Tell me more... |
| Status | monitor the status of the transfer, and to know whether or not the transfer completed successfully. |
| Scheduled Time |
view the beginning and end times for each transfer of data. |
| Completed Time |
Tell me how to...
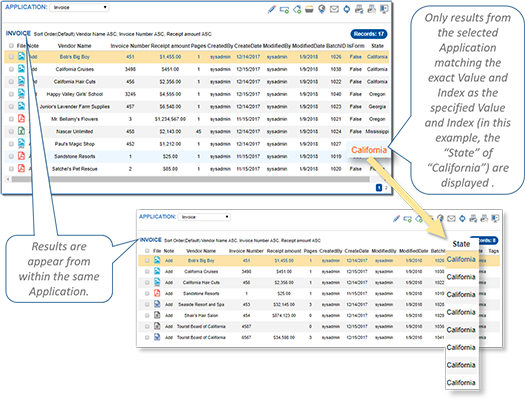
Once a search displays your results, you can then narrow (within the same Application) or expand (including all Applications) the search using a specified Value and Index.
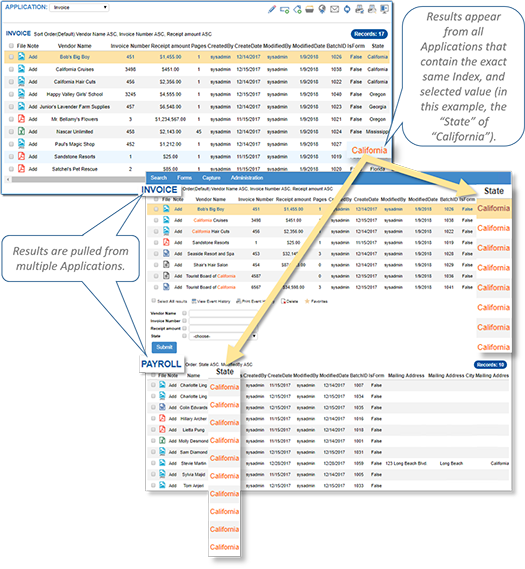
To Expand Search Results
Click a Value in a column to initiate a global search based on that value. This expands your current result set to include only/all Documents, in any Application, with that value in any column.
EXAMPLE
If you are doing a search for a Document with some elements using the numbers "45" (such as the page count, invoice number, etc.), but then decide you also want to find that element for everyone in California, you click on the value of "California" in the State column. The results display will include those from any/all Documents from all Applications that contain a value of "California" in any column. Show me...
To Narrow Results (Drill-down)
Hold the Shift key and click on a Value within a column to narrow search results to only those Documents with that same Value, in that same column, within that same Application.
EXAMPLE
Let's say you want to see all the Documents with a status of "Pending." Click on the word "Pending" in any column to display only Documents with the status of Pending in that column within the same Application. Show me...
You can click on column headings to change the order of information displayed in search results. You can sort any column in ascending or descending order, and you can use mufti-column level sorting as well.
EXAMPLE
You may want to view Invoices by Vendor Name in ascending alphabetical order, then include another column (such as Receipt Amount in descending order) to further sort the results. This particular combination would result in Vendor names displaying from A to Z order, with their associated receipt amounts displaying from highest to lowest. Show me
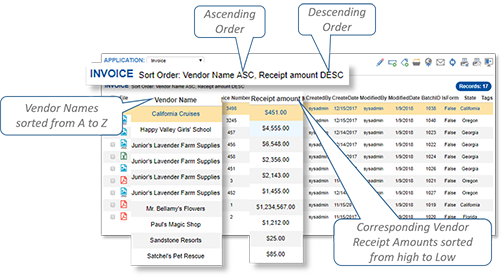
TIPS
- Ascending order is noted as ASC; descending order is noted as DESC.
- Each click of an Index makes a change to the sort order.
Click on an Index to add it to the end of the Sort Order.
AND/OR
Click on an Index set as ASC to change it to DESC.
OR
Click on an Index set as DESC to remove it from the Sort Order.
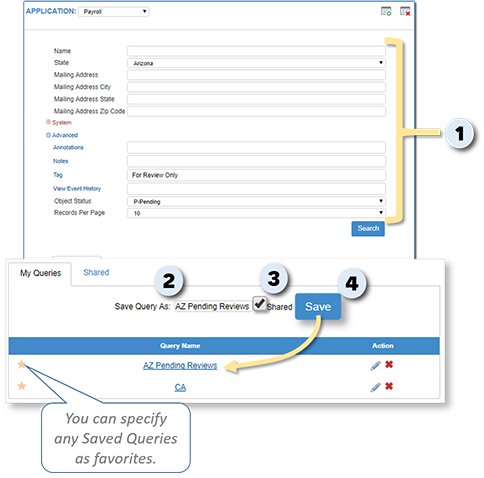
Saved Queries can be used over and over again.
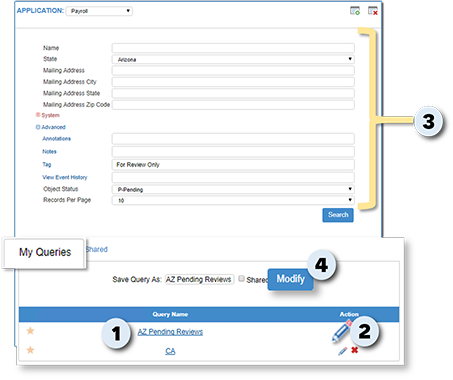
To Save a Query
On the Search screen:
1) Enter/select all relevant search criteria.
In the Save Query As field under the My Queries tab:
2) Enter a name for the specified search criteria (i.e., the Query).
To Share a Query (making it available for other Users):
3)
Enable (![]() ) the Shared option.
) the Shared option.
AND/OR
4) Click  to store the Saved Query for future use (and initiate a search).
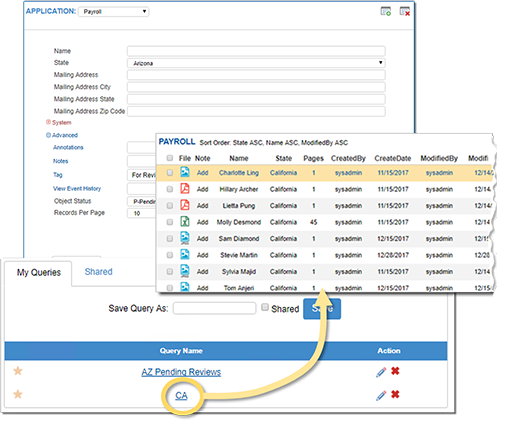
To use a Saved Query
Under the My Queries tab or Shared tab (if you want to use a Query that has been shared) on the Search screen:
Find and click on the Query you want to use to display corresponding results.
To edit a Saved Query
Under the My Queries tab or Shared tab (if you want to use a Query that has been shared) on the Search screen:
1) Find the Query you want to change.
2) Click ![]() next to the Query to display the saved criteria for the Query.
next to the Query to display the saved criteria for the Query.
3) Make changes as needed.
4) Click  to store the changes.
To delete a Saved Query
WARNING!!!
Use this deletion (![]() ) functionality with care. Once you delete a Query, it cannot be recovered. If you inadvertently delete a Query, you need to re-create it.
) functionality with care. Once you delete a Query, it cannot be recovered. If you inadvertently delete a Query, you need to re-create it.
Under the My Queries tab or Shared tab (if you want to use a Query that has been shared) on the Search screen:
1) Find the Query you want to delete.
2) Click ![]() next to the Query to display a confirmation prompt.
next to the Query to display a confirmation prompt.
3) Click  to store the changes.

1) Search for and find the Document you want to view.
TIP
The ![]() icon appears next to any Document that has multiple versions.
icon appears next to any Document that has multiple versions.
In the Search Results list:
2) Click the file icon next to the Document you want to view to display it in the Viewer.
NOTE
Depending upon the size of a Document, it may take several seconds to load.
3) Edit and/or Annotate Documents, as needed.

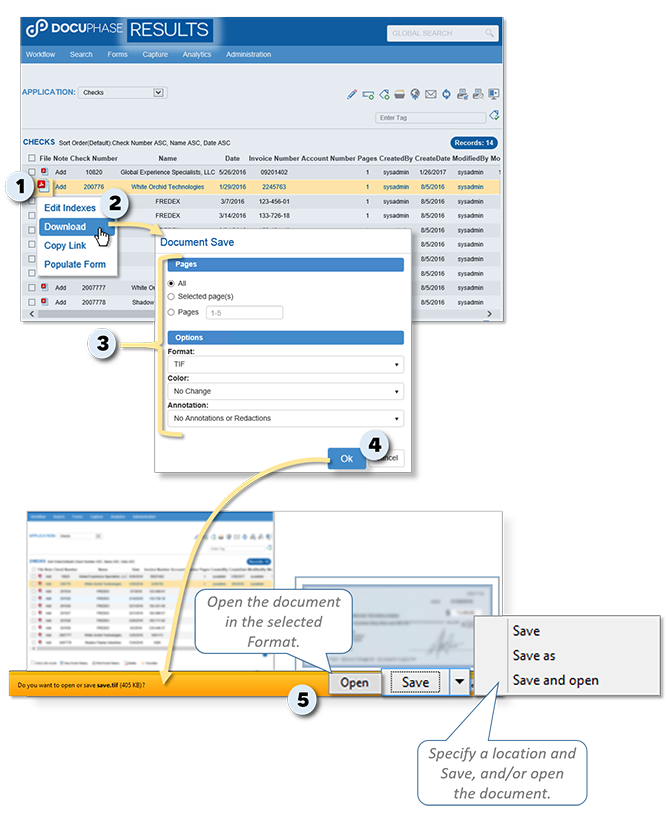
You can download a Document from the list of Results:
From the Results list:
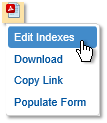
1) Right-click on the File Type icon for the file you want to download to display a sub-menu of options.
From the Sub-menu:
2) Select the Download option to display the Document Save window.
3) Select each of the following as they relate to the Document being downloaded:
- Pages: Pages of the Document to be opened/downloaded
- Format: Format in which you want the Document opened/downloaded (e.g., FIT, JPEG, PDF, or the original Document format such as a Word or Excel format).
- Color: Whether you want to open/save the Document in color (if it's a color Document), black and white, grayscale, or no change (as is - whatever that may be).
- Annotation: Whether you want to include no Annotations or Redactions, Annotations or Redactions only, or both Annotations and Redactions.
When all settings are complete:
4) Click to close the Document Save window and display the Open and Save options at the bottom of the screen.
- You can now either Open and/or Save (download in a selected folder) the Document as you would any other Document.
5) Open and/or save the Document.
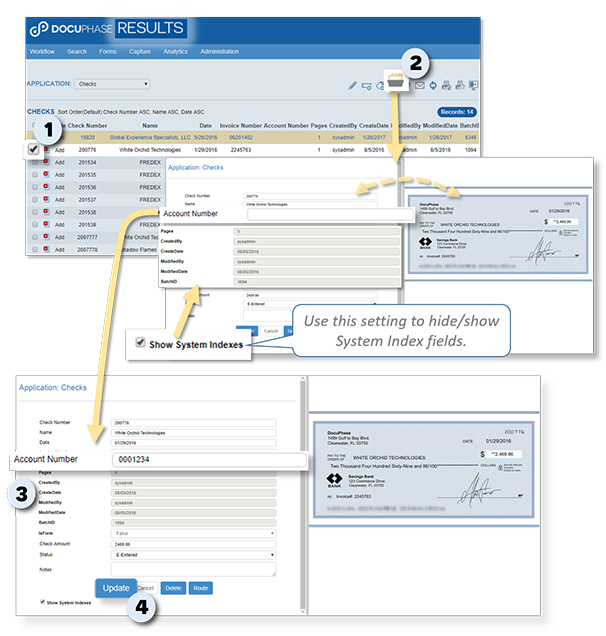
You can add/edit/change Index values (i.e., the data entered in an Index field) for a Document at any time.
EXAMPLE
Let's say a Document was Indexed but the Account Number was not entered. You can go back at any time and add that account number; if it was entered incorrectly, you can go back and correct it at any time. See example image here.
NOTES
- You can edit multiple Indexes at once. Tell me more...
- Index values are available for editing except when one of the following conditions applies:
- they are System Indexes.
- the Document has already been checked out (i.e., locked ) by another User.
- you do not have permissions within the system to do this. If you believe you should have access to this functionality, but do not, please contact your TPOC.
- When a Document has been checked out by another User, the
 icon appears next to the File Type icon in the Results list.
From the Search Results list:
1) Select the Document containing the Index(es) you need to change/add.
2) Click to display the selected Document, along with its currently set Indexes.
TIP
You can de-select the Show System Indexes (at the bottom of the Indexing screen) to hide the uneditable System Index fields.
3) Make changes as needed.
4) Click  to save the changes (and unlock the Document for other Users).
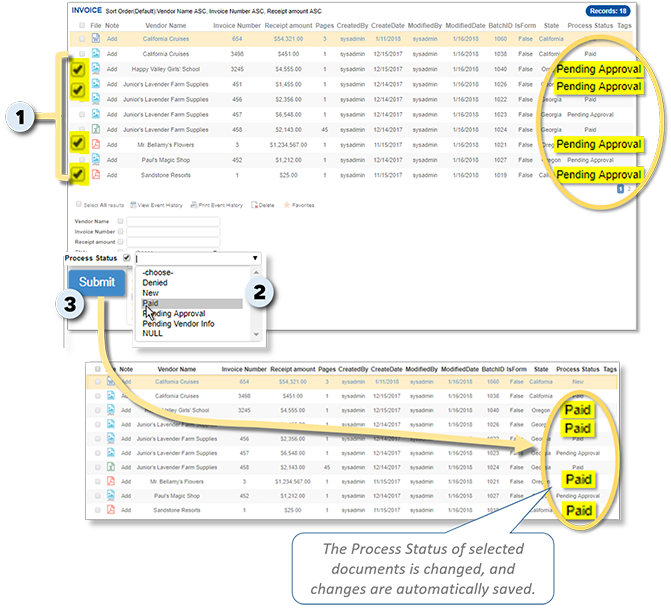
This feature allows you to simultaneously change data appearing into two or more (of the same) Indexes used within multiple Documents (i.e., instead of having to make the same change on several Documents, all Documents can be changed at the same time.
EXAMPLE
Let's say you need to change several invoices from "Pending" status to "Paid"; instead of having to make the change one Document at a time, you can select all the invoices that need to be changed, select the appropriate status, then click to make that change in all of the selected Documents at one time.
NOTE
- Because the ability to use this feature is based on permissions and access to various Applications, you'll know if you have it if you see the Multi-Edit Index fields at the bottom of the window. Show me...
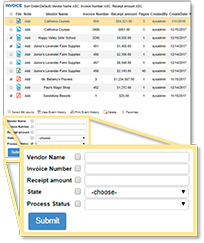
- Multi-Edit accessibility is made on a PER INDEX basis; therefore, not all Indexes within an Application are necessarily available for Mutli-Editing capability.
In the Search Results List:
1) Select ![]() the Documents that need changes made to one or more Indexes.
the Documents that need changes made to one or more Indexes.
In the Multi-Edit Index field(s):
2) Select/Enter the new value you want to apply to the selected Documents (e.g., Process Status).
3) Click  to make and save the designated change(s).
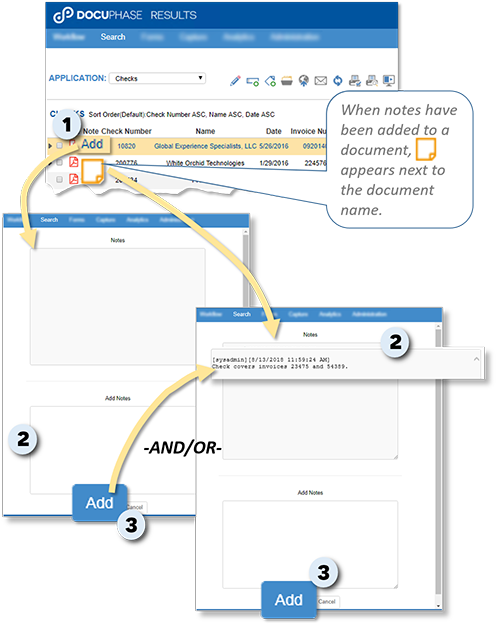
If you have Applications Permissions that allow you to do so, you can view and add Notes to a Document (e.g., reminders as to what the Document relates, associated contact names, etc.).
EXAMPLE
- "This purchase order was submitted by Suzy in HR."
- "Client has promised payment within 60 days. If there are questions, contact David P in Sales."
- "Check covers invoices 23475 and 54389."
NOTE
While you can always add notes, notes that are already saved to a Document cannot be edited or removed from the Document. The only time notes are deleted is if/when the Document itself is deleted
On the Search Results screen:
If no notes exist yet:
1) Click Add next to the name of the Document for which you want to add notes.
- Any notes which may have already been added to the designated Document appear in a new window, and an Add Notes field appears.
OR
If notes have already been added to a Document:
Click ![]() next to the name of the Document for which you want to view and/or add notes.
next to the name of the Document for which you want to view and/or add notes.
2) Review and/or enter notes, as needed.
3) Click  to save the notes to the designated Document.
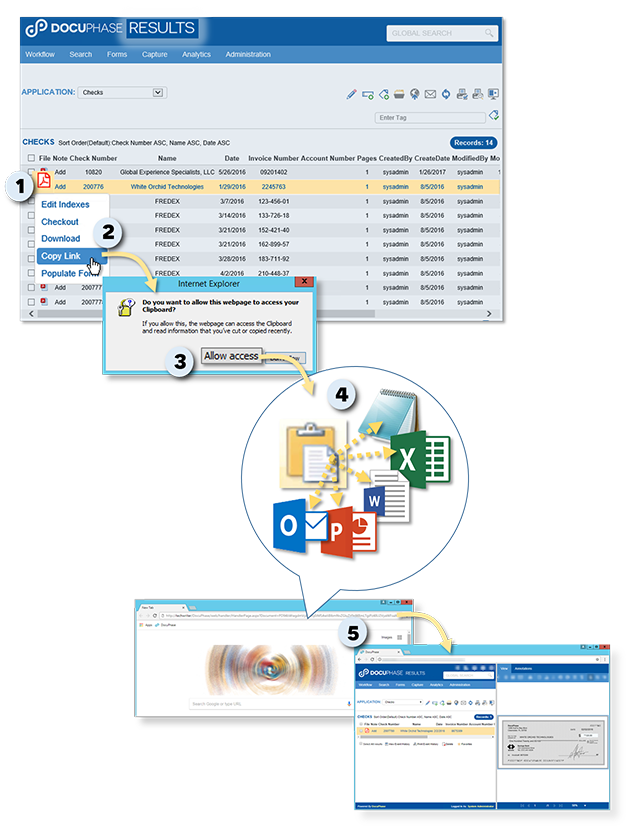
You can copy and save/send a link to a Document to make it easier to find and access the Document (without having to do a search).
NOTE
Only other Users with access to DocuPhase, the Document's corresponding Application, and the Document can use the link to view the Document.
From the Results list:
1) Right-click on the File Type icon for the file you want to download to display a sub-menu of options.
From the Sub-menu:
2) Select the Copy Link option to display a browser confirmation prompt asking for Access to your clipboard.
3) Click  to copy the link to your device's clipboard.
To Use the Link In an Email or Document:
4) Paste the link into an email or a Document and send/save it.
OR
To Use the Link from its Pasted Location:
5) Copy the link and paste it into your browser, then press Enter to display the DocuPhaseViewer.
IMPORTANT!
This feature requires specific configuration. If you don't see a Definition as described in step 4 below, please contact your TPOC.
NOTE
The terms "Export" and "Transfer" are used interchangeably in this context.
On the Search Results screen:
1) Select the Application containing the Documents/Data you want to transfer to another location.
From the list of files:
2) Select the Documents to be exported.
In the upper right corner of the screen:
3) Find and click ![]() to display the configuration Definition screen.
to display the configuration Definition screen.
From the Definition field on the configuration Definition screen:
4) Select the correct definition from the list.
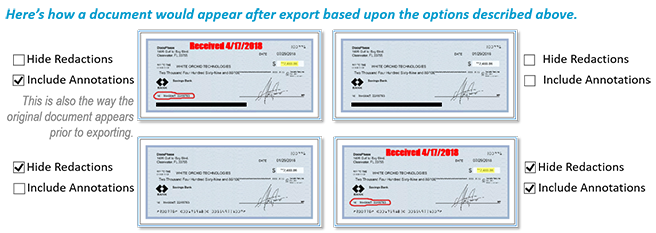
5) Enable (![]() ) the Hide Redactions and/or Include Annotations options, as needed.
) the Hide Redactions and/or Include Annotations options, as needed.
- Selecting Hide Redactions removes the redactions so that the Documents that have been transferred show all text instead of text with redactions intact (covered or unreadable text). If you want information in the selected Documents to remain hidden or unreadable, do NOT enable this option.
- Selecting Include Annotations simply means that any/all Annotations that have been applied to the selected Documents are included and viewable on the transferred Documents/Data.
TIP
When all selections have been completed:
6) Click  to Export the selected Documents/Data and display the Export Results screen.
TIPS
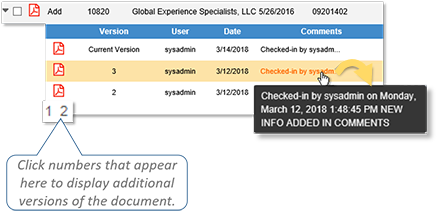
- You can move the mouse over the comments in the list to view more information about each.
- If you see numbers in the lower left corner of the version list, it indicates that there are additional versions. Click on one of the numbers to display more of the list of versions.
1) Search for and find the Document with a version you want to view.
TIP
The ![]() icon appears next to any Document that has multiple versions.
icon appears next to any Document that has multiple versions.
To View a Previous Version:
In the Search Results List:
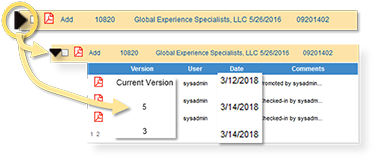
2) Click ![]() next to the file to display a list of versions that have been saved for the Document.
next to the file to display a list of versions that have been saved for the Document.
3) Click the file icon next to the version you want to view to display it in the Viewer.
NOTE
Depending upon the size of a Document, it may take several seconds to load.
and/or
To (Restore as Current) Promote a Previous Version:
In the Search Results list:
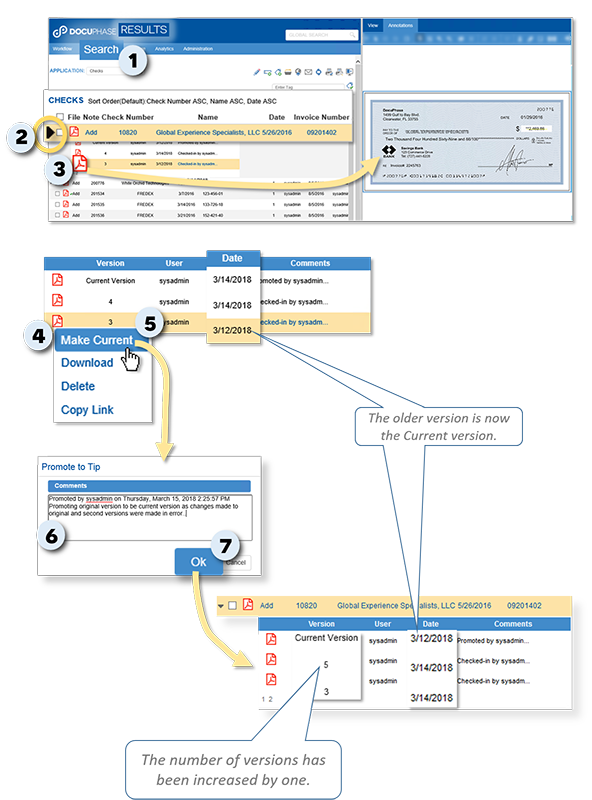
4) Find and right-click on the version you want to use as the most current version (i.e.,"promote").
- A list of options is displayed.
From the list of options:
5) Select Make Current to display the Promote to Top dialog.
In the Promote to Top dialog:
6) Enter notes about why you promoted the Document (e.g., changes to previous versions made in error, etc.).
7) Click to close the dialog, and complete the promotion.
- The promoted Document now appears as the Current version.
- A copy of the original Document is maintained on its own, in addition to it now being the Current version. Therefore, the number of versions (copies) of the Document is increased by one.
NOTES