Editing Links for iLink (Link Editor)
The Link Editor is used for both defining and editing links. Some options are available only when Editing an existing links and some only in very specific cases. In addition, some of the Editing options for target Application Links may differ from target Web Links.
Tell me about...
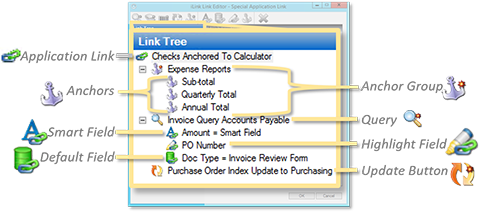
The iLinkLink Editor Link Tree provides a hierarchical view so that you can quickly see and navigate through the various properties of each defined link (e.g., links, anchors, anchor Groups, buttons, etc.). Each time one of these elements is added, it appears within the Link Tree. You can select elements in order to add to them specifically, as well as to edit or remove them.
Depending on which item is selected in the Link Tree, the Toolbar adjusts to display corresponding options available for that item (for example, an Application Link has more available options than does a Web Link). Specific tool icons appear in gray, indicating that they are not available for the current selection in the Link Tree.
An icon appears next to each item within the Link Tree to indicate the relevance of each link.
| Field/Option | For New (N) or Existing (E) Link? | Use it to... |
|---|---|---|
| APPLICATION AND WEB LINK EDITOR TOOLS | ||
|
|
N/E | create a predefined query (i.e., search) button on a target Application or web-page. You can then use this button to search and retrieve Documents from DocuPhase that correspond to the search criteria designated for this button.
NOTE
|
|
|
N/E | add a Scan button that launches ScanDox from the target third-party Application or web page. When ScanDox is launched with a Scan button, its Smart Field definitions extract information from the target Application window: automatically filling the corresponding ScanDox Index fields, making a Document ready for Indexing to be completed and submitted to DocuPhase.
NOTE
|
|
|
N/E | add a Barcode button that launches the DocuPhaseBarCoder. You can define Smart Fields to extract information and automatically fill designated Document Index fields. Once configured, the Barcode button launches the BarCoder tool, and displays the extracted information in a printable barcode format.
NOTEOnly available when if you have access to BarCoder. Tell me more... |
|
|
N/E |
configure and use this button to extract specifically defined data (from a target Application or Web Page), then use that information to automatically update corresponding Indexes within a DocuPhase Application. |
|
|
E | create a new Anchor Group that provides a way to categorize and organize set Anchors. |
|
|
E
APPLICATION LINKS ONLY |
add an anchor to an Anchor Group, and reference a specific area of a target window. Basically this tells the system when to show the button within the Anchor area.
NOTEYou must create an Anchor Group prior to using this tool in order to add an anchor. |
|
|
E | associate a Smart Field with a button (i.e., Query, Scan, or Barcode), then designate values from a target Application or Web Page to populate specified Indexes within a DocuPhase Application. In other words, this option allows you use information contained in a third-party Application or Web page to update Indexes within DocuPhase. Tell me more...
IMPORTANT!The values designated are/must be based on the Indexes within the DocuPhase Application. NOTEOnce you have added and set up a Smart Field, you need click on the target window, then click and drag |
|
|
E | associate a DocuPhase Index with a constant default value. By using a Default Link Field, you can pre-set this part of the necessary search criteria, or establish a pre-set value when updating a Document’s Index fields.
EXAMPLEFor example, if a specific date was important, the default field could be added to always return Documents with that date. BEST PRACTICESThe following guidelines are recommended when adding/using a Default Link Field:
TIPS
Other Index fields such as amounts or names are less likely to have a Default Link Field since they can have a virtually unlimited range of values as their default value: except in cases where there is a need to define a specific value such as zero, one, blank or Null. In this way, a Query Button search can be pre-qualified to only look for a particular type of DocuPhase Document, or Documents with a specific Status code.
|
|
|
E | highlight text within a target Application or Web page, then use a specially configured Hot Key combination to extract the highlighted data and use it to update corresponding Index values within DocuPhase Applications.
NOTEA Highlighted Field can only have one associated Hot Key combination. TIPYou can use Highlight Fields for fields that may change position if/when a window is re-sized. When a window is re-sized, these fields may suddenly disappear behind other elements on the display: making it impossible to use unless the window is maximized. By using a Highlight Field, you can use a Hot Key combination to effect an action without needing to see the field itself. |
|
|
E | delete (remove) a selected item from the Tree Link.
WARNING!!!Use this deletion functionality with care. Once you delete an item from this list, you cannot recover it. If you inadvertently delete an item, you will need to re-add it. |
 to the target field within the target window. This is the field that is now associated with the corresponding Index in
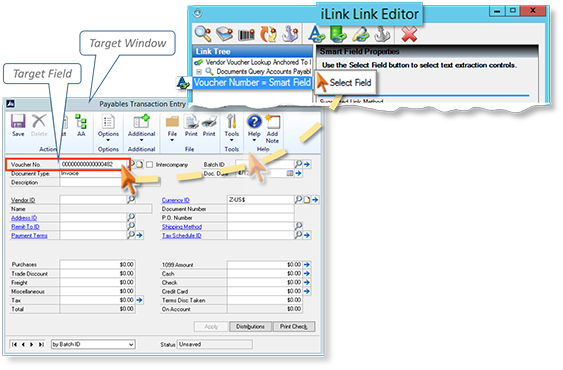

| Field/Option | Use it to... |
|---|---|
| DocuPhase (Index) | select the DocuPhase Index Field you want filled with the highlighted extracted data associated to the defined hotkey combination. |
| Key Options | define the hotkey combinations using the Shift, Ctrl, or Alt key with alpha characters, numbers, and function keys.
NOTEBefore you set the Key Options, you must have text already highlighted for extraction in the target Application or Web Page. |
|
Read-Only Field |
view the currently designated key combination. |
NOTE
Buttons stay within the Link Form/Anchor window regardless of where you drag them.
BEST PRACTICE
It is recommended that you not have multiple active iLink definitions within the same target window (and Link From), as these may result in data conflicts and/or run-time issues.
| Field/Option | Use it to... |
|---|---|
| Button Name | define a unique, descriptive identifier for the web link. |
| DocuPhase App | select the DocuPhase Application that corresponds to the link you are creating. |
| Action | specify the operation that you want this link to perform:
NOTENo matter which of these actions are associated with the original link/button, you can change it using this option (e.g., you can turn a Query button into an Update button - with its corresponding action). |
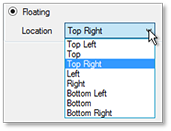
| Button Placement | specify the location of the button:
For Application Links
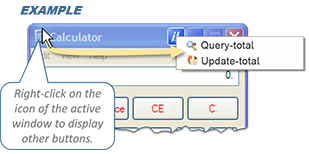
NOTEYou can create multiple iLink buttons; however, only one button at a time can be accessed in the Control Box button on the target window. To access all associated buttons, right click on the icon of the active window to display any additional buttons. For Web Links
|
| Anchor Group APPLICATION LINKS ONLY | select the Anchor Group to which you want to add this link, if appropriate.
NOTEYou must create an Anchor Group prior to making this selection. |
| Field/Option | Use it to... |
|---|---|
| APPLICATION LINKS | |
| Form Name | easily identify and select the appropriate link for additional settings and edits.
TIPThis is the unique identifier displayed in the list of links ( |
| Match Anchor Text | customize the title of the target window of an Application, and provide an alias in the corresponding text field. The content of the corresponding text field depends upon the option you choose:
*Allows you to directly enter or edit an alias title, as needed. |
| Selected Window TypeRead-Only Field - | confirm that the target window is the top/active window. |
| Match Window Executable Name | automatically link to the executable name of the target Application.
EXAMPLEIf you have linked to a Microsoft Word Document, if this field has been selected, iLink will only display for windows from winword.exe. NOTES
|
| Poll for Window Changes | turn on polling to help iLink track windows for possible or relevant events. |
| Alternative Screen Reader Mode | use the DocuPhase Legacy Viewer instead of the iLinkScreen Reader.
NOTEThe Legacy Viewer is only available when accessing the DocuPhase via Internet Explorer (IE). |
| WEB LINKS | |
| Web Page Link Name | easily identify and select the appropriate link for additional settings and edits.
TIPThis is the unique identifier that is displayed in the list of links ( |
| Available Pages | view a list of any web pages open in an active browser on your workstation. |
|
|
refresh the available web pages (listed in the drop down menu) that are currently active on your workstation. |
| Page Title | customize the title of the target window of a web link and provide an alias in the corresponding text box. The content of the corresponding text field depends upon the option you choose:
*Allows you to directly enter or edit an alias title, as needed. |
| Page URL | customize the URL of the target web link and provide an alias in the corresponding text box. The content of the corresponding text field depends upon the option you choose:
*Allows you to directly enter or edit an alias title, as needed. |
| Dynamic Page | enable ( |
| Field/Option | Use it to... |
|---|---|

|
select a field in the active target window from which you want data extracted.
NOTEOnce you have added and set up a Smart Field, you need click on the target window, then click and drag TIPOnce you click on this button, the anchor cursor appears as you hover over fields, controls, and areas in the target window. These areas turn orange to indicate that they are for data extraction and for the corresponding DocuPhase Index field. |
| Suggested Link Method | define how a target source (i.e., Application or web page) is accessed, and display the text value from a selected field. Each of the methods (described below) displays the sample Text Value extracted. As they are selected with the field area is defined in the linked target’s window, and shows the unfiltered results of this extraction; this ensures that the proper extract options and location are specified.
BEST PRACTICEIt's recommended that you use Anchor Groups and Anchor Buttons for complex target windows that have multiple tabs and/or sections. This allows for more effective management of buttons and extraction of data. |
| Use Screen Reader | enable ( |
| DocuPhase (Index) | choose the DocuPhase Index to associate with the Smart Field; the information extracted from the Smart Field populates the associated DocuPhase Index that is selected here. |
| SCREEN READER | |
| Screen Reader |
view the extracted text and its selected location for a Smart Field set up in a the target window of an Application.
TIPClick |
| Extracted Text | show the actual value in the specified Index. This is the text that is used to populate corresponding fields in DocuPhase. |
| Selection | set the placement(i.e., x and y) and size(i.e., width and height) of the Smart Field on the target window. |
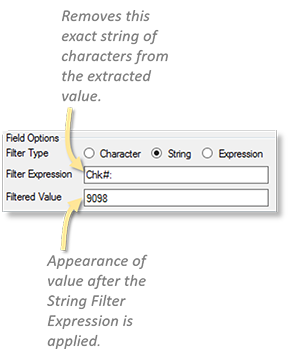
| Field Options | define Filters for the information being extracted. This allows you to find and view specific information as you need it. You can filter the information using the following options in both the Link Editor and Screen Reader windows.
|
 to display the
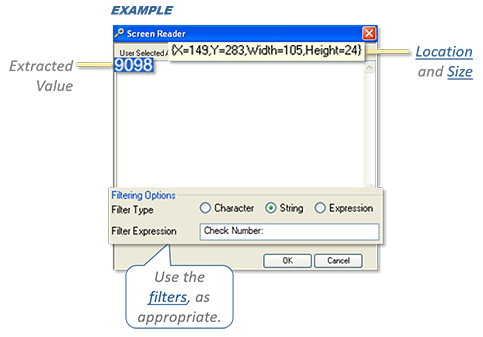
 to the clear the extracted text from the
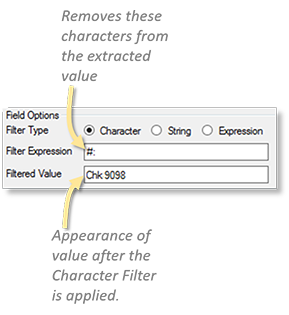
Tell me how to...
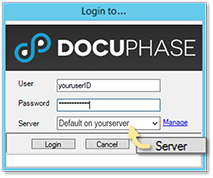
Generally, when you access a tool (e.g., License Manager, iLink, iAlerts, Full Text Manager, etc.) to display the Login dialog, the server is already designated. However, if this has not been set up, you can do so by following the TIPS and steps below:
TIPS
- If the Server field is not visible, click
 to display it.
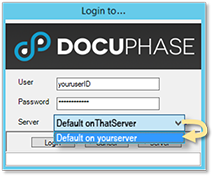
- If multiple Servers are available for the License Manager, and one has already been designated, you can change that server by clicking on the Server drop-down menu for a list of configured servers.
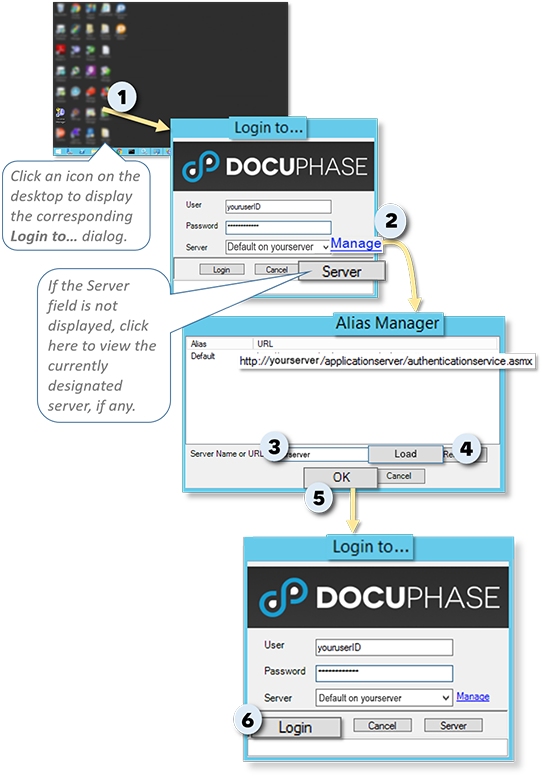
On your desktop:
1) Double-click the appropriate icon (e.g., ![]() or
or ![]() , etc.) to display the corresponding Login to... dialog .
, etc.) to display the corresponding Login to... dialog .
If the Server field is empty:
2) Click Manage to display the Alias Manager window.
In the Server Name or URL field of the Alias Manager window:
3) Enter the name of the server on which the designated tool currently resides.
4) Click  to add it to the list of Servers in the list.
5) Click  to return to the Sign In window.
On the Sign In window:
6) Enter your User ID and password, then click  to display the first page of the designated tool on the designated server.
The procedure described below allows you to set the main link to a target Application or web page. This basically sets an overall framework in which you can begin adding buttons and fields, as needed.
On your desktop:
1) Open the target window in which you want to link DocuPhase(e.g., QuickBooks, Dynamics GP, MS Word, etc.).
In the Application Linker dialog of iLink:
2) Select the tab that corresponds to the link you want to add (i.e., Application vs Web).
At the bottom of the dialog:
3) Click  to display the Link Editor dialog.
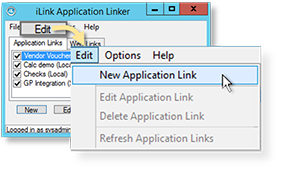
TIP
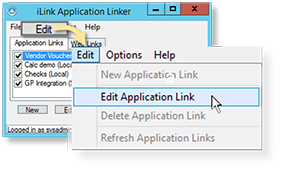
You can also access the Link Editor dialog by clicking theNew (Application/Web) Link from the Edit menu at the top of the Application Linker dialog of iLink:
In the Link Editor dialog:
In the Form Properties pane:
4) Enter a name for the new Link.
On your desktop:
5) Click on the target Application window (you opened in step 1) to make the window active.
In the Link Editor dialog:
In the Form Properties pane:
6) Click and drag  to the corner of the target window to create the Link Form between that target and DocuPhase.
7) Complete the settings for the new Link Form, Tell me more...
When all settings are complete:
8) Click to store the settings, close the Editor, and return to the Linker window.
TIP
You can now edit the new Link(e.g., add buttons, etc.) as needed. Tell me more...

The procedure described below shows you how to make changes to an existing Application or Web Link:.
On your desktop:
1) Open the target window for which you want to edit a link DocuPhase(e.g., QuickBooks, Dynamics GP, MS Word, etc.).
In the Application/Web Linker dialog of iLink:
2) Select the tab that corresponds to the link you want to change(i.e., Application vs Web).
3) Select the Link you want to change.
At the bottom of the dialog:
4) Click  to display the Link Editor dialog.
TIP
You can also access the Link Editor dialog by clicking theEdit (Application/Web) Link from the Edit menu at the top of the Application Linker dialog of iLink:
To add/change Link Properties:
In the Link Editor dialog:
In the Form Properties pane:
5) Complete the settings for the new Link Form, Tell me more...
To add/change an Anchor:
On your desktop:
6) Click on the target Application window (you opened in step 1) to make the window active.
In the Link Editor dialog:
In the Form Properties pane:
7) Click and drag to the corner of the target window to create the Link Form between that target and DocuPhase.
When all settings are complete:
8) Click to store the settings, close the Editor, and return to the Linker window.

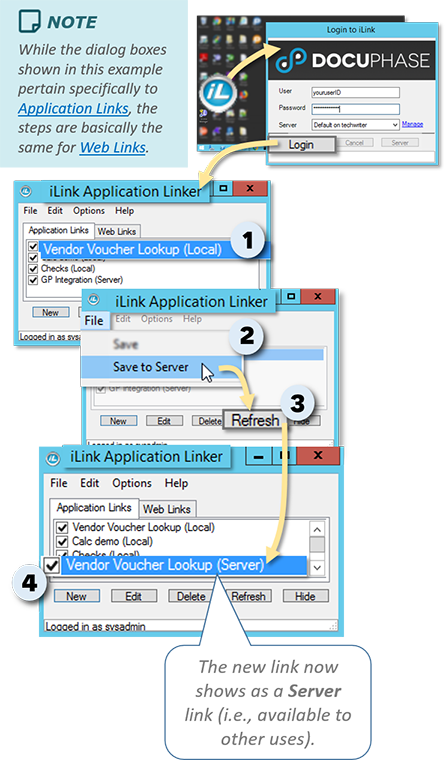
In the iLink Application Linker window:
1) Highlight the Link you want to make available to other Users.
In the File menu:
2) Select Save to Server.
At the bottom of the Application Linker window:
3) Click  to update the list of links and display the new link.
- A copy of the selected link from step 1 appears at the bottom of the list with the word "Server" next to it: indicating that this link can now be made available to other Users (see step 4).
In the list of Links:
4) Enable ![]() the Server link(s) you want to make available to all Users.
the Server link(s) you want to make available to all Users.
NOTE
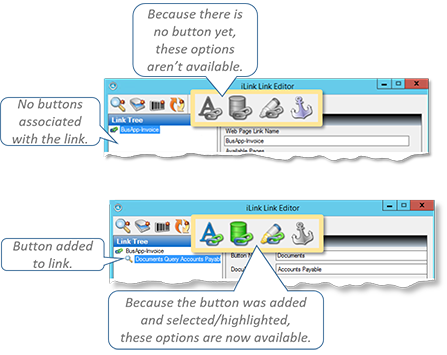
- Before attempting to add a button (Query, Scan, Barcode, or Update), field (i.e., Smart Field, Default Field, Highlight Field), and/or Anchor Group (with/without Anchors) to a target window, you must create the initial Link Form. Tell me more...
- Before you add a field to a link, you must first add a button. Field tools in the toolbar are not available until you create, then select a button.
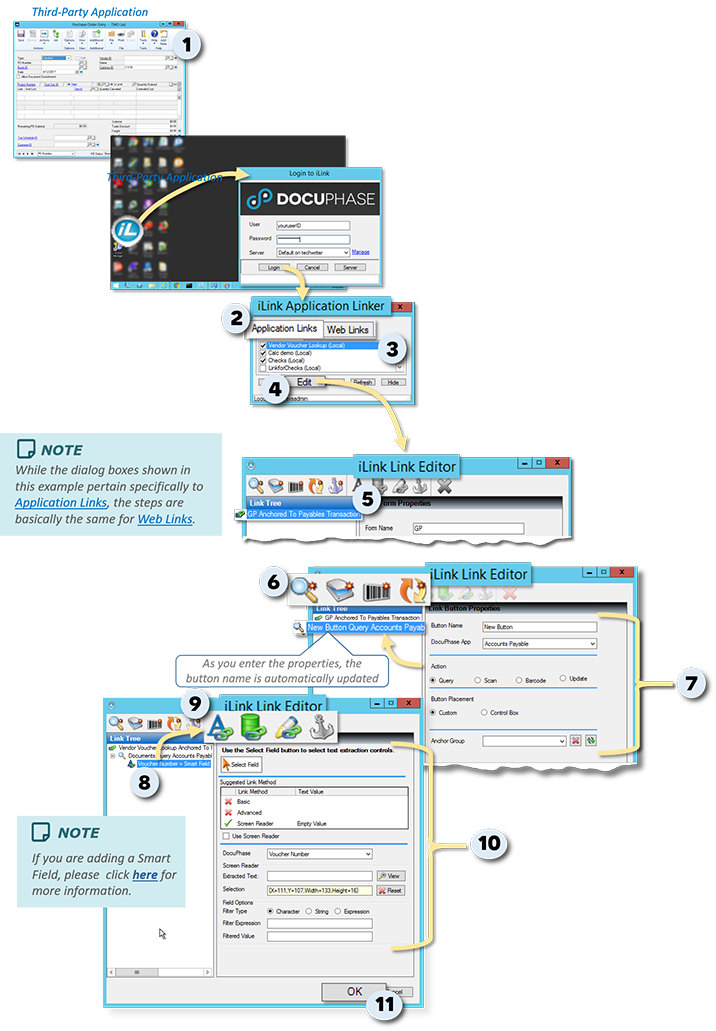
On your desktop:
1) If it isn't already, open the target Application or web page already associated with the link to which you want to add buttons or fields.
In the Application Linker dialog of iLink:
2) Select the tab that corresponds to the link to which you want to add elements (i.e., Application vs Web).
In the list of links:
3) Select/Highlight the link to which you want to add elements.
At the bottom of the dialog:
4) Click to display the Link Editor dialog.
In the Link Editor dialog:
In the Link Tree:
5) Select/Highlight the existing Form Link.
From the Toolbar:
6) Click on the button you want to add to the Link Tree (e.g., ![]() ).
).
In the Link Button Properties pane:
7) Enter/Select button properties, as appropriate. Tell me more...
- As you enter it, the button name is automatically updated in the Link Tree.
In the Link Tree:
8) Select/Highlight the button to which you want to add (or change) elements (e.g., fields).
From the Toolbar:
9) Click on the field you want to add to the button (e.g.,![]() ).
).
In the Properties pane:
10) Enter/Select properties, as appropriate for any of the following:
Repeat steps 5 through 8 for each button and its elements you want to add to the currently displayed Link Form.
When all settings are complete:
11) Click to store the settings, close the Editor, and return to the Linker window.
NOTE
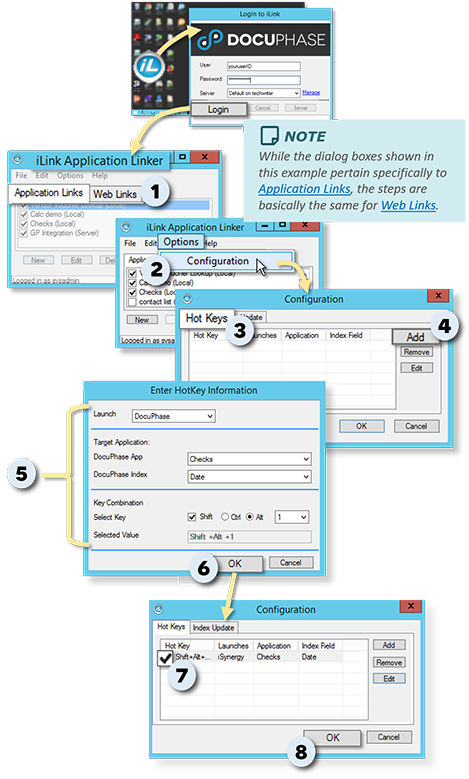
Only one target (i.e., combined Application and Index) can be set for each Hot Key combination.
On the Application Linker dialog of iLink:
1) Select the tab that corresponds to the Hot Key you want to add (i.e., Application vs Web).
From the Options menu:
2) Select Configuration to display the corresponding dialog.
In the Configuration dialog:
3) Make sure the Hot Keys tab is selected.
4) Click  to display the Hot Key Information dialog.
5) Select information in the fields as described below:
| In this field: | Select... |
|---|---|
| Launch | the DocuPhase Platform component you want searched when using this Hot Key (i.e., DocuPhase, ScanDox, or BarCoder. |
| TARGET APPLICATION | |
| DocuPhase App | the Application containing the Index you want to use for search purposes. |
| DocuPhase Index | the Index you want to use to search for the selected value. |
| KEY COMBINATION | |
| Select Key | the combination of keys on the keyboard you'd like to assign to the Target Application settings. |
| Selected Value | READ-ONLY field - displays the selected key combination. |
When all settings are complete:
6) Click to store the new Hot Key, close the dialog. and return to the Configurationwindow.
Repeat steps 4 through 6 to add additional Hot Keys.
and/or
When you have added all the currently required Hot Keys:
In the Configuration window:
7) Enable ![]() the Hot Keys you want to have available when using iLink.
the Hot Keys you want to have available when using iLink.
8) Click to close the Configuration, and return to the iLink Application Linkerwindow.
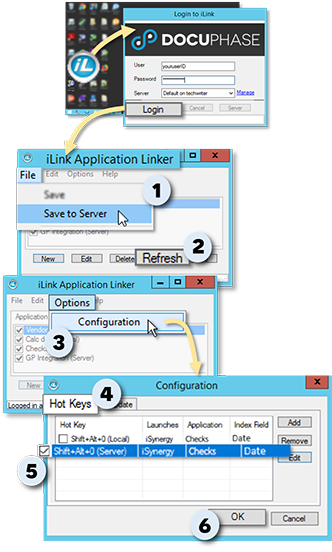
From the iLink Application Linker window:
In the File menu
1) Select Save to Server.
At the bottom of the Application Linker window:
2) Click to update the setting.
From the Options menu:
3) Select Configuration to display the corresponding dialog.
In the Configuration dialog:
4) Make sure the Hot Keys tab is selected.
- A copy of the newly added Hot Key combination appears in the list with the word "Server" next to it: indicating that this combination can be made available to all Users (see step 5).
5) Enable ![]() the Hot Keys you want to make available to all Users.
the Hot Keys you want to make available to all Users.
6) Click to store the setting(s).
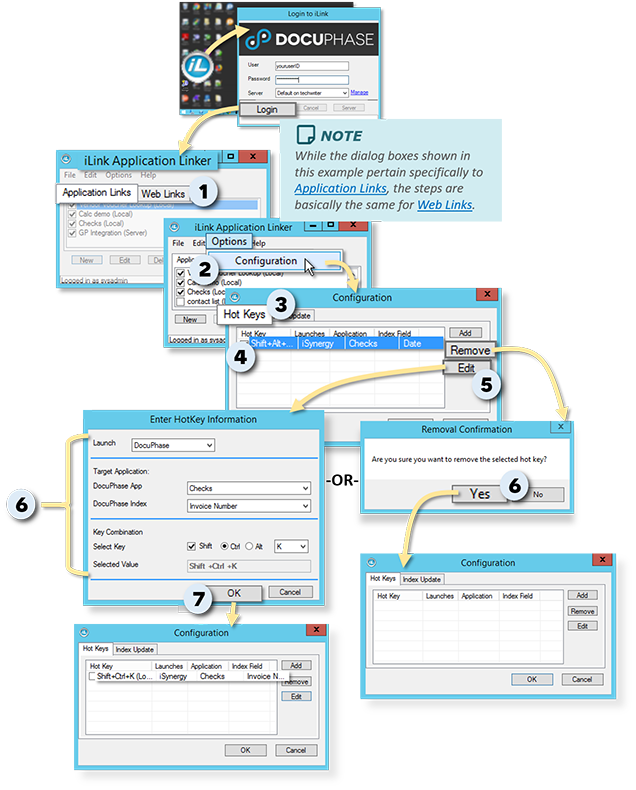
WARNING!!!
Use this deletion functionality with care. Once you delete an item from this list, you cannot recover it. If you inadvertently delete an item, you will need to re-add it.
On the Application Linker dialog of iLink:
1) Select the tab that corresponds to the Hot Key you want to edit or delete (i.e., Application vs Web).
From the Options menu:
2) Select Configuration to display the corresponding dialog.
In the Configuration dialog:
3) Make sure the Hot Keys tab is selected.
4) Select/Highlight the Hot Key you want to edit or delete.
To Edit the Hot Key:
5) Click to display the Hot Key Information dialog for the selected key.
6) Change information in the fields, as needed:
| In this field: | Select... |
|---|---|
| Launch | the DocuPhase Platform component you want searched when using this Hot Key (i.e., DocuPhase, ScanDox, or BarCoder. |
| TARGET APPLICATION | |
| DocuPhase App | the Application containing the Index you want to use for search purposes. |
| DocuPhase Index | the Index you want to use to search for the selected value. |
| KEY COMBINATION | |
| Select Key | the combination of keys on the keyboard you'd like to assign to the Target Application settings. |
| Selected Value | READ-ONLY field - displays the selected key combination. |
7) Click to store the settings, close the dialog, and return to the Configuration window.
- The changes are now displayed in the list.
or
To Delete the Hot Key:
5) Click  to display a confirmation prompt asking you to make sure you want to remove the selected Hot Key.
6) Click  to delete the selected Hot Key, close the prompt, and return to the Configuration window.
- The deleted Hot Key combination no longer appears in the list.
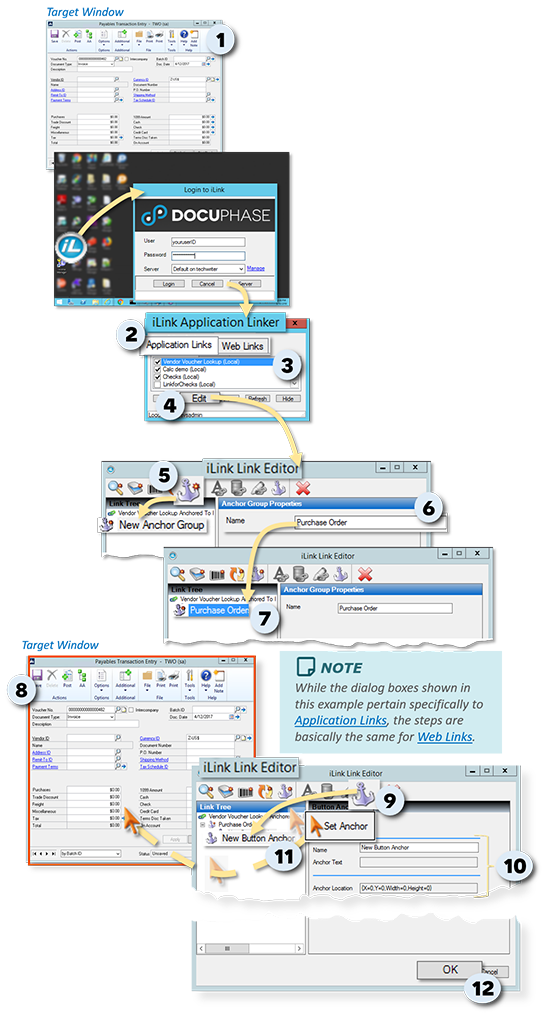
On your desktop:
1) Open the third-party Application or web page for which you want to create an anchor Group.
In the Application Linker dialog of iLink:
2) Select the tab that corresponds to the link to which you want to add the Anchor Group (i.e., Application vs Web).
In the list of links:
3) Highlight the link to which you want to add elements.
At the bottom of the dialog:
4) Click to display the Link Editor dialog.
In the Link Editor dialog:
From the Toolbar:
5) Click ![]() to add an Anchor Group to the Tree Link pane and display the Anchor Group Properties pane.
to add an Anchor Group to the Tree Link pane and display the Anchor Group Properties pane.
In the Anchor Group Properties pane:
6) Enter a unique but descriptive name for the new Anchor Group.
In the Tree Link pane:
7) Select/Highlight the Anchor Group to which you want to now add Anchors.
On your desktop:
8) Click on the target Application window (you opened in step 1) to make the window active.
In the Link Editor dialog:
In the Toolbar of the Editor window:
9) Click ![]() to add an Anchor to the selected Group in the Link Tree.
to add an Anchor to the selected Group in the Link Tree.
10) Select/Enter Anchor Properties, as appropriate.
11) Click and drag ![]() to the location in the target window at which you want the Anchor to be.
to the location in the target window at which you want the Anchor to be.
Repeat steps 7 through 11 for each Anchor you want to add to the selected Group.
Repeat steps 5 through 11 for each Anchor Group you want to add to the Link Form.
When all the settings are complete:
12) Click to save the settings.
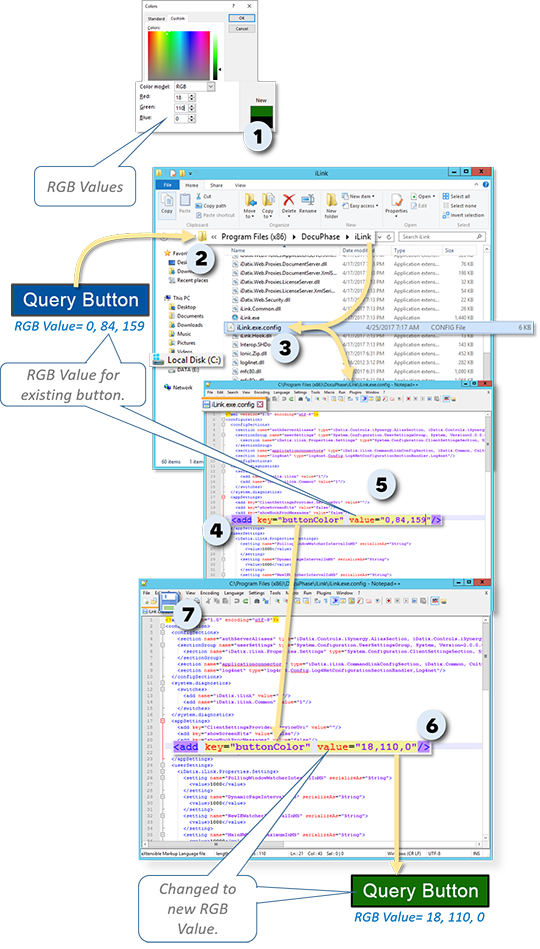
You can change the color of a button via the iLink Config file:
1) Find the RGB values for the color you want the button to be:
In Windows Explorer:
2) Go to C:\Program Files (x86)\DocuPhase\iLink.
3) Find and open the iLink.exe.config.
IMPORTANT!
Be sure to open this file using a pure text Application (e.g., Notepad or Notepad++). Editing a configuration file in any other type of Application could prevent the configuration file from working properly.
In the iLink.exe.config file:
4) Find the button color reference.
In the line of code for the button color:
5) Look for three, comma-separated values that appear after the value= reference.
6) Replace the numbers with the numbers that correspond to the RGB color you want the button to be.
At the top of the window:
7) Click ![]() to save the file to store the settings and change the color of the button as defined.
to save the file to store the settings and change the color of the button as defined.