Managing and Monitoring Full Text Processes (Full Text Manager)
The Full Text Manager is used to select which Application files are processed, as well as to monitor the status and progress of those files. Specifically, you can do all of the following within Full Text Manager:
- Enable Applications: making the Documents within those Applications eligible for processing by the Full Text Indexer
- Include revised Documents in the process
- View and filter (refine) the queue of files awaiting processing by the Indexer
- Review and filter the history of Documents that have already been processed (or failed to be processed and why)
NOTE
When an Application has been enabled for Full Text enabled, the Search screen for that Application includes a Full Text Search field that appears as an element of the general DocuPhase Search screen. Tell me more...
Tell me about...
| Menu | Description |
|---|---|
| File |
You can use the options in the File menu to either log off (leave Full Text Manager without closing it, or Exit to close Full Text Manager. |
| Options |
Offers 2 functions:
|
| Help |
review DocuPhase corporate information as well as product version information. |
The Applications tab allows you to choose which DocuPhase Applications you want to include for processing by the Full Text Indexer.
TIP
Remember, when the Full Text Indexer is processing files, you can use  at the bottom of the tab to update the information in the list.
| Element | Description |
|---|---|
| Application (list) |
Provides the list of all the implemented Applications in DocuPhase |
| Full Text Status |
Displays whether (True) or not (False) a specific Application is enabled/included in the Full Text process - and whether or not you want to include Document revisions that exist within the selected Application. |
| Include Revisions |
Indicates whether (True) or not (False) a specific Application that is included in the Full Text process includes Document revisions that exist within the selected Application. NOTEThis option is only available when an Application has been enabled (True) for Full Text processing. |
| Total Record Count |
Lists the number of records (files) within the corresponding DocuPhase Application that have been (or will be) processed for Full Text Indexing. |
| Records in Full Text |
Shows the total number of records (that have been processed by the Full Text Indexer. |
| Documents in Queue |
Shows the number of files waiting to be processed by the Full Text Indexer. |
| Failed Documents |
Indicates the number of files that could not be processed by the Full Text Indexer. |
|
|
As the system processes Documents/Files, use this button to keep the information on this screen up-to-date/in real-time. |
The Queue tab allows you to view information about any files remaining in the queue waiting to be processed by the Full Text Indexer. You can also re-enable or delete Documents from the queue. Once a Document is processed, it appears in the list under the History tab (described below).
TIP
Remember, when the Full Text Indexer is processing files, you can use at the bottom of the tab to update the information in the list.
| Element | Description |
|---|---|
| Application Name |
Shows the Application containing the Document/File that's in the queue. |
| Document ID |
Displays the Document's unique, system-generated identifier used by the system for tracking and reporting purposes. |
| Version Number |
Shows the version number of a revised Document, and is only used when both of the following conditions exist:
NOTEThis column remains blank for Documents that only have one version in the Repository. |
| Server Name |
Indicates the name of the Full Text server on which the corresponding Document/File is being processed. |
| Remaining Retries |
This references the number of times the system will continue to process the corresponding file (e.g., a total number of three times). Each time a file fails processing, the number of retries is reduced. NOTE
|
| Insert Time |
Shows the exact date and time that the file was submitted to Full Text Indexer. |
| Start Time |
Provides the exact time and date that Full Text processing of a file actually began. NOTEJust because a Document is inserted/submitted (as described above) for processing does not mean it is immediately processed. |
|
|
As the system processes Documents/Files, use this button to keep the information on this screen up-to-date/in real-time. |
| Filtering Criteria |
If there are a large number of items in the list, you can narrow the number of items shown by using the filtering criteria:
|
Files move from the Queue list into the History list once Full Text Indexing has occurred. You can then use the History tab to view information about any files that were processed (or for those where processing was attempted) by Full Text Indexer.
TIP
Remember, when the Full Text Indexer is processing files, you can use at the bottom of the tab to update the information in the list.
| Element | Description |
|---|---|
| Application Name |
Shows the Application containing the Document/File that was processed. |
| Document ID |
Displays the Document's unique, system-generated identifier used by the system for tracking and reporting purposes. |
| Version Number |
Shows the version number of a revised Document, and is only used when both of the following conditions exist:
NOTEThis column remains blank for Documents that only have one version in the Repository. |
| Server Name |
Indicates the name of the Full Text server on which the corresponding Document/File was processed. NOTEThe server name does not appear for Documents that failed processing. |
| Error Code |
Indicates the file was processed successfully or failed. If it failed, the reason for the failure is displayed (e.g., invalid Document type, Document was checked-out, etc.). TIPS
|
| Insert Time |
Shows the exact date and time that the file was submitted to Full Text Indexer. |
| Start Time |
Provides the exact time and date that Full Text processing of a file actually began. NOTEJust because a Document is inserted/submitted (as described above) for processing does not mean it is immediately processed. |
| End Time |
Indicates the exact date and time a Document completed processing by the Full Text Indexer. |
| Duration |
Displays the length of time (in hh:mm:ss format) it took to process the corresponding Document. |
|
|
As the system processes Documents/Files, use this button to keep the information on this screen up-to-date/in real-time. |
| Filtering Criteria |
If there are a large number of items in the list, you can narrow the number of items shown by using the filtering criteria:
|
| Engine | Description | Available Accuracy vs Speed Settings |
||
|---|---|---|---|---|
| Fast | Accurate | Balanced | ||
| MTX |
|
X | X | X |
| MOR |
|
X | X | X |
| FRX |
|
n/a | n/a | n/a |
|
Voting 2-Way (PLUS 2-way Voting Engine) |
Provides accurate and fast machine print OCR capabilities. | X | X | X |
|
Voting 3-Way (OmniPage 3-way Voting Engine) |
Provides accurate and fast machine print OCR capabilities. | X | X | X |
TIP
You can select a different OCR Engine via the Options menu in Full Text Manager. Tell me more...
Tell me how to...
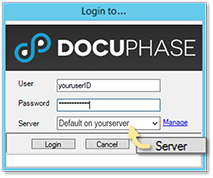
Generally, when you access a tool (e.g., License Manager, iLink, iAlerts, Full Text Manager, etc.) to display the Login dialog, the server is already designated. However, if this has not been set up, you can do so by following the TIPS and steps below:
TIPS
- If the Server field is not visible, click
 to display it.
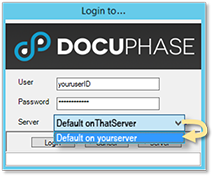
- If multiple Servers are available for the License Manager, and one has already been designated, you can change that server by clicking on the Server drop-down menu for a list of configured servers.
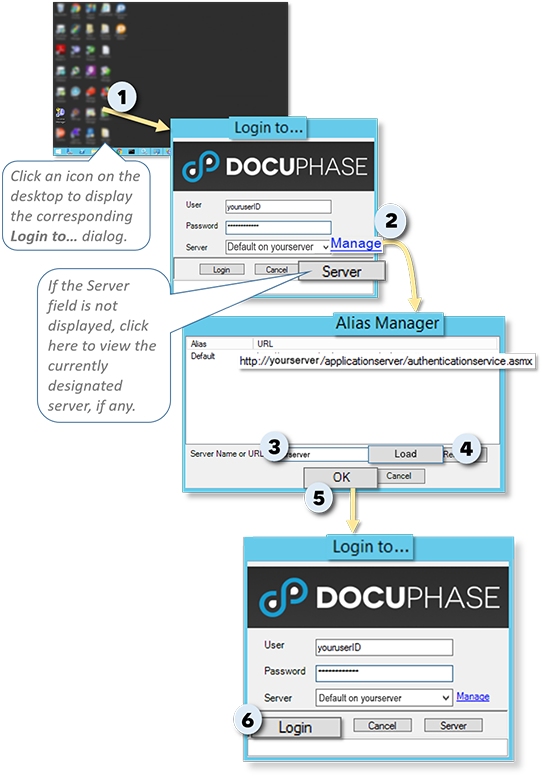
On your desktop:
1) Double-click the appropriate icon (e.g., ![]() or
or ![]() , etc.) to display the corresponding Login to... dialog .
, etc.) to display the corresponding Login to... dialog .
If the Server field is empty:
2) Click Manage to display the Alias Manager window.
In the Server Name or URL field of the Alias Manager window:
3) Enter the name of the server on which the designated tool currently resides.
4) Click  to add it to the list of Servers in the list.
5) Click  to return to the Sign In window.
On the Sign In window:
6) Enter your User ID and password, then click  to display the first page of the designated tool on the designated server.
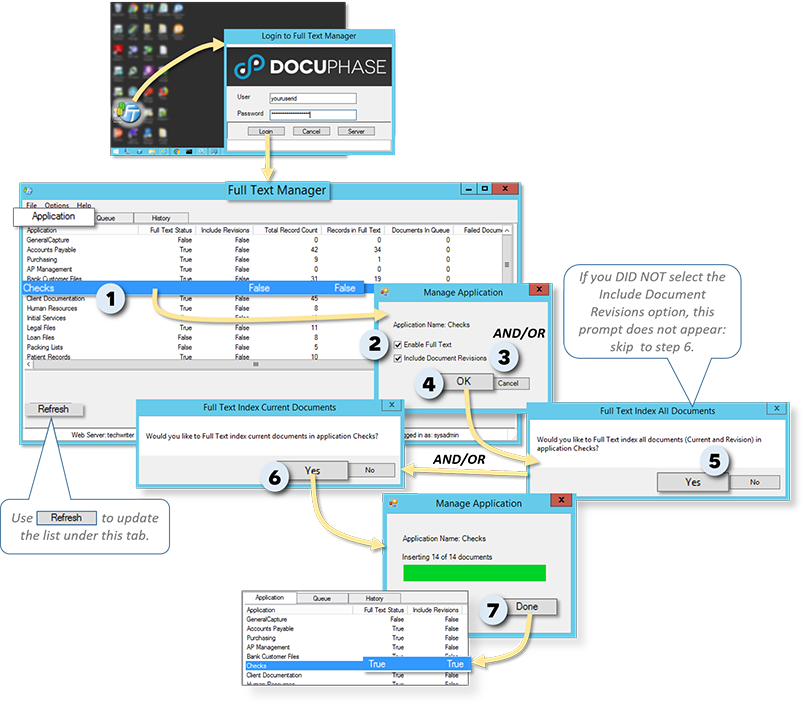
You need to select Applications containing the files you want to process so that the system knows which files to access from the Repository. As with the rest of the DocuPhase Platform Documents/Files are all managed and accessed via the Application(s) in which they reside. If you company is using Revision Control, then you can also enable revised Documents to be included in the processing.
Under the Applications Tab:
1) Locate and double-click on the name of the Application containing the files that you want to process through the Indexer to display the Manage Application dialog.
On the Manage Application dialog:
To process the selected Application's files:
2) Select (![]() ) the Enable Full Text option.
) the Enable Full Text option.
- Once you enable an Application, the Document Revisions option becomes available for selection.
and/or
To have revised Documents included in the Indexer processing:
3) Enable (![]() ) the Include Document Revisions option.
) the Include Document Revisions option.
Repeat steps 1 through 3 for each Application you want to enable.
Once all settings are completed:
4) Click to display a confirmation prompt.
If you selected the Include Document Revisions option, the Full Text Index All Documents (for current Documents and any revisions) prompt appears; go to step 5.
OR
If you did not select the Include Document Revisions option, the Full Text Index Current Documents (for current Documents, but no revisions included) prompt appears; skip to step 6.
On the Full Text Index All Documents prompt:
5) Click  close the prompt and display a second confirmation prompt asking you to confirm that you want to Index current Document residing in the Application.
IMPORTANT!
If you click  the prompt closes; the Application is enabled for Full Text, but revised Documents will not be processed.
and/or
On the Full Text Index Current Documents prompt:
6) Click close the prompt and display a second confirmation prompt asking you to confirmManage Application window showing how many Documents are being inserted (submitted) to the Indexer.
IMPORTANT!
If you click the prompt closes; the Application is enabled for Full Text, but only new Documents will be processed (i.e., any Documents currently existing in the designated Application will be ignored).
On the Manage Application window:
7) Click  to close the window.
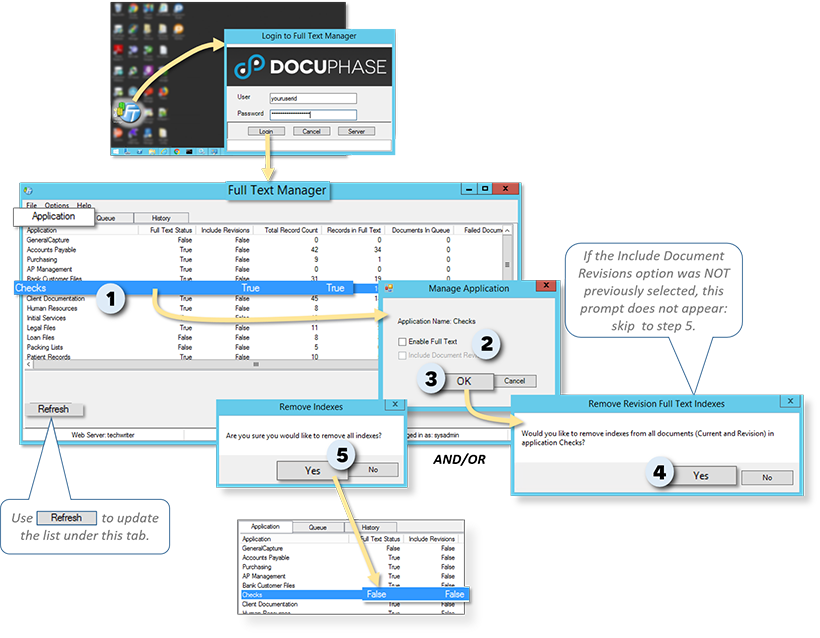
If at some point, you decide that you no longer want to include an Application's files in the Full Text Indexing, you can disable it. When you do this, you can choose to remove the data that has already been extracted by the Indexer or allow it to remain in the Repository (see step 3 below).
Under the Applications Tab:
1) Locate and double-click on the name of the Application containing the files that you remove from the Full Text process and display the Manage Application dialog.
On the Manage Application dialog:
2) Deselect (![]() ) the Enable Full Textoption.
) the Enable Full Textoption.
- If the Include Document Revisions option was selected, this step automatically removes that setting.
IMPORTANT!
To exclude only Document revisions in processing, deselect (![]() ) the Include Document Revisions option.
) the Include Document Revisions option.
Once all settings are completed:
3) Click to display a confirmation prompt.
If the Include Document Revisions option, was previously selected for this Application, the Remove Revision Full Text Indexes (for current Documents and any revisions) prompt appears; go to step 4.
or
If the Include Document Revisions option, was NOT previously selected for this Application, the Remove Indexes (for current Document Indexes only) prompt appears; skip to step 5.
On the Remove Revision Full Text Indexes prompt:
4) Click close the prompt and display a secondary prompt making sure you want to delete the Indexes.
IMPORTANT!
If you click the prompt closes; references remain in the Repository, but the Application and its resident files are disabled (i.e., they are no longer processed by the Indexer).
and/or
On the Remove Indexes prompt:
5) Click to close the prompt, exclude the Application from processing, and return to the Full Text Manager Application tab.
WARNING!!!
Use this feature with care. Once you exclude (disable) an Application, all associated data is removed as well. Therefore, if/when you decide to again include (enable) the Application all of its files are re-processed which adds to overall processing time.
IMPORTANT!
If you click the prompt closes; references remain in the Repository, but the Application and its resident files are disabled (i.e., they are no longer processed by the Indexer).
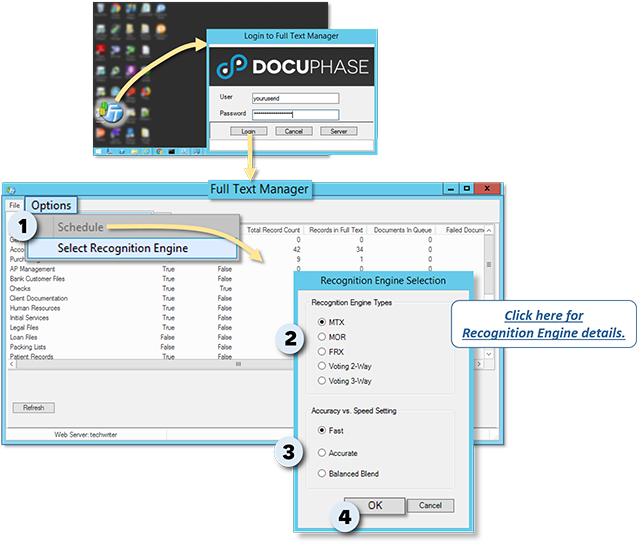
By default, the Indexer uses Scansoft API as its OCR engine to extract text from files; however, you can select a different Recognition Engine to change the speed and/or accuracy of the Indexer process. Tell me more...
From the Full Text Manager Options menu:
1) Select the Select Recognition Engine option to display the corresponding dialog.
In the Recognition Engine Selection dialog:
2) Select the engine you want to use. Tell me more...
- If you have selected FRX as the engine, skip to step 4.
For any Engine except FRX:
3) Select the appropriate Accuracy vs Speed Setting.
Once settings are completed:
4) Click to close the dialog.
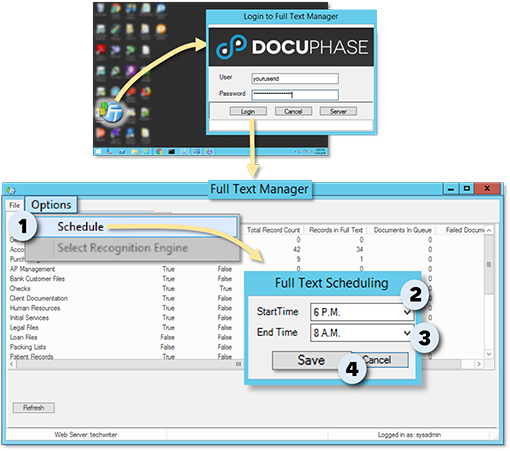
You can set a time for files to start to be processed and/or a time for them to complete processing: allowing processing to take place outside of regular business hours or during a specific time during the day.
From the Full Text Manager Options menu:
1) Select the Schedule option to display the Full Text Scheduling dialog.
In the Full Text Scheduling dialog:
2) Set the time you want processing to begin.
3) Set the time you want processing to end.
WARNING!!!
You should review the throughput and backlog of files to be processed in order to make sure you leave a long enough window of time for all eligible files to be completed. If you do not allow enough time, any Documents that don't make it into the Indexer by the set End Time remain unprocessed.
Once settings are completed:
4) Click  to close the dialog.