Setting Up Email Notifications with iAlerts
iAlerts is an Application provided with DocuPhase that allows you to set up automated notification (either immediate or deferred) to other Users (subscribers) or groups of Users that have access to Applications within the DocuPhase Repository. These notifications provide information to recipients about Work Items that affect them with regard to their job duties. iAlerts also integrates seamlessly with other DocuPhase components such as ScanDox and Xtractor.
EXAMPLE
Let's say your Accounts Payable Supervisor wants to be notified of any/all unpaid vendor invoices over $1,000.00 that are over 30 days old. You can set up a defined set of conditions that tell DocuPhase to send her an email providing the information she needs to securely retrieve such invoices from the DocuPhase Repository. This allows her to proactively manage a specific set of Accounts Payable items.
IMPORTANT!
These settings must be completed in order for the system to generate and send notifications to subscribers. Tell me more...
Tell me about...
| Element | Use it to... |
|---|---|
| MENUS | |
| File |
access the Exit option that closes the iAlerts Manager. |
| Options |
display the dialog that allows you to configure email settings for iAlerts. |
| Help |
review DocuPhase corporate information as well as product version information. |
| TOOLBAR | |
|
|
add a new Group (of subscribers). A Group can consist of one or more subscribers. |
|
|
delete the selected Group. WARNING!!!Use this deletion functionality with care. Once you delete an item from this list, you cannot recover it. If you inadvertently delete an item, you will need to re-add it. |
|
|
rename the selected Group. |
|
|
add an Alert to the selected Group. |
|
|
deletes the selected Alert. WARNING!!!Use this deletion functionality with care. Once you delete an item from this list, you cannot recover it. If you inadvertently delete an item, you will need to re-add it. |
|
|
rename the selected Alert. |
|
|
place a copy of the selected Alert onto your computer's "clipboard." |
|
|
paste the copy (as described above) of the selected Alert at. |
|
|
display the dialog that allows you to configure email settings for iAlerts. Before emails can be sent, you must use the Configuration option to set up sender system information. Tell me more... IMPORTANT!These settings must be completed in order for the system to generate and send notifications to subscribers. |
| LISTS | |
| Alerts Tree |
view Alerts in hierarchical "tree" form, and includes all the Groups and Alerts that have been set up for your organization. When you see |
| Filters |
narrow the displayed alerts using filters that you can define. You can also edit and define filters. This is exceptionally helpful if your organization has created a large number of Alerts, and you are looking for a specific or group of specific Alerts. |
You will use this area of the iAlerts Manager to create the conditions (i.e., rule) under which an Alert is triggered. Rules are made up of variables that you can define (i.e., based on designated Field, Operator, and Value). You can add multiple Expressions to a single Rule; thereby, creating a highly defined "trigger."
| Element | Use it to... |
|---|---|
| DESCRIPTION TAB | |
| Identification |
NOTEThis setting cannot be completed until all other Alert settings are made: including Expressions, Message, and Subscribers. |
| Description |
You can enter detailed or summarized information (e.g., who, what, when, where, why, etc.) about the selected Alert. This information can help you to remember, and other Users to understand, the purpose of the Alert. |
| RULE- EXPRESSION BUILDER | |
| Field |
select the appropriate Field to be used as part of the trigger for the Alert. NOTEOnce you select the DocuPhase Application (as described above), this pick list is populated with the Indexes (Fields) residing in that Application. |
| Operator |
add definition to the Field as it relates to triggering this Alert. |
| Value |
define the value that triggers the Alert. NOTEThis is the data that the system looks for based on the selected Field (Index), as well as the defined Operator. |
| Load Index Values |
enable ( |
| (Rule Display) |
dynamically display the elements of the Rule as you create it or have created it. |
| MESSAGE | |
| Subject |
define the subject of the email just as you would with any email you send out. However, in this case you can also use a Field to make the Subject more specific to the content of the Alert. |
| Message |
enter a message you want to include in the email notification. |
| Format |
specify whether the email notification is sent to the subscriber(s) as plain text or with formatting (HTML). |
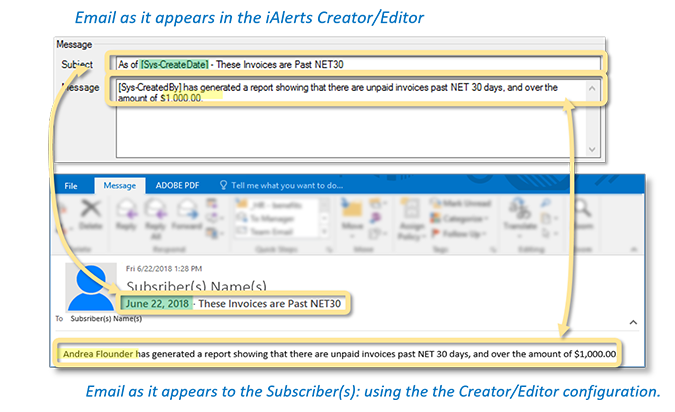
| Field |
designate a Field if you want to include its value in the Subject and/or Message. EXAMPLELet's say you selected the Sys-CreateDate Field (Index) to be included in the subject and the Sys-Status Field in the Message area. When the email is sent out, the actual value of the Fields appear in the email to the Recipient. |
| SUBSCRIBERS TAB | |
| Available/Assigned |
move recipient email addresses from Available to Assigned (so that they are subscribed to the current Alert) or from Assigned to Available (so that they will no longer receive the configured Alert). |
IMPORTANT!
These settings must be completed in order for the system to generate and send notifications to subscribers.
| Element | Use it to... |
|---|---|
| EMAIL PREFERENCES | |
| Email From: |
enter the email address that you want to have appear as the Sender's email for notifications sent to Subscribers. When such an email is sent out, the recipient(s) can reply to it: with the reply being sent to the email address you enter here. |
| SMTP (Simple Mail Transfer Protocol) | |
| Server |
define the Exchange Server name (e.g., mail.docuphase.com) |
| Username |
enter the User name associated with the Exchange Server defined above |
| Password |
enter the password associated with the User name entered above. |
| SSL |
enable this option if SSL is a requirement for your organization. IMPORTANT!If you enable this option, then be sure that all other DocuPhase Components are also SSL enabled. Please refer to the DocuPhase] SSL Configuration Guide. |
| Port |
enter the port number associated with emails being sent out. NOTEIn most network configurations, the port number is 25; therefore, by default iAlerts automatically populates the text box with 25. |
| SERVICE | |
| Poll Period |
specify the frequency (in minutes) that the system checks the database for items that meet the criteria/conditions set in the defined Rule for the associated Alert. When a "match" is found, the defined notification is sent to the Subscriber(s). NOTE5 minutes is the maximum; 1 minute is the minimum. |
| WEB URL | |
| URL |
define the URL of the DocuPhase Web Server used for linking the repository with email notifications/ iAlerts. NOTEThis URL is used to insert a hyperlink to a record within the subject line or message body of each notification. |
Tell me how to...
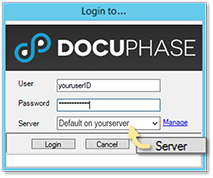
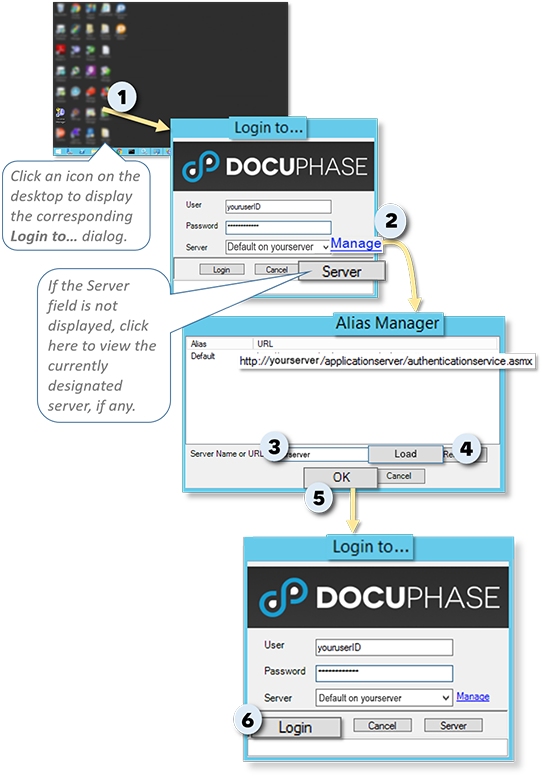
Generally, when you access a tool (e.g., License Manager, iLink, iAlerts, Full Text Manager, etc.) to display the Login dialog, the server is already designated. However, if this has not been set up, you can do so by following the TIPS and steps below:
TIPS
- If the Server field is not visible, click
 to display it.
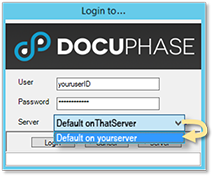
- If multiple Servers are available for the License Manager, and one has already been designated, you can change that server by clicking on the Server drop-down menu for a list of configured servers.
On your desktop:
1) Double-click the appropriate icon (e.g., ![]() or
or ![]() , etc.) to display the corresponding Login to... dialog .
, etc.) to display the corresponding Login to... dialog .
If the Server field is empty:
2) Click Manage to display the Alias Manager window.
In the Server Name or URL field of the Alias Manager window:
3) Enter the name of the server on which the designated tool currently resides.
4) Click  to add it to the list of Servers in the list.
5) Click  to return to the Sign In window.
On the Sign In window:
6) Enter your User ID and password, then click  to display the first page of the designated tool on the designated server.
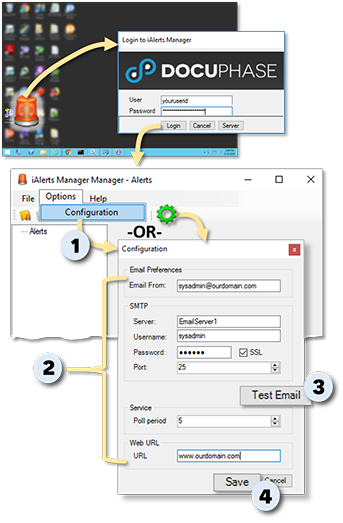
The procedure shown below for setting up Sender information must be completed in order for the system to be able to send notifications to subscribers
In the iAlerts Manager:
From the Options menu:
1) Select Configuration to display the Configuration dialog.
or
In the Toolbar:
Click ![]() to display the Configuration dialog.
to display the Configuration dialog.
In the Configuration dialog:
2) Complete the settings. Tell me more...
3) Click  to confirm that the settings are correct so that notifications can be sent.
NOTE
If the test is unsuccessful, try adjusting the current settings, then re-test.
When all settings are complete:
4) Click  to store the settings, close the Configuration dialog, and return to the iAlerts Manager window.
TIP
- To Edit an Existing Group or Alert, highlight the one or the other in the Alerts Tree, then make changes using the same basic steps as shown below.
- If you want to change the name of a Group or Alert: click the Rename icon for the Group (
 ) or Alert (
 ) to make the Alert Rule name available for editing, then change the name as needed.
 - Besides using the icons in the Toolbar to Create/Add, Rename, or Delete a Group or Alert, you can right-click on the item to display a list of options that allow you to perform the same functions as the icons.
- You can click and drag an Alert Rule to move it to another Group.
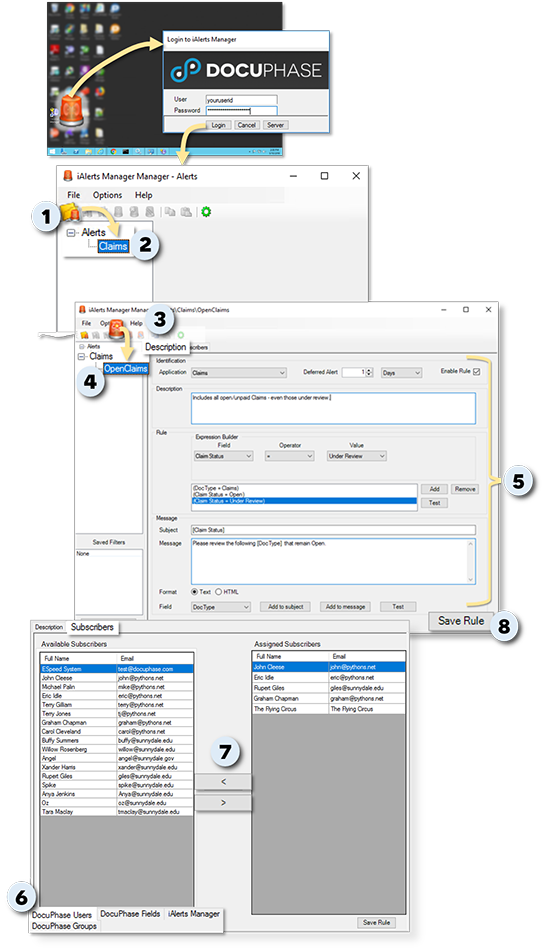
In the iAlerts Manager:
In the Toolbar:
1) Click ![]() to add a new Group to the Alert Tree.
to add a new Group to the Alert Tree.
In the Alert Tree:
2) Enter a name for the new Group (e.g., AP, Claims, Patient Forms, etc.), and make sure it remains highlighted.
In the Toolbar:
3) Click ![]() to add a new Alert Rule to the highlighted Group and display the Alerts Description and Subscriber tabs.
to add a new Alert Rule to the highlighted Group and display the Alerts Description and Subscriber tabs.
In the Alert Tree:
4) Enter a name for the new Alert Rule (e.g., Net30Invoices, OpenClaims, Intake, etc.).
On the Description tab:
5) Select/Enter settings as appropriate for the Alert, including Expressions and any Filters (as needed).
IMPORTANT!
If you used the Field options to populate the Subject and/or Message of the email notification(s), click  to make sure the selections are correct.
If the test fails, try adjusting the current settings, then re-test.
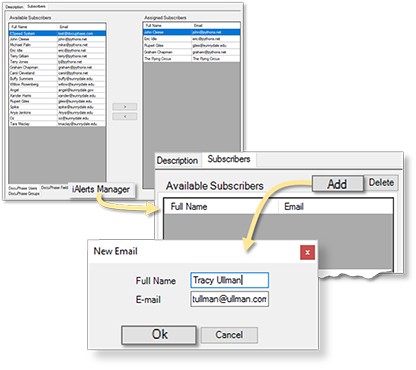
On the Subscribers tab:
6) Select the tab that corresponds to the list of subscribers that includes those you want to add to this Alert Rule.
7) Use  to move selected Available Subscribers to the Assigned Subscribers list.
- Only Subscribers in the Assigned Subscribers list receive notifications for the associated Alert.
and/or
Use  to move selected Assigned Subscribers to the Available Subscribers list.
- Available Subscribers do not receive associated notifications for the associated Alert.
- Click the iAlerts Manager tab at the bottom of the Available Subscribers list to display the
 button.
 - Click to display the New Email dialog, then enter the Name and Email for the subscriber you want to add.
- Click to close the dialog and return to the Subscribers tab.
TIPS
When all settings are complete:
8) Click  to store the settings/changes.
In the iAlerts Manager:
TIP
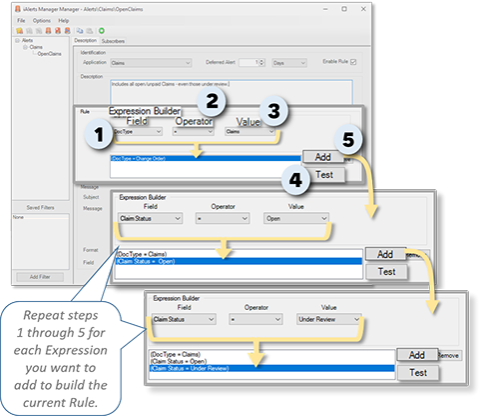
An Alert Rule must be selected in the Alerts Tree in order to create an Expression.
In the Expression Builder area on the Description tab:
1) Select the Field ( DocuPhase Index) on which the notification is based.
2) Select an operator to qualify the Index selected in the previous step (e.g., do you want the notification to be based on the same, greater, or lesser value than the Index?).
3) Select or enter the Value that defines the trigger for this notification based on the Operator selected in the step above.
- any date-related Index results in a calendar appearing in the Value field
- if DocType is selected as the Index, a list of pre-defined doc types appears in the Value field
- if system status is selected as the Index, then a list of pre-defined statuses appear in the Value field, etc.).
TIP
Values that appear in the list are based upon the Index selected in step 1 above. For example...
4) Click to make sure the Expression has been set up correctly.
NOTE
If the test fails, try adjusting the current settings, then re-test.
5) Click to add another Expression to the Rule to further define and specify the trigger that sends the notifications.
Repeat steps 1 through 5 for each Expression you want to add to build the current Rule.
NOTE
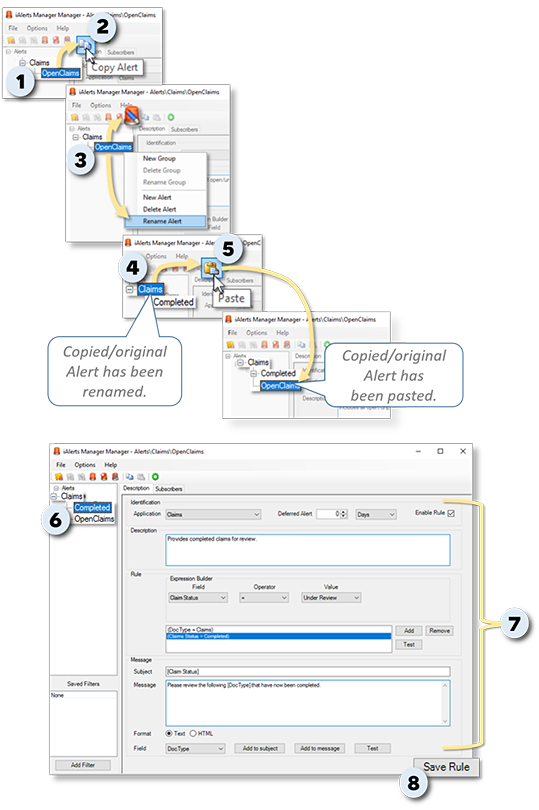
- Only saved Alerts can be copied and pasted.
- You cannot paste an Alert without renaming the original (as noted in step 3 below).
In the Alerts Tree on the iAlerts Manager screen:
1) Select the Alert Rule that you want to copy.
In the Toolbar:
2) Click ![]() to copy the rule to the clipboard.
to copy the rule to the clipboard.
3) Rename the copied Alert.
4) Select the Group under which you want to paste the copied Alert.
- The paste icon (
 ) is now available.
5) Click ![]() to paste the rule under the selected Group.
to paste the rule under the selected Group.
- If you only want to change the name of an Alert, use to make the Alert Rule name available for editing, edit the name.
- You can click and drag an Alert Rule to move it to another Group.
TIP
6) Select the renamed (original/copied) Alert.
7) Make changes to the settings on the Description and/or Subscribers tabs, as needed.
8) Click to store the copied Alert.
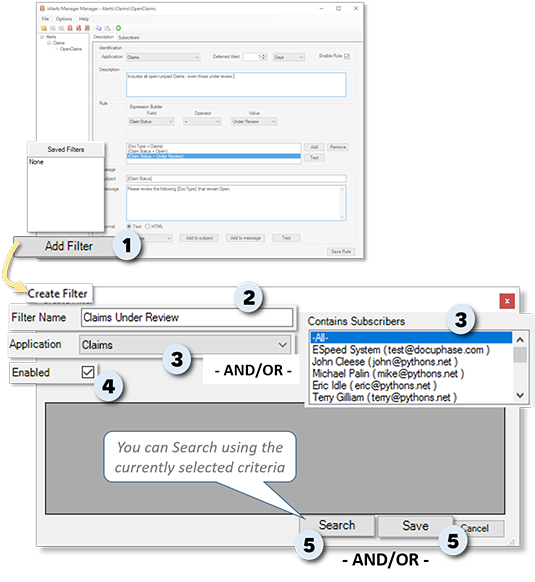
On the iAlerts Manager screen:
1) Click  to display the Create Filter dialog.
In the Create Filter dialog:
2) Enter a name for the filter.
3) Select the Application and/or Subscriber associated with the Alerts you want to see.
- If you select -All- for either the Application or Subscribers, the filter returns more Alerts in the list. This may also cause the search for the filtered Alerts to take longer.
- You can select multiple Subscribers:
- Select multiple, consecutive items in a list by either of the following methods: holding the Shift key, and clicking on items; or click on the first item you want selected, hold the Shift key, then click on the last item in the list you selected.
- Select multiple, non-consecutive or consecutive items by holding the Shift key, and clicking on items.
TIP
4) Select the Enable (![]() ) option to make this Filter available for use.
) option to make this Filter available for use.
5) Click  to display a list of Alerts that correspond to the selections.
and/or
Click to store the Filter and add it to the list of Saved Filters.
- To Edit a Filter, double-click on it to open the Create Filter dialog, make changes to the settings as needed.
- To Delete a Filter, right-click on the filter you want to delete to display the Delete Filter option.
TIP
WARNING!!!
Use this deletion functionality with care. Once you delete an item from this list, you cannot recover it. If you inadvertently delete an item, you will need to re-add it.
WARNING!!!
Use this deletion functionality with care. Once you delete an item from this list, you cannot recover it. If you inadvertently delete an item, you will need to re-add it.
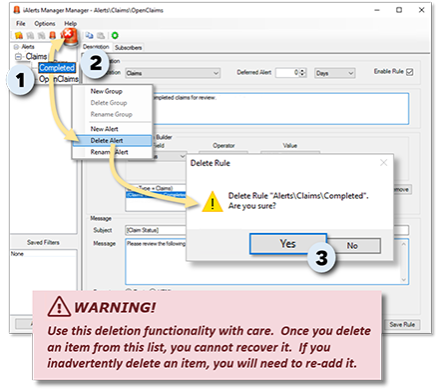
NOTE
While the steps below refer specifically to deleting an Alert, you can use the same process for deleting a Group (![]() ).
).
In the Alerts Tree on the iAlerts Manager screen:
1) Select the Alert Rule that you want to copy.
In the Toolbar:
2) Click ![]() to display a confirmation prompt asking you to make sure you want to make the deletion.
to display a confirmation prompt asking you to make sure you want to make the deletion.
TIP
You can also right-click on an Alert to display an option to delete it. That option displays the same confirmation prompt as when you click ![]() .
.
3) Click  to complete the deletion of the selected Alert Rule.