Managing User Licenses
The DocuPhase Platform components are licensed products; therefore, the License Manager is designed to make the assignment and administration of product licenses simpler and more effective. By using this tool, DocuPhaseadministrative staff (usually TPOCs) can establish and maintain each component license.
NOTE
While it controls all DocuPhase component licenses, License Manager resides (and is accessed) outside of the DocuPhase Platform. While installed on the server, it can also be installed locally for staff who administer the system (for users with no server access).
IMPORTANT!
Phone Home Licensing technology has been implemented, and is available as of DocuPhase version 6.4. When enabled, this service perpetually sends automatic, daily API calls (to the DocuPhase license database) to validate the expiration date: making it possible for DocuPhase to renew or upgrade a license without any TPOC or System Admin interaction. If your organization is using Phone Home Licensing, once a license is loaded into the License Manager, there is no need to access License Manager for updates.
If the Phone Home Licensing technology is not being utilized by your organization, or if there appears to be an issue with any license updating, you can use License Manager to update license or verify updates made via Phone Home.
Remember, if you have questions or concerns regarding any aspect of licensing of DocuPhase, please contact the DocuPhase Support Team.
Tell me about...
| Element | Use it to... |
|---|---|
| MENUS | |
| File |
add new licenses or to exit License Manager. |
| View |
view existing licenses. |
| Help |
get information about the current product and version. |
| COLUMNS | |
| License Type |
identify whether the corresponding license is for a User (Named User) or for a machine (Named Machine):
|
| License Name |
identify the license by User or machine name - as designated by the License Type (described above). NOTEWith concurrent licenses, a name may not even appear since multiple people may use a single license. |
| Product |
view the name of the licensed software product (e.g., DocuPhase, ScanDox, iLink, etc.) |
| Version |
view the version of the licensed software product. |
| In Use By |
view the name of the User or machine currently logged into and using the corresponding product license. |
| Start Date |
view the date the license was created. NOTEWhen a license is renewed, the start date column is also updated with that renewal date. |
| Expiration Date |
view the date the product license is set to run out. |
| Properties |
view details specific to the associated to the product license. Tell me more... |
| Property | Use it to... |
|---|---|
| AutoAllocate |
set to "True"to automatically assign the associated license to the User or machine (depending upon the License Type - as described above). |
| Has OCR |
set to "True" if iLink is licensed for OCR to read text. |
| Allow Indexer |
set to "True" if iScan Indexing functionality is enabled. |
| Rules Acknowledged |
see the number of defined rules that iAlerts recognizes. |
| Support Compound Documents |
identify which Binders can process more than one type of Document definition. NOTEWhile this functionality enables iDox to have two different Documents within the same binder, Progression does not utilize this compound license property, even though it uses the same concept of Documents and binders. |
| Maximum Document Definitions |
determine the number of Document definitions that can be created within a workspace. |
| MaxConcurrent Users |
know the maximum number of Users that can be simultaneously logged into DocuPhase at any one time. |
| MaxConcurrentHttpUsers |
know the maximum number of Users that can simultaneously access the Document Viewer at a given time. |
| MaxConcurrent Users |
know the maximum number of Users that can simultaneously access the Workflow tab in at any one time. |
| Instance Limit |
know the maximum number of servers/engines that can be running on the named machine. |
| /Application/DataService.asmx |
set to "True" to allow the Data webservice to be accessed from a partner Application. |
| Global Search Enabled |
enable when you want to allow Global Searches from outside DocuPhase. |
| Cross Query Search Enabled |
enable when you want to allow Cross Query Searches from outside DocuPhase. |
| Generic Search Enabled |
enable when you want to allow generic Searches from outside DocuPhase. |
| MaxConcurrent Users |
know the maximum number of concurrent Users that supported by the Document Server at any one time. |
| Documents Per Hour |
know the maximum number of Documents that the Document Server processes each hour. |
| Licensed Applications |
see a list of Application numbers that are licensed through the API. |
| Instance Limit |
know the maximum number of Servers that can be simultaneously running on the named machine. |
Tell me how to...
Generally, when you access a tool (e.g., License Manager, iLink, iAlerts, Full Text Manager, etc.) to display the Login dialog, the server is already designated. However, if this has not been set up, you can do so by following the TIPS and steps below:
TIPS
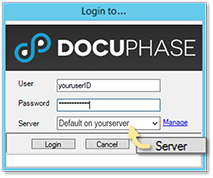
- If the Server field is not visible, click
 to display it.
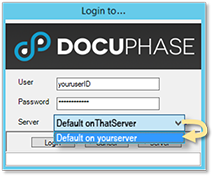
- If multiple Servers are available for the License Manager, and one has already been designated, you can change that server by clicking on the Server drop-down menu for a list of configured servers.
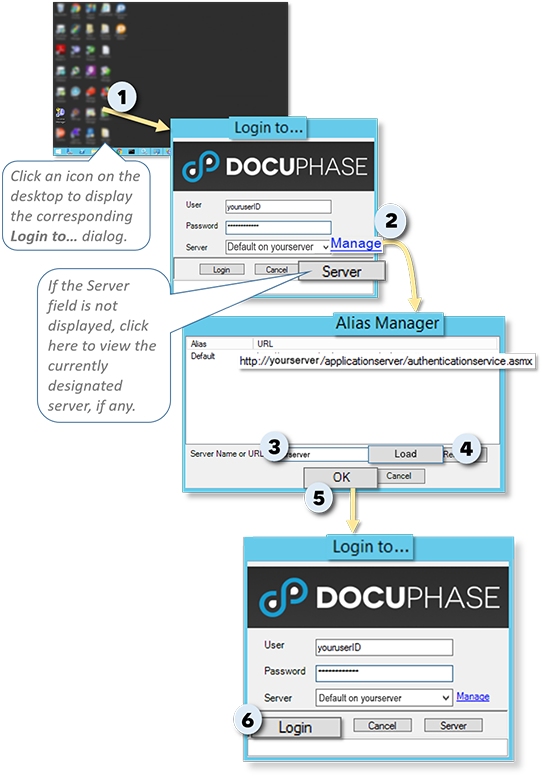
On your desktop:
1) Double-click the appropriate icon (e.g., ![]() or
or ![]() , etc.) to display the corresponding Login to... dialog .
, etc.) to display the corresponding Login to... dialog .
If the Server field is empty:
2) Click Manage to display the Alias Manager window.
In the Server Name or URL field of the Alias Manager window:
3) Enter the name of the server on which the designated tool currently resides.
4) Click  to add it to the list of Servers in the list.
5) Click  to return to the Sign In window.
On the Sign In window:
6) Enter your User ID and password, then click  to display the first page of the designated tool on the designated server.
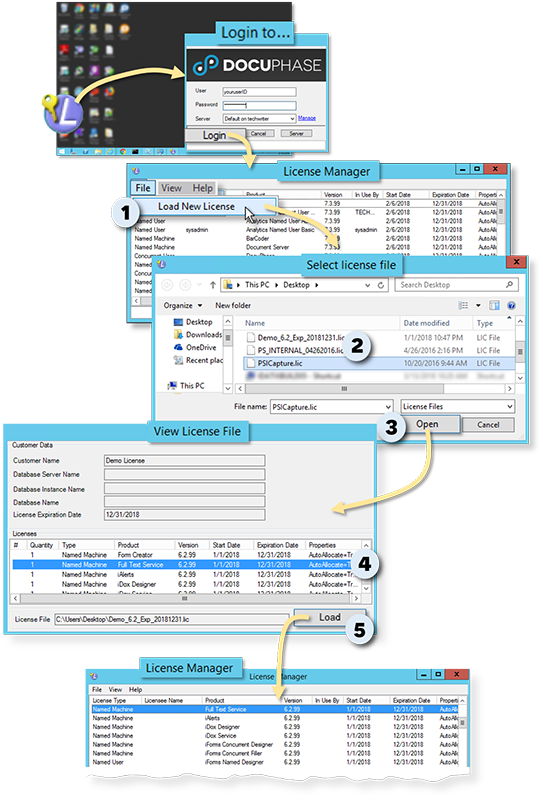
From the menus at the top left of the License Manager window:
1) Go to File sysadm Load New License to display the Select License File window.
2) Find and select the license file to be loaded.
3) Click  to display the View License File dialog with the list of all licensed products (associated with the selected license file).
4) Find and select the file that corresponds to the License Type and Product to be loaded.
5) Click to add the selected license file.
- The newly loaded license file now appears in the License Manager main screen.
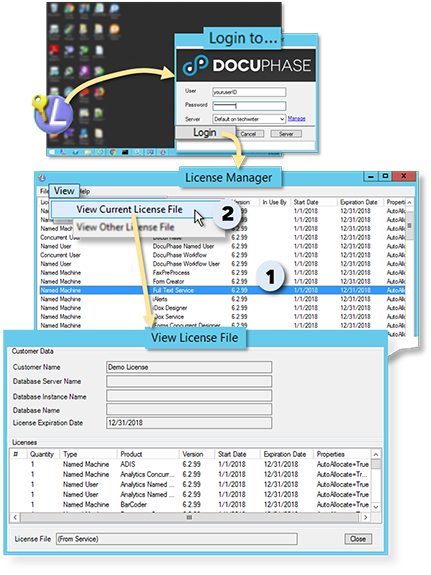
In the License Manager window:
1) Find and select the license file you want to view.
From the menus at the top left of the License Manager window:
2) Go to View View Current License File to display the View License File window with details of all loaded licenses.
- The information that appears includes Customer Name, Database Server Name, CPU ID of License Web Server, License Expiration Date, Properties, and the location of the file.
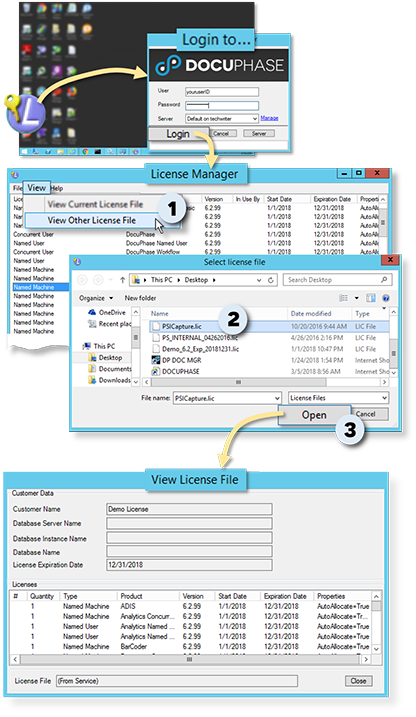
From the menus at the top left of the License Manager window:
1) Go to View View Other License File to display the Select License File window.
In the Select License File window:
2) Find and select the license file you want to view.
3) Click to view details about the selected license.
- The information that appears includes Customer Name, Database Server Name, CPU ID of License Web Server, License Expiration Date, Properties, and the location of the file.
WARNING!!!
Please use this functionality with great care in order to prevent issues that may interfere with optimum system performance.
In the License Manager window:
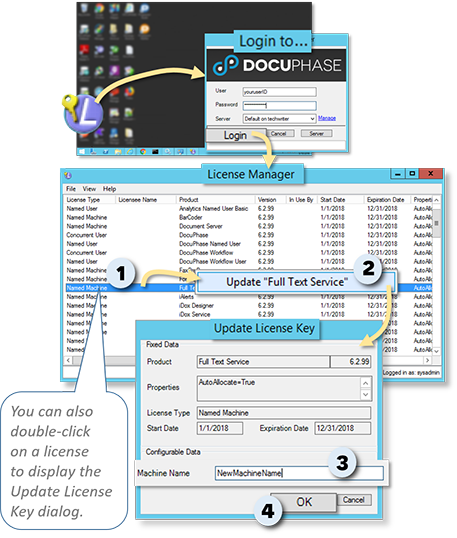
1) Right-click on the license you want to update/renew to display the "Update" option for that license.
TIP
You can also double-click on the license you want to update, then skip to step 3.
2) Select the "Update" option to display the Update License Key dialog.
3) Change the Machine or User Name, as needed.
4) Click to store the change.