Uploading Documents
There are several ways to move files into the system; one of them is to use the Capture Upload functionality. This features allows you to upload Documents from a computer, network, cloud, or email attachments.
TIP
Before uploading a Document, you must indicate the Application in which the document is to reside. Therefore, to access the Specify Application screen, from the main header go to Capture![]() LOADUpload.
LOADUpload.
Tell me how to...
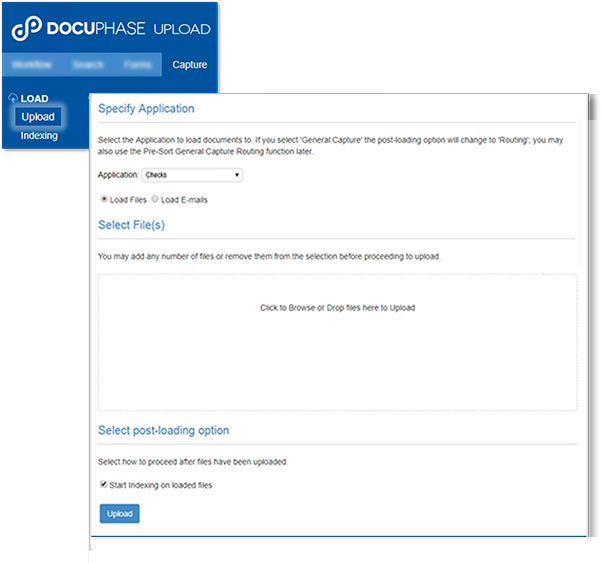
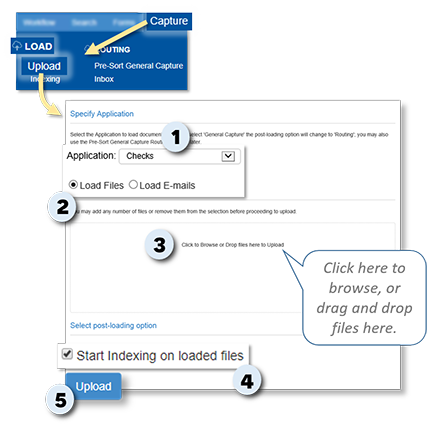
You can upload files/documents from any available device (local drive, network drive, cloud, etc.).
From the Upload screen:
1) Select the Application into which you want the Document(s) uploaded.
2) Select (![]() ) the Load Files option.
) the Load Files option.
3) Click in the center of the screen to display your file browser, and select the file(s) you want to upload.
or
Drag and drop files from your device into the center of the screen.
To begin Indexing the Documents as soon as loading is complete:
4) Enable the Start Indexing on loaded files option.
and/or
To skip Indexing as soon as Documents are uploaded (so that you can Index later):
Skip to Step 5.
NOTE
Documents can be Indexed at any time. Tell me more...
5) Click  to upload the designated files into the system, and display the first Document in the viewer.
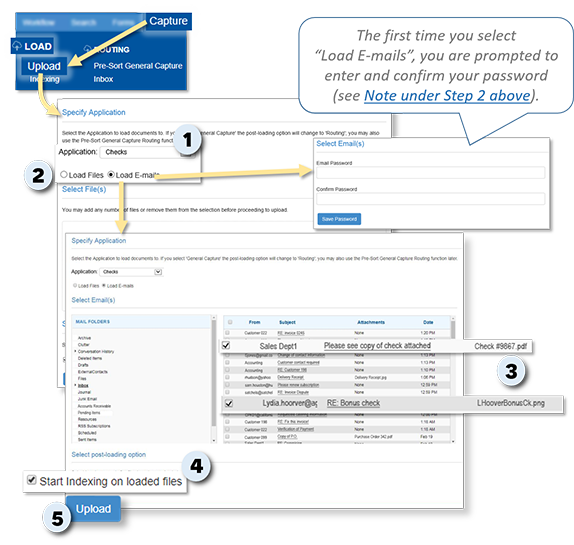
You can upload, view, and Index Documents attached to any email from your default email address (and exchange server).
From the upload screen:
1) Select the Application into which you want the Email attachment(s) uploaded.
2) Select (![]() ) the Load E-mails option.
) the Load E-mails option.
- The first time you choose the Load E-mails option, you are automatically prompted to enter and confirm your Email password. Once you have done that, you can save the password and view Emails for upload. Once you save your password, the next time you select the Load E-mails options, it doesn't have to be entered again (unless it has expired); you are automatically logged in.
- Once login is completed, your email folders and their contents are displayed.
NOTE
Once your Emails are displayed:
3) Locate and select (![]() ) the Email(s) with the attachment(s) you want to upload.
) the Email(s) with the attachment(s) you want to upload.
To begin Indexing the Documents as soon as loading is complete:
4) Enable the Start Indexing on loaded files option.
and/or
To skip Indexing as soon as Documents are uploaded (so that you can Index later):
Skip to Step 5.
NOTE
Documents can be Indexed at any time. Tell me more...
Once all selections are made as needed:
5)
Click to upload the designated files into the system, and display the first Document in the viewer.
NOTE
If you did not enable the Start Indexing on loaded files option noted in step 5 above, once you click , the Upload screen remains visible (i.e., the Indexing and Viewer screens do not appear).
While you can generally Index Documents at any point, as soon as you upload a Document, you have the chance to Index it.
TIP
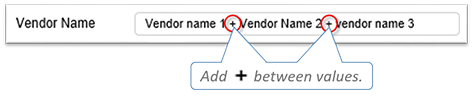
Remember that you can Index the same Document using multiple values for a single Index text field using + (the plus sign on your keyboard). The Document can then be searched for using ANY of the Index values entered. Please note that this technique can only be used in text and number (i.e., free typing) fields, not in a UDL.
EXAMPLE
Sometimes, a vendor may be known by three different names. You probably don't want to have to enter that same Document 3 ways. Instead, you can simply enter the three different names in the same Index field using the + between each name.
Once you do this, you can use any of the names to find the Document.
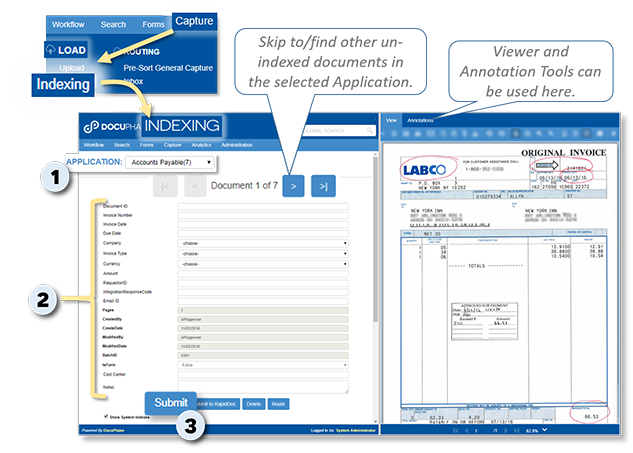
On the Indexing screen:
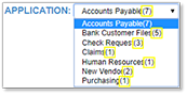
1) Select the Application containing the Document(s) you want to Index.
- The first Document that has not yet been Indexed in the Application appears in the Viewer.
- only Applications with un-Indexed Documents appear.
- the number of un-Indexed Documents appears next to the name of the Application.
TIP
In the drop-down list of Applications...
2) Enter/select Index information, as appropriate.
- In Applications containing multiple Documents that require Indexing, use the navigational buttons at the top of the Indexing window to skip Documents without submitting them.
- You can also use the Viewer (and Annotations) tools on this screen, as well. Tell me more...
TIP
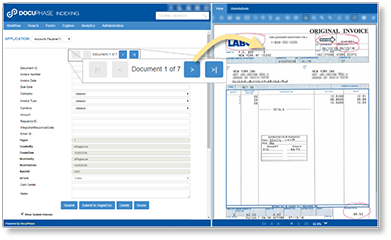
When you have completed Indexing:
3) Click  to move the Document into the Repository.
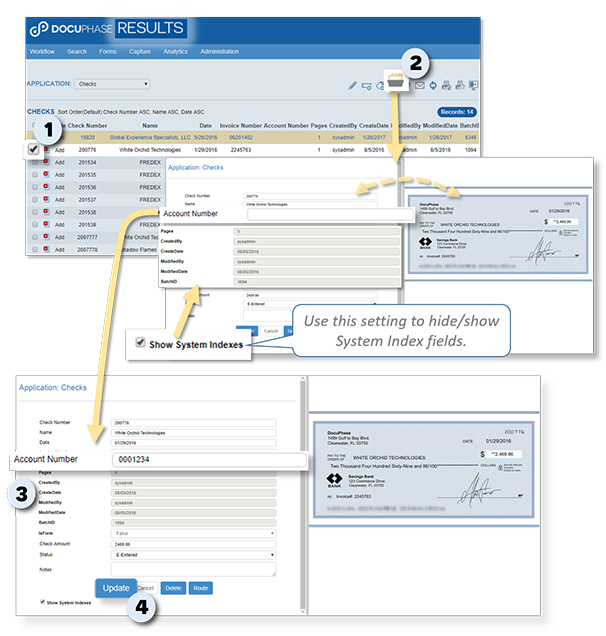
You can add/edit/change Index values (i.e., the data entered in an Index field) for a Document at any time.
EXAMPLE
Let's say a Document was Indexed but the Account Number was not entered. You can go back at any time and add that account number; if it was entered incorrectly, you can go back and correct it at any time. See example image here.
NOTES
- You can edit multiple Indexes at once. Tell me more...
- Index values are available for editing except when one of the following conditions applies:
- they are System Indexes.
- the Document has already been checked out (i.e., locked ) by another User.
- you do not have permissions within the system to do this. If you believe you should have access to this functionality, but do not, please contact your TPOC.
- When a Document has been checked out by another User, the
 icon appears next to the File Type icon in the Results list.
From the Search Results list:
1) Select the Document containing the Index(es) you need to change/add.
2) Click to display the selected Document, along with its currently set Indexes.
TIP
You can de-select the Show System Indexes (at the bottom of the Indexing screen) to hide the uneditable System Index fields.
3) Make changes as needed.
4) Click  to save the changes (and unlock the Document for other Users).