 Configuring Users and Groups
The information shown on the User and Group Configuration screens is mostly informational only. However, you can access Permission settings for both Users and Groups, as well as set User Preferences and Group Details. The User Configuration screen also allows you to search for a specific User; Users and Groups can also be added via their respective Configuration screens.
- User Configuration - At the most basic level, a User account grants an individual Authentication and Entry privileges into DocuPhase. Permissions assigned to a User account determine the access and functionality an individual has when logged into DocuPhase. Tell me more...
- Group Configuration - User Groups lessen the Task load of the System Administrator. The administrator can set security and functionality permissions within each Group, then automatically grant Group permission settings to each User within the Group. Tell me more...
EXAMPLES
Some Group Account examples include Groups based on...
- department membership (e.g., Sales, HR, Customer Service).
- job scope and responsibility (e.g., scanner operators, data entry personnel, analysts, claims processors, auditors, supervisors, System Administrators, etc.).
- limited permissions for identified types of duties and responsibilities (e.g., customers, vendors, contractors, clerks).
- System Administration purposes for Users with full permissions across all departments, or Departmental Administrators Groups with scope limited to their specific departmental authority.
TIP
To access the User Configurationscreen: from the main header, go to AdministrationuCOREuUser Configuration.
OR
To access the Group Configurationscreen: from the main header, go to AdministrationuCOREuGroup Configuration
Tell me about...
| Element | Use it to... |
|---|---|
| Search |
search for Users within the system. |
| Show disabled Users |
include disabled User Accounts in the list. A User with a disabled account no longer has access to the system, unless the account is re-enabled. |
| Access ( |
view and/or set Permissions for the associated User. |
| User Name |
view and click on the User Name (aka User ID) to view and set Preferences for that User. |
| Full Name |
enter the first and last name of the User associated with the User Name. In addition, this can also be a descriptive name or title/role associated with the User (e.g., AP Supervisor, HR Clerk, Receptionist, etc.) |
| Member of Groups |
view a listing of Groups to which this member belongs, if any. |
|
view or verify the email address as entered for the corresponding User. |
| Element | Use it to... |
|---|---|
| Access ( |
view and/or set Permissions for the corresponding Group. |
| Group Name |
view and click on the Group Name (aka User ID) to view and set Details for that Group. |
If your organization has decided to implement the ability for a User to create a new account, a Request a new account link appears on the Sign In screen. Once the User clicks that link, a new window appears that allows the User to enter the preferred user name, their full name, as well as their email and a password. As soon as request has been submitted, an email is sent to the designated email account (usually the TPOC or System Administrator). The requested account is then created. Tell me more...
NOTES
Any organization that implements this feature, must also decide what process takes place once you have received a request and created an account (e.g., the time frame allowed for creation of an account, whether or not you notify the user that the account has been created, and/or how the requesting user is notified, etc.). Please contact your TPOC or System Administrator for more information about what happens once an account has been requested.
Tell me how to...
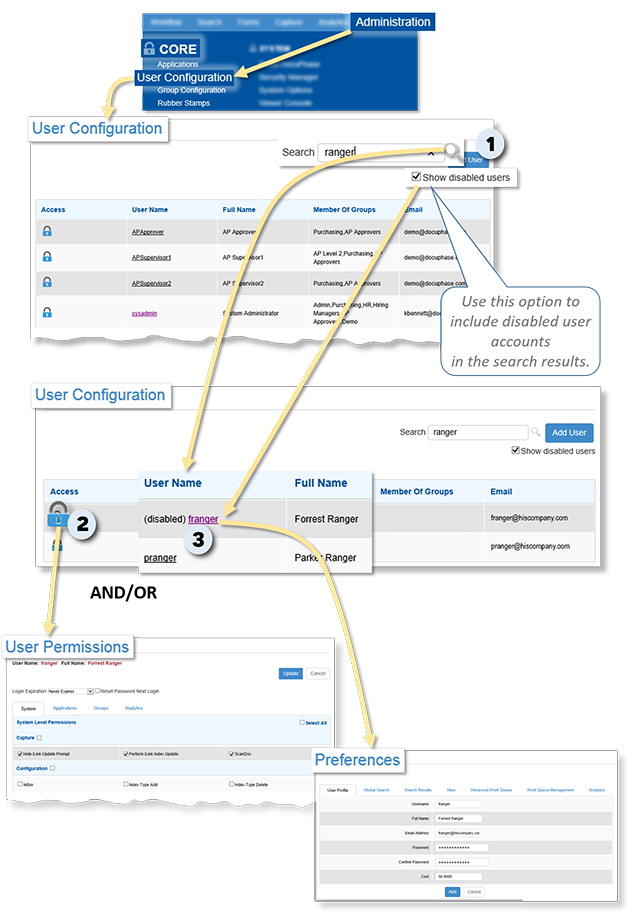
In the Search field on the User Configuration screen:
1) Enter a name or partial name, then click to display corresponding results (if any).
TIP
Remember, you can use the Show disabled Users option to find all Users that fit your search criteria.
If you see the User for whom you searched:
2) Click ![]() next to the User name to display the User Permissions settings for that User. Tell me more...
next to the User name to display the User Permissions settings for that User. Tell me more...
and/or
3) Click on the User name to display the Preferences settings for that User. Tell me more...
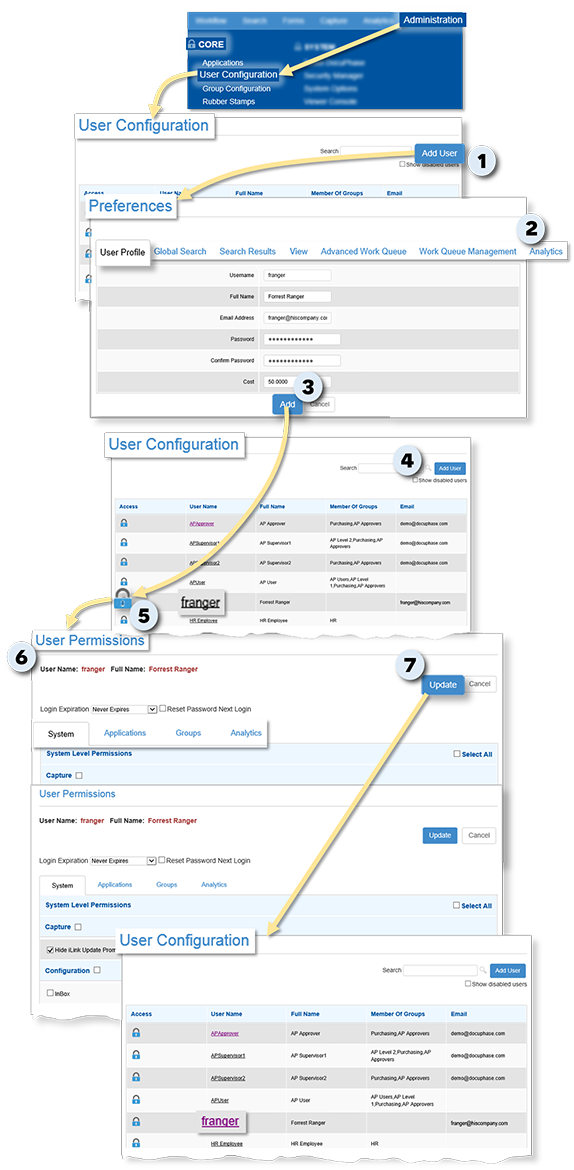
On the User Configuration screen:
1) Click  to display the Preferences screen.
2) Set User Preferences on each tab, as appropriate. Tell me more...
On the User Profile tab of the Preferences screen:
3) Click  to complete the User settings and return to the User Configuration screen.
- The new User now appears in the list.
On the User Configuration screen:
4) Find the name of the newly added User in the list.
5) Click ![]() next to the name to display the User Permissions screen for that User.
next to the name to display the User Permissions screen for that User.
On the User Permissions screen:
6) Set User Permissions on each tab, as appropriate. Tell me more...
When settings are complete:
7) Click  to save the settings and return to the User Configuration screen.
NOTE
Remember, disabled accounts are never deleted from the system. User account information is always maintained and stored safely order to maintain the integrity of any past audit trail references to activities performed while the account was active.
To make changes to User Permissions:
On the User Configuration screen:
1) Click ![]() next to the name to display the User Permissions screen for that User.
next to the name to display the User Permissions screen for that User.
2) Set User Permissions on each tab, as appropriate. Tell me more...
3) Click to save the changes and return to the User Configuration screen.'
AND/OR
To make changes to User Preferences:
On the User Configuration screen:
1) Find and click on the name of the User to display the corresponding Preferences screen.
On the User Preferences screen:
2) Make changes to User Preferences on each tab, as needed. Tell me more...
Once changes are complete:
3) Click  to save the changes and remain on the current tab;
or
Click  to save the changes and return to the User Configuration screen.

NOTE
Remember, disabled accounts are never deleted from the system. User account information is always maintained and stored safely order to maintain the integrity of any past audit trail references to activities performed while the account was active.
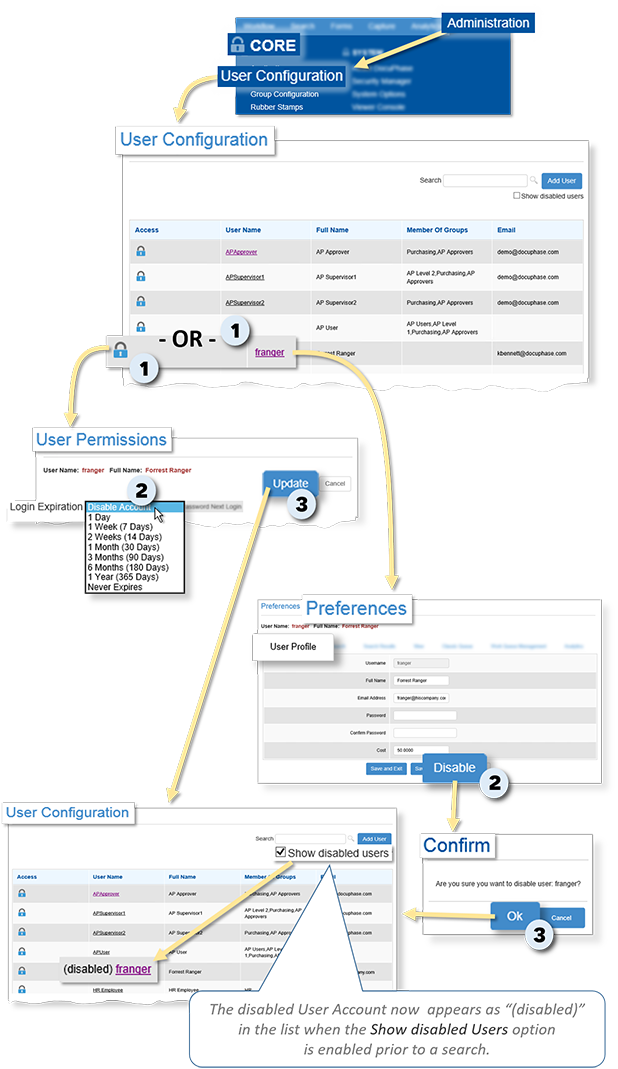
To disable a User Account from the Preferences screen:
On the User Configuration screen:
1) Search for (as shown above), find, and click on the name of the User Account you want to disable to display the Preferences screen.
On the User Profile tab of the Preferences screen:
2) Click  to display a confirmation prompt asking you if you are sure you want to disable the User.
3) Click  to disable the User and return to the User Configuration screen.
- The User no longer appears in the list of Users on the User Configuration screen unless the Show disabled Users option is enabled (
 ).
).
or
To disable a User Account from the User Permissions screen:
On the User Configuration screen:
1) Search for (as shown above), find, and click ![]() next to the name of the User Account you want to disable to display the Permissions screen.
next to the name of the User Account you want to disable to display the Permissions screen.
In the Login Expiration field at the top of the User Permissions screen:
2) Select Disable Account.
3) Click to disable the User and return to the User Configuration screen.
- The User Name no longer appears in the list of Users on the User Configuration screen unless the Show disabled Users option is enabled ().
To re-enable a disabled User Account:
On the User Configuration screen:
1) Enable (![]() ) the Show disabled Users option to display disabled User account in the list: designated as "(disabled)."
) the Show disabled Users option to display disabled User account in the list: designated as "(disabled)."
2) Search for (as shown above), find, and click ![]() next to the name of the User Account you want to disable to display the Permissions screen.
next to the name of the User Account you want to disable to display the Permissions screen.
In the Login Expiration field at the top of the User Permissions screen:
3) Select any Login Expiration time (other than Disable Account) or Never Expires to re-enable the User Account.
4) Click to save the setting and return to the User Configuration screen.
- The re-enabled User account name now re-appears in the list of Users on the User Configuration screen.

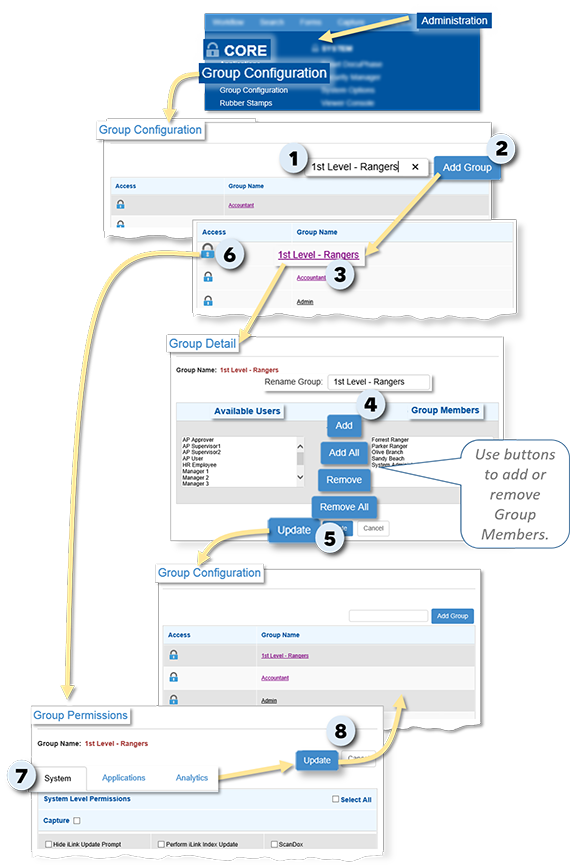
To create the Group:
In the field at the right top portion of the Group Configuration screen:
1) Enter a name for the Group you want to create.
2) Click  to add the new Group name to the list on the Group Configuration screen.
IMPORTANT!
You must use the procedures below to add Members/Users to the Group, and also to set Group Permissions in order for the Group to be able to access and use Applications and other functionality within the DocuPhase system.
To set Group Details:
On the Group Configuration screen:
3) Find and click on name of the new Group to display the Group Detail screen. Tell me more...
On the Group Detail screen:
4) Make settings as needed (i.e., change the Group name, add/remove members, etc.).
- Adding and Removing Users:
- Add Users to a Group: click on the User(s) in the Available Users column, then click to move the selection(s) to the Group Members column.
- Remove Users from a Group: click on the User(s) in the Group Members column, then click
 to move the selection(s) to the Available Users column.
 - Add All Users to a Group: click
 to move ALL Available Users to the Group Members column (i.e., adding all Users to the Group without first needing to select them).
 - Remove All Users from a Group: click
 to move ALL Group Members to the Available Users column (i.e., removing all Members from the Group without first needing to select them).
 - Selecting Multiple Items at Once:
- Select multiple, consecutive items in a list by either of the following methods: holding the Shift key, and clicking on items; or click on the first item you want selected, hold the Shift key, then click on the last item in the list you selected.
- Select multiple, non-consecutive or consecutive items by holding the Shift key, and clicking on items.
TIPS
5) Click to save the settings and return to the Group Configuration screen.
To set Group Permissions:
On the Group Configuration screen:
6) Find and click ![]() next to the Group to display the corresponding Group Permissions screen.
next to the Group to display the corresponding Group Permissions screen.
On the Group Permissions screen:
7) Set Group Permissions on each tab, as appropriate. Tell me more...
When settings are complete:
8) Click to save the settings and return to the Group Configuration screen.
To change the Group Details (i.e., change Group Name, add/remove members):
On the Group Configuration screen:
1) Find and click on name of the Group to which you want to make changes to display the Group Detail screen. Tell me more...
On the Group Detail screen:
2) Change settings as needed (i.e., change the Group name, add/remove members, etc.).
3) Click to save the settings and return to the Group Configuration screen.
To Change Group Permissions:
On the Group Configuration screen:
4) Find and click ![]() next to the Group to display the corresponding Group Permissions screen.
next to the Group to display the corresponding Group Permissions screen.
On the Group Permissions screen:
5) Set Group Permissions on each tab, as appropriate. Tell me more...
When settings are complete:
6) Click to save the settings and return to the Group Configuration screen.

WARNING!!!
Use this deletion functionality with care. Once you delete a Group, it cannot be recovered.
If Progression is in use, keep in mind that Groups are tied to assignments and assignment rules within Progression; therefore, if you delete a Group, any/all associated assignment(s) rules are also deleted.
NOTE
Deleting a Group DOES NOT delete the User Accounts for Members. User Accounts stand independently, and are maintained even when a Group to which they belong is deleted.
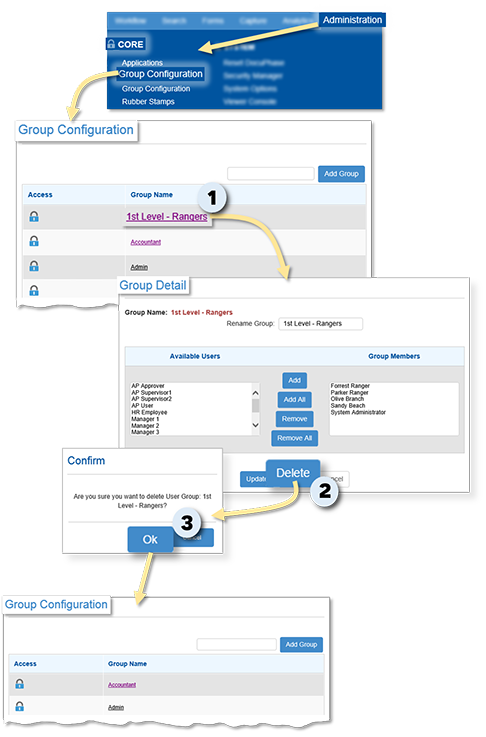
On the Group Configuration screen:
1) Find and click on name of the Group you want to delete to display the Group Detail screen. Tell me more...
On the Group Detail screen:
2) Click  to display a confirmation prompt asking if you are sure you want to delete the Group.
3) Click to delete the Group and return to the Group Configurationscreen.
- The Group no longer appears in the list of Groups.
IMPORTANT!
- Don't forget to give yourself access to an Application so that you can make Application configurations. Make sure you make all configurations (as described below) for your self before you make them for other Users or Groups.
- In order for a User or Group to have access to an Application, you must update the configurations.
TIP
If/when a User can't access or even see an Application on their system, these are the first settings that should be reviewed to Troubleshoot such issues.
On the User or Group Configuration screen:
1) Click ![]() next to the User or Group to which you want to give access to display the corresponding Permissions screen.
next to the User or Group to which you want to give access to display the corresponding Permissions screen.
TIP
Since, the System tab appears by default, it's a good idea to make sure System Level Permissions settings are correct.
In the Grant column under the Applications tab:
2) Enable (![]() ) the Application(s) to which you want the designated User or Group to have access.
) the Application(s) to which you want the designated User or Group to have access.
IMPORTANT!
If you want to remove a User's or Groups access to an Application, just make sure that there is no check in the check box : click on an enabled (![]() ) check box to disable (
) check box to disable ( ![]() ) it.
) it.
TIP
Refer to Multi-App Configuration settings (described here).
On the User or Group Configuration screen:
3) Click to complete and save the settings.
