Working with Group Details
The Group Details screen is where you set up and edit the name of the Group, as well as add and remove members. Just like the Group Permissions screen, it's accessed from the Group Configuration screen; but while the Permissions screen tells the system how and what you want Group Members to see/access, Group Details provide an efficient way to designate the "who" (i.e., ho can access the information set up in Permissions). Without setting up the Details, a Group has no purpose within the system.
TIP
To access the Group Detailscreen for editing: from the main header, go to AdministrationuCOREuGroup Configurationu(Group Name).
Tell me about...
| Screen Element | Use it to... |
|---|---|
| Group Name | identify the name (that appears in red) currently set for the Group and what appears in the Member of Groups column for each User on the User Configuration screen. |
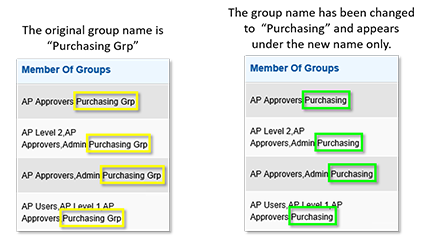
| Rename Group | enter a new name for the Group here. The Group Name is updated throughout DocuPhase.EXAMPLEIf the original name of a Group is "Purchasing Grp", but then it is changed to "Purchasing", it then appears only as "Purchasing" throughout the system. |
| Available Users | select one or more users to add them to the designated Group. Tell me more...
NOTE
|
| Group Members | select one or more Members to be removed from the Group. Tell me more... |

|
move one or more selected Users from the Available Users column to the Group Members column: adding them to the Group. |

|
move ALL Users from the Available Users column to the Group Members column: adding them all to the Group at once without having to select them first. |

|
move one or more selected Users from the Group Members column to the Available Users column: removing them from the Group. |

|
move ALL Users from the Group Members column to the Available Users column: removing them all from the Group at once without having to select them first. |

|
save settings/changes. |

|
delete the currently displayed Group. Tell me more...
WARNINGS!!!
NOTEDeleting a Group DOES NOT delete the User Accounts for Members. User Accounts stand independently, and are maintained even when a Group to which they belong is deleted. |
Tell me how to...
To create the Group:
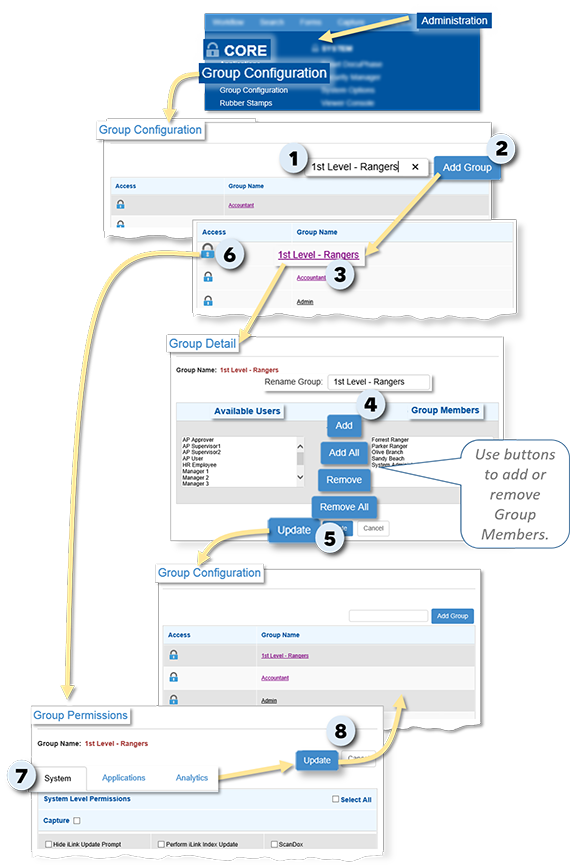
In the field at the right top portion of the Group Configuration screen:
1) Enter a name for the Group you want to create.
2) Click  to add the new Group name to the list on the Group Configuration screen.
IMPORTANT!
You must use the procedures below to add Members/Users to the Group, and also to set Group Permissions in order for the Group to be able to access and use Applications and other functionality within the DocuPhase system.
To set Group Details:
On the Group Configuration screen:
3) Find and click on name of the new Group to display the Group Detail screen. Tell me more...
On the Group Detail screen:
4) Make settings as needed (i.e., change the Group name, add/remove members, etc.).
- Adding and Removing Users:
- Add Users to a Group: click on the User(s) in the Available Users column, then click to move the selection(s) to the Group Members column.
- Remove Users from a Group: click on the User(s) in the Group Members column, then click to move the selection(s) to the Available Users column.
- Add All Users to a Group: click to move ALL Available Users to the Group Members column (i.e., adding all Users to the Group without first needing to select them).
- Remove All Users from a Group: click to move ALL Group Members to the Available Users column (i.e., removing all Members from the Group without first needing to select them).
- Selecting Multiple Items at Once:
- Select multiple, consecutive items in a list by either of the following methods: holding the Shift key, and clicking on items; or click on the first item you want selected, hold the Shift key, then click on the last item in the list you selected.
- Select multiple, non-consecutive or consecutive items by holding the Shift key, and clicking on items.
TIPS
5) Click to save the settings and return to the Group Configuration screen.
To set Group Permissions:
On the Group Configuration screen:
6) Find and click ![]() next to the Group to display the corresponding Group Permissions screen.
next to the Group to display the corresponding Group Permissions screen.
On the Group Permissions screen:
7) Set Group Permissions on each tab, as appropriate. Tell me more...
When settings are complete:
8) Click to save the settings and return to the Group Configuration screen.
To change the Group Details (i.e., change Group Name, add/remove members):
On the Group Configuration screen:
1) Find and click on name of the Group to which you want to make changes to display the Group Detail screen. Tell me more...
On the Group Detail screen:
2) Change settings as needed (i.e., change the Group name, add/remove members, etc.).
3) Click to save the settings and return to the Group Configuration screen.
To Change Group Permissions:
On the Group Configuration screen:
4) Find and click ![]() next to the Group to display the corresponding Group Permissions screen.
next to the Group to display the corresponding Group Permissions screen.
On the Group Permissions screen:
5) Set Group Permissions on each tab, as appropriate. Tell me more...
When settings are complete:
6) Click to save the settings and return to the Group Configuration screen.

WARNING!!!
Use this deletion functionality with care. Once you delete a Group, it cannot be recovered.
If Progression is in use, keep in mind that Groups are tied to assignments and assignment rules within Progression; therefore, if you delete a Group, any/all associated assignment(s) rules are also deleted.
NOTE
Deleting a Group DOES NOT delete the User Accounts for Members. User Accounts stand independently, and are maintained even when a Group to which they belong is deleted.
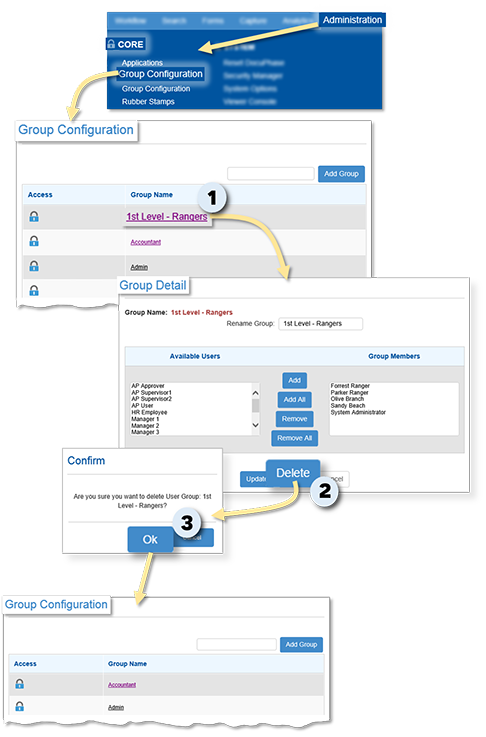
On the Group Configuration screen:
1) Find and click on name of the Group you want to delete to display the Group Detail screen. Tell me more...
On the Group Detail screen:
2) Click to display a confirmation prompt asking if you are sure you want to delete the Group.
3) Click  to delete the Group and return to the Group Configurationscreen.
- The Group no longer appears in the list of Groups.