Transferring Documents/Data (Exporting Files)
Documents and their data can be easily transported from one Application to another and/or sent to an FTP site for importing into another system. You'll first need to set up the configuration so that DocuPhase knows what, where, and how to transfer Documents/Data. Once the configuration is complete, you can then export the Document/Data as needed from the Search Results screen, and review the Export Results.
NOTE
- Only Documents/Data contained within an implemented Application are available for export.
- The terms "Export" and "Transfer" are used interchangeably in this context.
TIPS
- To access the Reset DocuPhasescreen: from the main header, go to AdministrationuSYSTEMuReset DocuPhase.
- If you are going to be transferring data to an FTP, you'll need to set up the FTP configuration first; that way, you can simply select the FTP Configuration Name when setting up the Export Configuration.
Tell me about...
This screen allows you to select whether you want to configure definitions for a local/network directory (Export) or for those you want to define for locations outside your network (e.g., cloud storage such as Dropbox, or to network of another office or company).
NOTE
If you are planning to configure settings for an FTP, you must first set up one ore more FTP sites., then you'll need to also set up an Export Configuration using that FTP configuration.
TIPS
- If you click
 , the corresponding screen (i.e., Export or FTP Configuration) appears with empty fields. You can then enter/select the appropriate information for the definition you are configuring.
 - If you click
 , the corresponding screen appears with previously entered/selected information. You can change the information at this point, as needed.
| Field/Function | Use it to... |
|---|---|
| Application |
identify the Application in which the Documents being exported reside. |
| Export Configuration Name |
enter a unique, identifiable (i.e., something that identifies the kind of data being exported, such as 2017 Invoices or 2018 Budgets), definition for the configuration you are creating/editing. |
| Directory |
enter the local or network path to the folder into which you want the exported Documents/Data to be transferred. |
| FTP Configuration Name |
select the name of the FTP site to which you are transferring data, when applicable.
NOTEOnce you configure one or more ftp sites, the names of those sites appear in a drop-down list in this field. IMPORTANT!
|
| Export Options | specify how you want to export the Documents/Data , and what you want included:
|
| Export Format |
specify how the exported data is organized/presented:
|
| Indexes to be Exported |
choose any Indexes (based on the Export Format selected - as described above) that you want to have exported. You can select all Indexes at once or individually. IMPORTANT!You must select at least one Index; otherwise, no data will be designated for export. NOTEThe exported values related to the selected Indexes automatically poplulate according to the designated format as described above. |
This screen allows you to configure settings for exporting Documents/Data to an ftp site/directory. Once this configuration is set up you can select it when performing a Data Transfer (Document/Data export).
TIPS
- If you click , the corresponding screen (i.e., Export or FTP Configuration) appears with empty fields. You can then enter/select the appropriate information for the definition you are configuring.
- If you click , the corresponding screen appears with previously entered/selected information. You can change the information at this point, as needed.
| Field/Function | Use it to... |
|---|---|
| FTP Configuration Name |
enter a concise, but unique and descriptive name: making each FTP configuration easy to recognize. |
| Server Name |
enter name of the remote destination server to which Documents/Data will be transferred. IMPORTANT!If you change the name of an FTP site that is linked to an Export Configuration, the name is automatically updated within the associated Export Configuration settings. |
| User Name and Password |
set a strong password: easy for you to remember, but difficult for others to guess. BEST PRACTICEUse the guidelines below to create a strong password:
EXAMPLE
This unique User and Password is used when accessing the FTP for data transfer. |
| Confirm Password |
enter the password again to make sure you have entered it correctly (as you remember it). |
| Field/Function | Use it to... |
|---|---|
| Job ID | view the a unique, system-generated number to help identify sets of data or Documents that have been transferred/exported to a local drive or network, or to an FTP site. |
| User Name | identify the name of the User who initiated the associated transfer/export of data. |
| Delete | delete the corresponding data.
WARNING!!!Use this deletion functionality with care. Once you delete something, it cannot be recovered: you will need to recreate it. |
| Application Name | identify the Application FROM which the data was transferred. |
| Export Name | see the Export Name given to the configuration prior to transfer of data. Tell me more... |
| Directory | view the path to the folder/directory into which the data was transferred. Tell me more... |
| Status | monitor the status of the transfer, and to know whether or not the transfer completed successfully. |
| Scheduled Time |
view the beginning and end times for each transfer of data. |
| Completed Time |
Tell me how to...
TIP
If you are going to be transferring data to an FTP, you'll need to set up the FTP configuration first (as shown below); that way, you can simply select the FTP Configuration Name when setting up the Export Configuration.
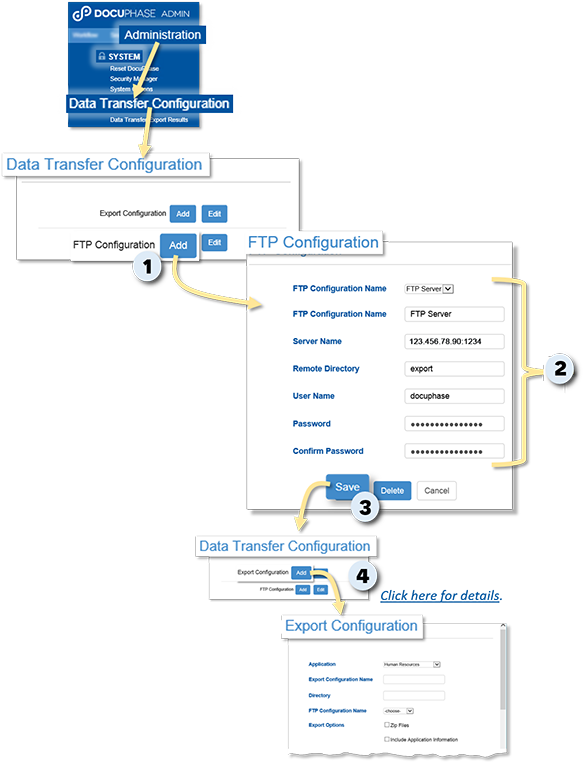
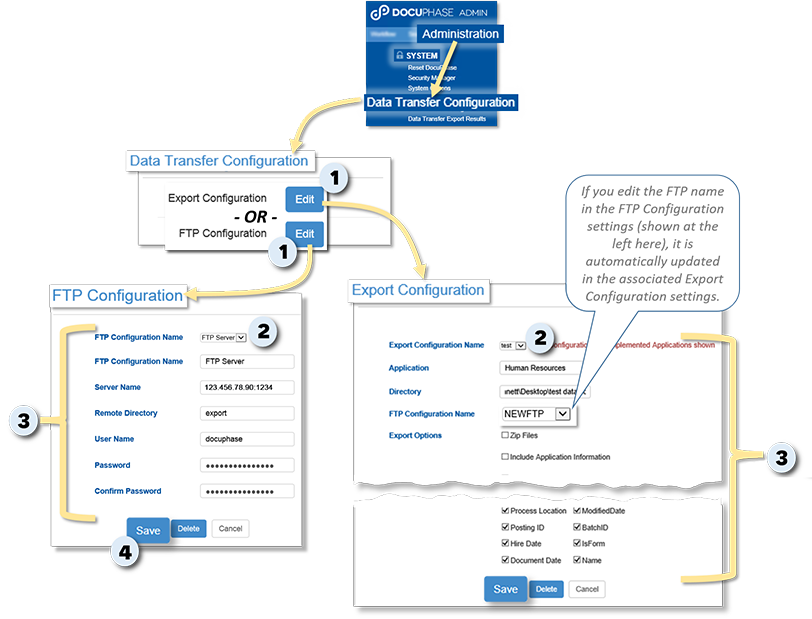
From the Data Transfer Configuration screen:
1) Click next to the FTP Configuration option to display the FTP Configuration screen.
On the FTP Configuration screen:
2) Enter the appropriate information for the FTP site being configured. Tell me more...
When all entries have been completed:
3) Click  to store the new configuration and return to the Data Transfer Configuration screen
4) Create an Export Configuration for this FTP. Tell me more...
TIP
If you are going to be transferring data to an FTP, you'll need to set up the FTP configuration first; that way, you can simply select the FTP Configuration Name when setting up the Export Configuration, as shown below.
From the Data Transfer Configuration screen:
1) Click next to the Export Configuration option to display the corresponding screen.
On the Export Configuration screen:
2) Enter the appropriate information for the configuration being added. Tell me more...
When all entries have been completed:
3) Click to add the new configuration to the list and return to the Data Transfer Configuration screen.
IMPORTANT!
This feature requires specific configuration. If you don't see a Definition as described in step 4 below, please contact your TPOC.
NOTE
The terms "Export" and "Transfer" are used interchangeably in this context.
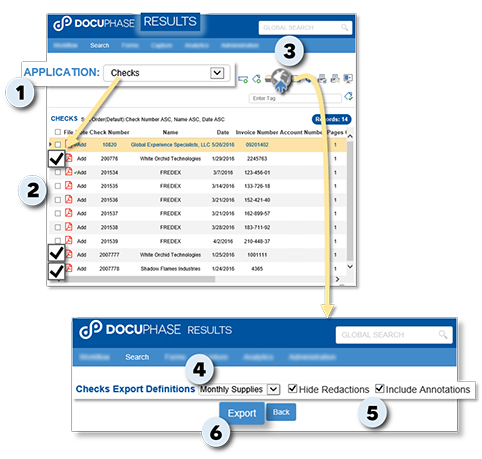
On the Search Results screen:
1) Select the Application containing the Documents/Data you want to transfer to another location.
From the list of files:
2) Select the Documents to be exported.
In the upper right corner of the screen:
3) Find and click ![]() to display the configuration Definition screen.
to display the configuration Definition screen.
From the Definition field on the configuration Definition screen:
4) Select the correct definition from the list.
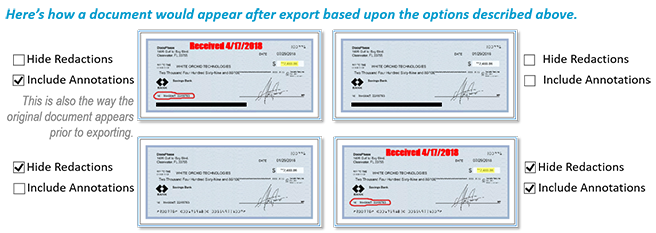
5) Enable (![]() ) the Hide Redactions and/or Include Annotations options, as needed.
) the Hide Redactions and/or Include Annotations options, as needed.
- Selecting Hide Redactions removes the redactions so that the Documents that have been transferred show all text instead of text with redactions intact (covered or unreadable text). If you want information in the selected Documents to remain hidden or unreadable, do NOT enable this option.
- Selecting Include Annotations simply means that any/all Annotations that have been applied to the selected Documents are included and viewable on the transferred Documents/Data.
TIP
When all selections have been completed:
6) Click  to Export the selected Documents/Data and display the Export Results screen.
On the Data Transfer Configuration screen:
1) Click next to the Export Configuration option to display the corresponding screen.
or
Click next to the FTP Configuration option to display the corresponding screen.
On the designated Configuration screen:
2) Find and select the Configuration name to display the details of the configuration you want to change.
On the Export Configuration screen:
3) Enter the appropriate information for the configuration being added. Tell me more...
or
On the FTP Configuration screen:
Enter the appropriate information for the FTP site being configured. Tell me more...
When all changes have been completed:
4) Click to store the changes and return to the Data Transfer Configuration screen.
WARNING!!!
Use this deletion functionality with care. Once you delete something, it cannot be recovered: you will need to recreate it.
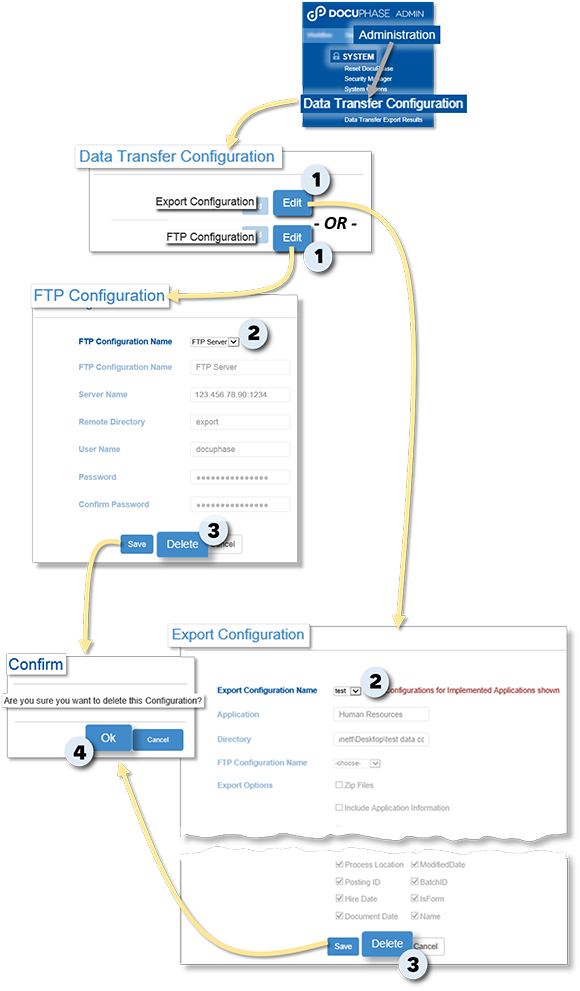
On the Data Transfer Configuration screen:
1) Click next to the Export Configuration option to display the corresponding screen.
or
Click next to the FTP Configuration option to display the corresponding screen.
On the designated Configuration screen:
2) Find and select the Configuration name to display the details of the configuration you want to delete.
3) Click  to display a prompt asking you to confirm that you want to delete the designated configuration.
From the confirmation prompt:
4) Click  to close the prompt and delete the designated configuration.