Finding and Using Fillable Forms
You can use the All Forms screen to find any fillable Form you want to complete/fill-in (e.g., Time Off Request, Purchase Request, etc.). Unlike completed Forms that you can Search for (and that appear in the Viewer), fillable Forms appear directly under the main header.Tell me more...
The All Forms screen allows you to locate these Forms using any of the following methods. Tell me more...
- By Application
- By Category
- As Favorites
IMPORTANT!
Not all Forms belong to a Category. Therefore, if you don't see the Form you need listed in any Category, try looking for the Form by Application, as described below.
TIPS
- Viewing by Category can filter the results to make it easier to find the Form you need.
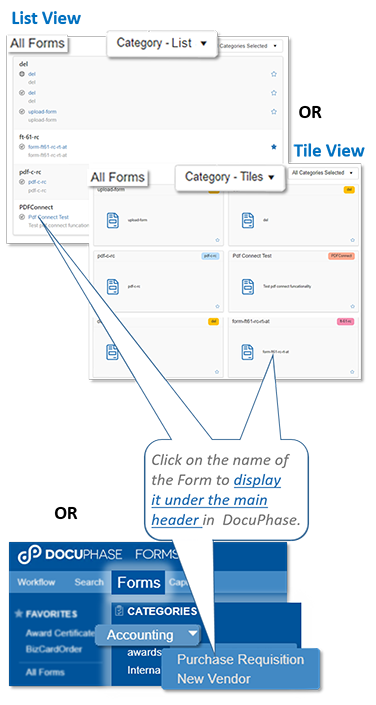
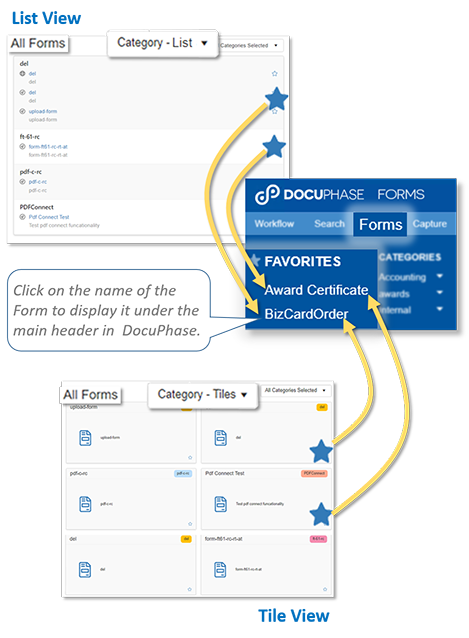
- Regardless of the way you view Forms (i.e., by Application, Category, or Favorites), when you find the Form you want, click on the name of the Form to display it under the main header .
Tell me about...
When a Form is created, it is directly associated with a specific, single Application. Select the Application option to view the list of Forms available to you: in alphabetical order, by Application. Once you select the Application option, you can then select which Applications you want to have appear in the list of Forms.

TIP
When you find the Form you want, click on the name of the Form to display it under the main header .
In addition to an Application, any Form can be assigned to one or more categories. Select (![]() ) the Category option to display a list of Forms by their Category, in alphabetical order.
) the Category option to display a list of Forms by their Category, in alphabetical order.
You can view forms by Category from the main Forms menu, or from within the All Forms screen.
IMPORTANT!
Not all Forms belong to a Category. Therefore, if you don't see the Form you need listed in any Category, try looking for the Form by Application, as described above.
TIPS
- Click
 next to any Category to display a list of the Forms that belong to that category.
 - Regardless of the way you view Form Categories, when you find the Form you want, click on the name of the Form to display it under the main header .
There are two ways to view Forms according to the Categories to which they belong: by List or by Tile (see below for more information)...
NOTE
In addition to an Application, any Form can be assigned to one or more categories.
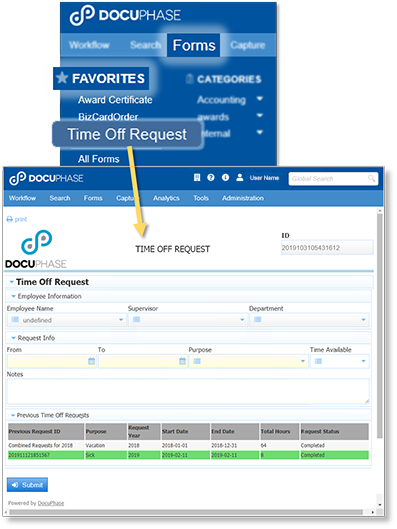
You can also set Favorites in either the Application or Category listing by clicking on a star (![]() ) to highlight it. Designated Favorites appear in the Forms menu for easy access to frequently used Forms.
) to highlight it. Designated Favorites appear in the Forms menu for easy access to frequently used Forms.
TIPS
- Viewing by Category can filter the results to make it easier to find the Form you need.
- When you find the Form you want, click on the name of the Form to display it under the main header.
Most of the elements you see in a Form are pretty obvious. However, if you find one you're not sure about, please refer to the list below for more information about that element.
|
Element |
Use it to... |
|---|---|

(Dropdown) |
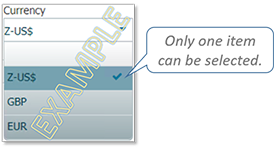
display list of options from which you can select one option. If the list of option si lengthy, then you can enter characters (alpha/numeric) that filter the choices and display those that match what you have entered. Show me...NOTESometimes a Dropdown will include an icon known as a ComboBox. Tell me more... |

(Radio Buttons) |
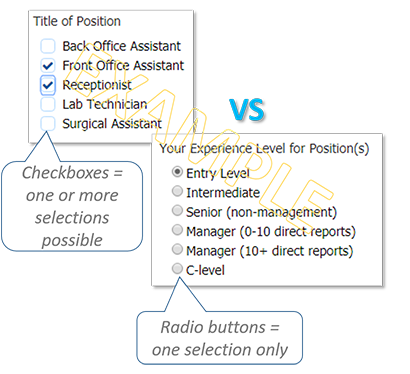
allow a single choice to be made from two or more choices. However, only one radio button can be selected at one time. NOTERadio buttons differ from checkboxes because while you can select multiple checkboxes, only one radio button can be selected at a time. Show me... |

(Checkboxes) |
generally provide multiple choices, and allow one or more selections to be made.NOTECheckboxes differ from radio buttons while you can only choose one radio button at a time, you can select multiple checkboxes. Show me... |
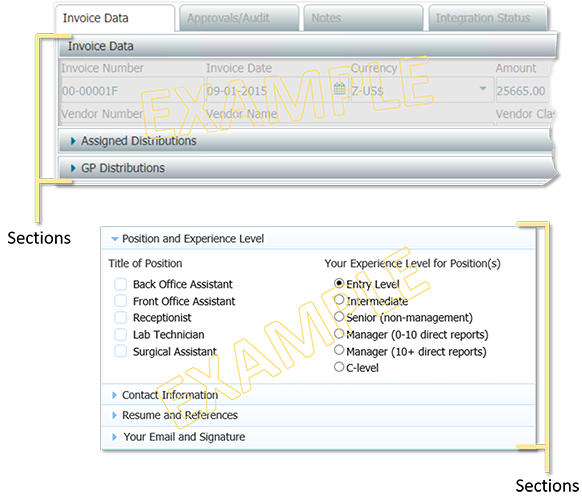
| Sections | group information making the form more compact for easier viewing and use by limiting the need to scroll. Show me... |
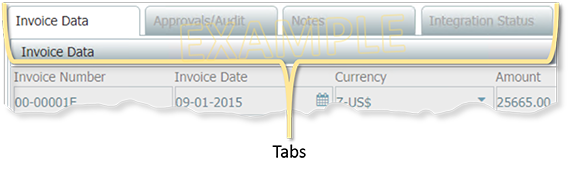
| Tabs | group or categorize specific information may be divided to make the form more compact and easier to use (similar to Sections, as described above). These appear as "page-like" sub-divisions. Each tab can contain any of the regular controls as described here. You can click your way to each tab to review and/or complete more information in the form. Show me... |

|
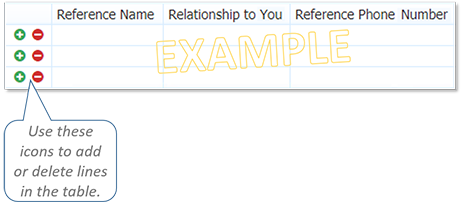
enter one or more lines of information in a table format.
TIPSome tables include icons that allow you to add ( |

|
provide a link from within a form that allows you to access a URL of the DocuPhasesystem (e.g., a related document that may be stored within DocuPhase, or a reference to a vendor's . The contents of the URL target are displayed in a separate window from DocuPhase. Show me...
|

|
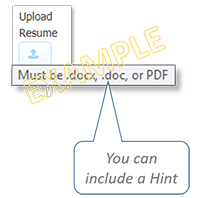
upload a document/file. Show me... |

|
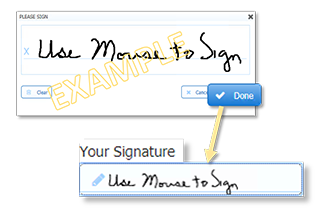
add your signature (when required) to a document using your mouse, stylus, or finger (depending upon the device being used to access the Form). Show me... |

|
add a single line of text (alphanumeric) to be entered by the person completing the form. Show me |

|
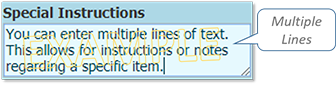
enter multiple lines of text. Show me |

|
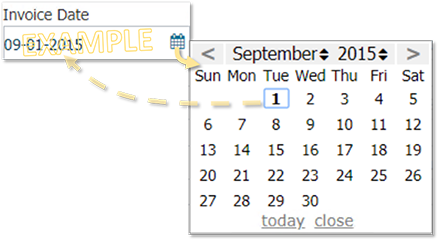
enter a date in a required, specific format. Because a special control is used when this icon is added to a form, all you have to do is choose the date from the calendar ( |

|
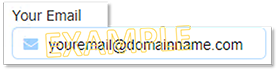
enter an email address and have it automatically verify that it meets the required email address format. Show me... |

|
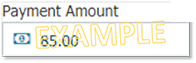
enter a number and have it automatically converted to a pre-determined currency format. Show me... |

|
enter a phone number using either of the following formats:
TIPIf a format other than the ones shown above are used, an error is displayed. If this occurs, you need change the format to match either of the correct options. |

|
enter a requires a number or quantity (numeric only).
TIPIf anything other than a number/digit is entered into this field (e.g., letters or symbols such as a decimal, pound sign, or percentage symbol, etc.) an error is displayed. If this occurs, you just need to remove the character that isn't a number. |

|
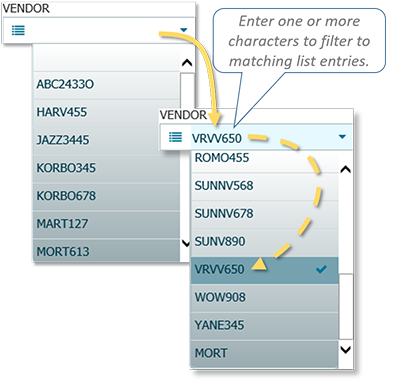
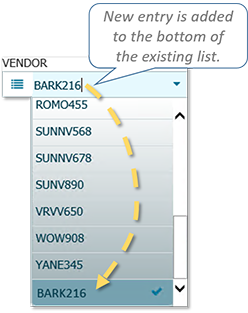
identify a dropdown list field that allows you to enter characters (alpha/numeric) that filter the choices and display those that match what you have entered.
EXAMPLELet's say there's a dropdown list of over 300 vendors. It would be time consuming to scroll through a list of those 300 idenfiers. However, a ComboBox allows you to enter the first few characters of a vendors identifier (name, ID number, etc.). Any vendor matching the characters you enter automatically appears at the top of the list. You can then make your selection from there. Show me... |
|
|
view specific forms that have been generated within the DocuPhase Platform. This is generally used when you are being asked to view a form for accuracy.
EXAMPLELet's say Security Training is required at your company. The trainer for that course may complete a form that is converted to a Certificate of Completion for each of the attendees that completed the course. The Forms Viewer is used to let each attendee review their own certificate to verify accuracy (such as date of course, spelling of name, association with the correct department, etc.). |


Tell me how to...
When a Form is created, it is directly associated with a specific, single Application.
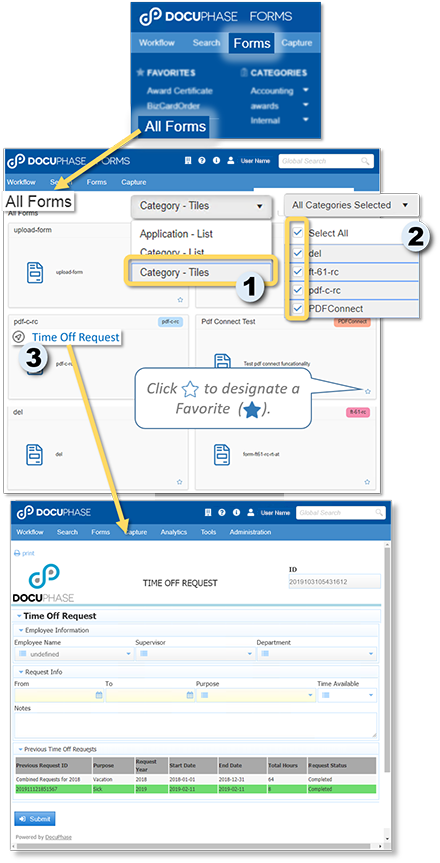
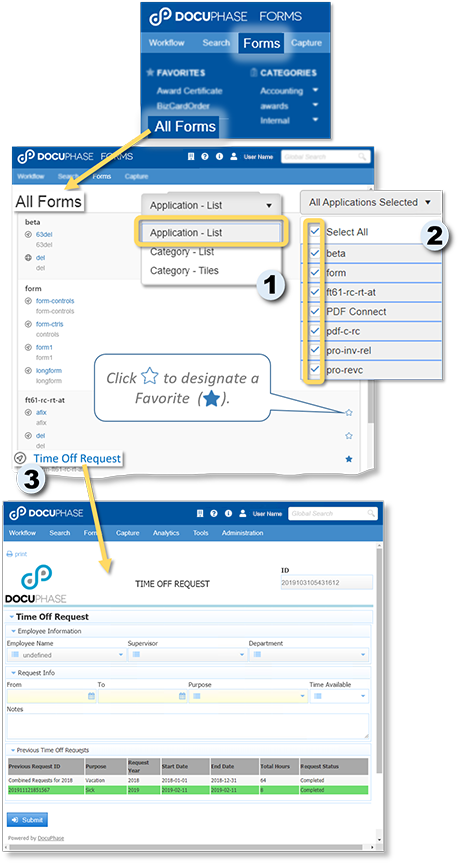
On the All Forms screen:
From each of the drop down lists:
1) Select the Application-List option.
2) Select the Application(s) associated with the Form you want to find.
Once you find the Form you need:
3) Click on the name of the Form to display it under the DocuPhase main header.
NOTE
While a Form may only be assigned to a single application, it can be assigned to one or more Categories.
TIP
When you find the Form you want, click on the name of the Form to display it under the main header (as described above).
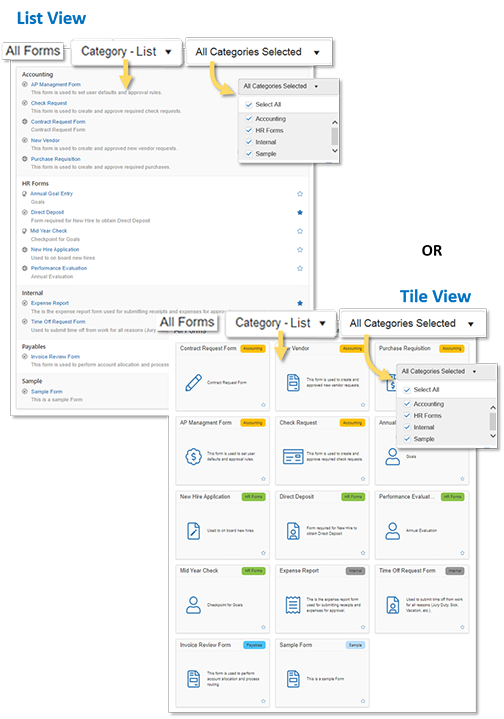
In addition to an Application, any Form can be assigned to one or more categories. The procedure below explains how to get to and use the List view:
IMPORTANT!
Not all Forms belong to a Category. Therefore, if you don't see the Form you need listed in any Category, try looking for the Form by Application, as described above.
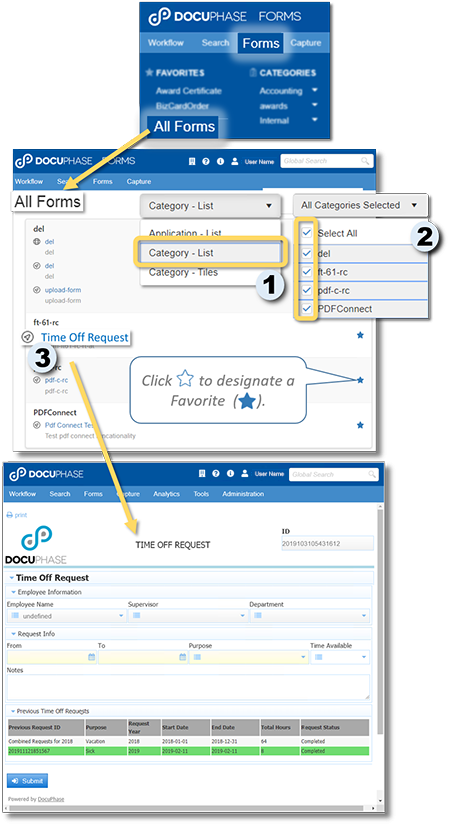
On the All Forms screen:
From each of the drop down lists:
1) Select the Category-List option.
2) Make sure the selected Category(ies) include the Form you want to find.
- You can select or deselect Categories, as needed.
Once you find the Form you need:
3) Click on the name of the Form to display it under the DocuPhase main header.
In addition to an Application, any Form can be assigned to one or more categories. The procedure below explains how to get to and use the Tiles view:
IMPORTANT!
Not all Forms belong to a Category. Therefore, if you don't see the Form you need listed in any Category, try looking for the Form by Application, as described above.
NOTE
Tiles view not available when using Internet Explorer (IE).
On the All Forms screen:
From each of the drop down lists:
1) Select the Category-Tiles option to display the Tiles view.
2) Make sure the selected Category(ies) include the Form you want to find.
- A Tile for each Category and each Form within each Category.
Once you find the Category Tile with the Form you need:
3) Click on the name of the Form to display it under the DocuPhase main header.