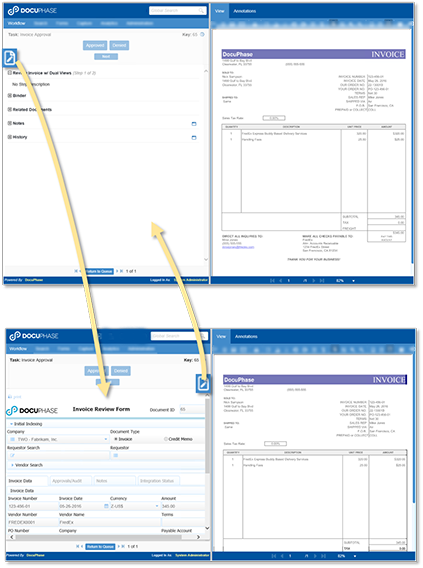
Completing Work Items (Using the Work Item Viewer)
Once you click on a Work Item from your Queue, the Work Item Viewer is displayed showing that item and the first associated File/Document. The following information includes a description of the options and features you may see in the Work Item Viewer, as well as instructions for using those options and features. Requirements for completion or actions performed on Work Items may vary between Work Items and Processes.
Tell me about...
These terms are sometimes used interchangeably. However, a Task is only one PART of a Work Item. The Work Item consists of several parts that include a Tasks, primary Documents, Related Documents, Notes, etc. (see below).
EXAMPLE
In a Human Resources Application New Hire Process, the Work Item is the collection of an Employment Application, Interview Notes, transcripts, and other Documents needed to complete the New Hire Process decision to hire or reject an applicant.
NOTE
Remember that what you see in the Work Item Viewerdepends upon the permissions set for you by your organization. Therefore, you may or may not see some of the features and options shown below. If you think there's something you should see that you don't, contact your TPOC.
Once you access the Work Item Viewer from your Queue, the process of completing Work Items may vary from Process to Processl; however, there are always instructions and information provided to help you complete the Work Itemat hand (as described below). If you have an issue or question regarding the completion of a Work Item, be sure to contact your Supervisor or TPOC for assistance.
A Task involves the action(s) you need to take to complete Work Items. The Task area provides the Action buttons (e.g.,  ,
,  ,
,  , etc.), you'll use to complete the Tasks assigned to you; its content depends upon selected the Process and Work Item. Some Tasks contain multiple steps and/or Documents. Once you perform a Task related to a specific Document, the next Document/Task is displayed.
NOTE
The Action buttons that appear may differ from Task to Task, Process to Process, etc. While most buttons are self-explanatory and may regularly appear during a processes, one button you may see is  . This button may appear ON an Exception Task, and is used to return the work item back into the process (to retry the action that caused the exception). This is a routine first action in order to retry anything that might have been a temporary issue.Tell me more...
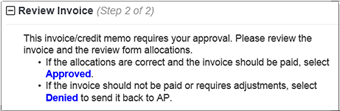
Basic instructions for the Work Item appear in this section. The content in this area varies according to what instructions are included for completion or actions performed on a Work Item.
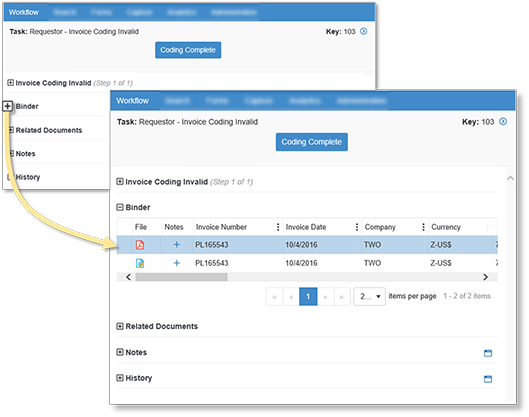
A Binder is like a (virtual) folder that contains related Documents that were submitted to DocuPhase. Settings for a Binder Definition allow multiple Documents to be handled within a single Work Item moving through a Process.
EXAMPLE
A Binder may hold all the Documents related to either of the following transaction-processes:
- A Human Resource Application Process Work Item might include the I-9, W2, Employment Application, Employee Resume and Interviewer Notes for an employee.
- An AP Approval Process Work Item might include the invoice and supporting backup documentation from the vendor that pertain to a particular project.
NOTE
- If documents from multiple Applications are included in the Binder, the binder automatically separates those documents into sub-sections that represent their associated Application.
- When the number of Documents in a Binder section exceeds 10, page controls appear in that section to allow you to scroll through the various Documents as needed.
(Binder) Related Documents generally include non-critical Documents that support or may be referenced by the Binder Documents, but aren't an actual part of the Process. This allows you to create an organized paper trail that is maintained within the DocuPhase where they are easily maintained and referenced at any point.
EXAMPLE
Related Documents related to Work Items might include:
- A Human Resource Onboarding Process Work Item might include a copy of a newly hired employee's social security card and driver's license supporting the employee's I-9, W2, and Employment Application.
- An AP Approval Process Work Item might include a purchase order and packing slip: supporting Invoices received for a particular project.
You can add notes to a work item to pass along information related to the actions you take during processing. This can be helpful to other users within the process to clarify or add context regarding the decisions that are taken. Tell me more...
TIP
Remember, if you have permissions to use the Annotation tools, you can add Notes directly into a Document. Tell me more...

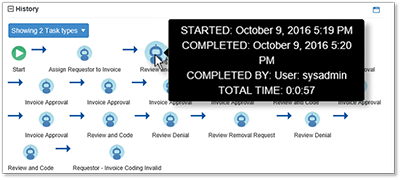
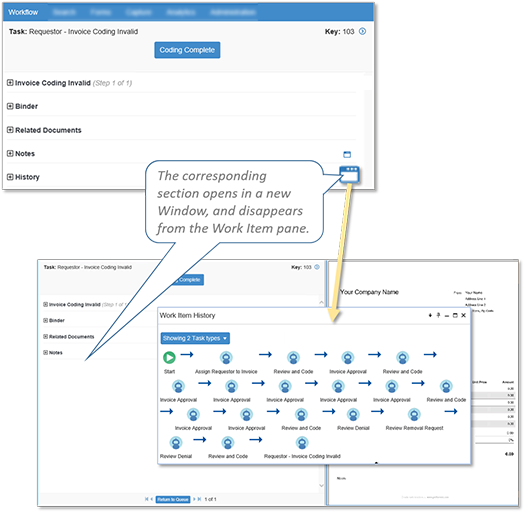
You can use this section to view more about the Work Item its progress in the current Workflow Process: beginning from the initial generation of the work item and each step of the Process. In addition, you canfilter what you see in the history by Task Type. Tell me more...
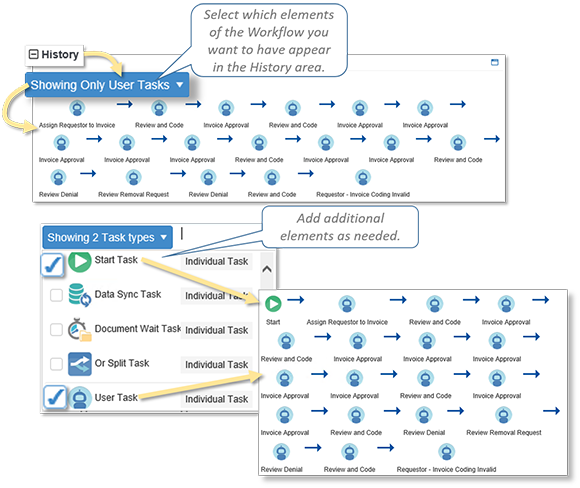
The basic elements of the History Workflow of a Work Item are known as "bots." The bots here represent various actions that have or will occur during the "life" of a Work Item.
TIP
Remember that you can filter the History information that appears. Tell me more...
| Bot | Function | ||||||||||||
|---|---|---|---|---|---|---|---|---|---|---|---|---|---|

|
Defines the resources (i.e., Users and/or Groups) assigned to User Tasks and determines who has access to a Work Item. |
||||||||||||

|
Automatically executes an external Application, and may include one or more actions. EXAMPLEAn HR process may have an automatic task that autocratically prints New Hire forms to be reviewed. |
||||||||||||

|
Defines a task to access and/or update data in one or more external data sources (e.g., databases) within or external to DocuPhase: requiring no human intervention. EXAMPLEIn a healthcare facility, a work item’s Patient ID Index field contains a valid ID number that the Data Sync Task uses to find (in either the DocuPhase or external database) and update the corresponding patient's account: synchronizing the database with the Patient record. |
||||||||||||

|
Used to determine which of two possible Workflow paths a process follows. EXAMPLEIf an Accounts Payable Manager may be required to Approve or Deny (i.e., make a decision) an invoice, this element is used to ensure that decision process. |
||||||||||||

|
Indicates a the final point of an Assignment Task. |
||||||||||||

|
Included in every process, the Exception Task defines (via one or more steps) the resolution to a problem that may occur somewhere within a specific process. It allows the issue to be resolved, then returns the item to the normal Workflow. EXAMPLEIn a Purchase Order process, once an order is received, the packing list must be submitted and matched with an order. However, if the system is unable to find the corresponding order (e.g., because it was manually Indexed incorrectly), an Exception Task is provided with steps for finding the correct order to be matched with the packing list; then passing it a User Tasks for verification and submission to AP for approval (i.e., resolving and displaying |
||||||||||||

|
Different from an End Assignment bot, this indicates the end of an entire process, rather than an individual Task. NOTEWhile a process can only have a single Start Task, there may be multiple Finish Tasks within one Process. This is because there may be more than one path to complete a process; each path in a Progression Workflow network must ultimately end with a Finish Task. EXAMPLEIn an HR process for recruiting new employees, you may have Work Items for reviewing resumes and interviewing candidates to determine suitability for a particular job opening; the process may end at any of the following points, when a candidate:
The HR Recruiting process can end at any (or other) of the above points. |
||||||||||||
|
Defines two or more Tasks that can be performed concurrently without relying on each other, but using the same Binder or Documents: creating parallel processing Workflow paths. EXAMPLEWhile a sales candidate’s Application, Resume, and Interview Notes are being reviewed as a Work Item by the Sales Department, the HR department may be performing background and reference checks (using the same work item documents) as a Work Item: concurrent paths within the New Hire Process established by the AND Split Task. NOTEA Merge Task always follows an AND Split Task (see below) ensuring that the Split paths converge and continues through the Workflow. |
|||||||||||||
|
Defines a point for parallel paths (created by an AND Split Task) to converge back into one unified path. NOTEEXAMPLEIn an HR Recruitment Process, the Employment Application Review path which is concurrently performed while the HR department verifies References and Transcripts are parallel paths within the New Hire Process. These parallel paths are allowed to converge into a common path again by the Merge Task which leads to a final “Hire” or “No Hire” result for the New Hire Process. |
|||||||||||||
|
Defines a Task that is divided into two or more possible paths. The division (split) of the Task is based on a set of conditions. How the conditions are met determines which path the Task follows: using the same Binder and Documents for each. EXAMPLEThe User or Group responsible for the approval of a Purchase Order may depend upon the total amount of the expenditure. In an Or Split, conditions are set up so that certain P.O. amounts trigger the system to send P.O.s through the appropriate path:
|
|||||||||||||
|
The point at which each Work Item begins. NOTEWhile a process can only have a single Start Task, there may be multiple Finish Tasks within one Process. This is because there may be more than one path to complete a process; each path in a Progression Workflow network must ultimately end with a Finish Task. |
|||||||||||||
|
Used to indicate and define some form of human interaction(e.g., a manager signing a document, a Group acquiring and processing additional information about a document, etc.). NOTEUser Tasks are associated with email notifications, as well as changes in Process Status of an item. |
|||||||||||||
|
An automatic flow-control task that "suspends" a work item’s progress until specified condition(s) have been met. EXAMPLEIn a healthcare setting, the office may be waiting for test results to be received before contacting a patient to come in for a follow-up visit. |


| Function/Feature | Description |
|---|---|
|
This is a system-generated, unique identifier used by the DocuPhase Platform to recognize and track the each Tasks and its elements within a Process. |
|
|
|
Switches your view by extending/reducing the Work Item screen (i.e., the extended screen expands into the Work Item Viewer pane to allow you to view more information at one time).
|
|
|
Expand/Collapse the corresponding section to see more/less of information in that area.
|

(Work Item Display Controls) |
TIPYou can roll your mouse over the page controls to display a message showing how many Work Items in the queue have been completed (e.g., 0 of 6). |
|
ONLY WITH FORMS |
|
|
|
This icon may appear when a Form is in use and is associated with a Document within the Repository. |
|
When you click on this option, you are offered a choice of saving or viewing You can view and/or save the associated Form as a PDF. Once you make the selection, you can then print the PDF. Tell me more... |
|
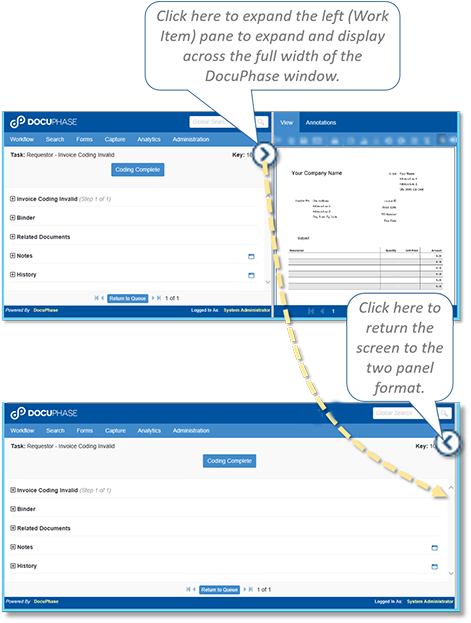
 to go back to your Queue at any point.
The ![]() icon allows you to display and hide a Form on the Work Item Viewer so that both the Form and its corresponding Document (in the Document Viewer ) can be seen and worked on at the same time.
icon allows you to display and hide a Form on the Work Item Viewer so that both the Form and its corresponding Document (in the Document Viewer ) can be seen and worked on at the same time.
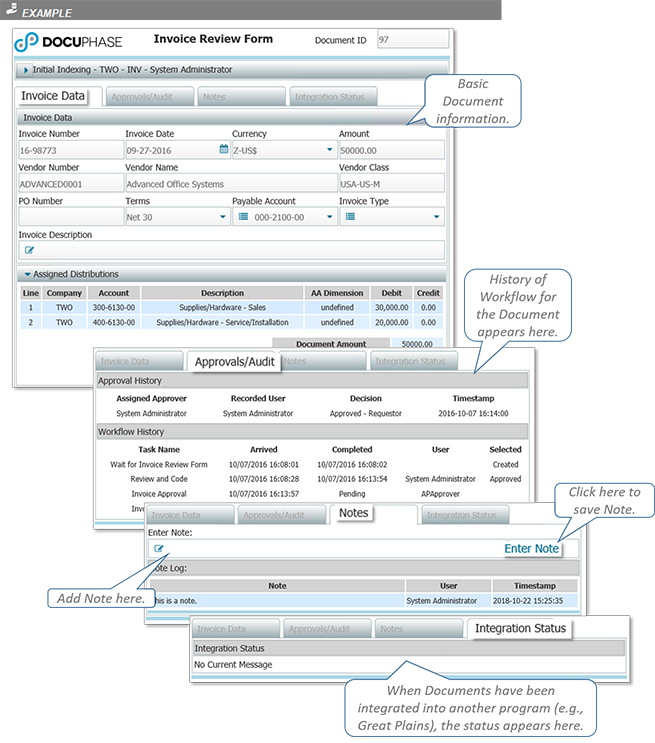
Some organizations use Forms as part of their Document Management system: providing tabs that allow you to view various aspects of the Document's history and status. The tabs and information they contain depend upon the way the Document is set up within the process with regard to Approvals and movement through the DocuPhase Workflow.
Tell me how to...
Move your mouse over an element within the Workflow in the History section (or window when the Window Mode is activated) to view historical information about that item (e.g., when it was started and/or completed, who completed the item, etc.).
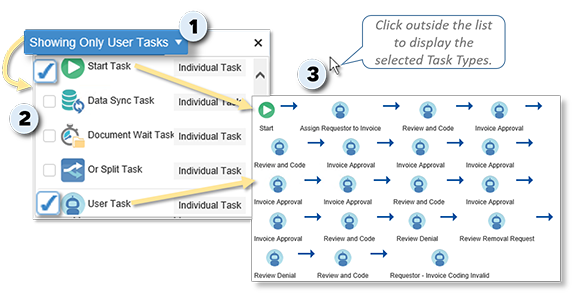
You can filter the history elements, depending upon what Task Types have been included in a particular Work Item.
At the top of the History section:
1) Click  to display a list of Task Types, as well as options to display All Tasks or User Tasks only.
NOTE
The label on the button that appears here depends upon whether or not the History has been previously filtered. If a filter has already been applied, the button label corresponds to the last option chosen (e.g., Showing 3 Task types, Showing All Tasks, etc.)
2) Select the Task Types you'd like to view within the History.
3) Click outside of the list to display the selected Task Types in the History section.
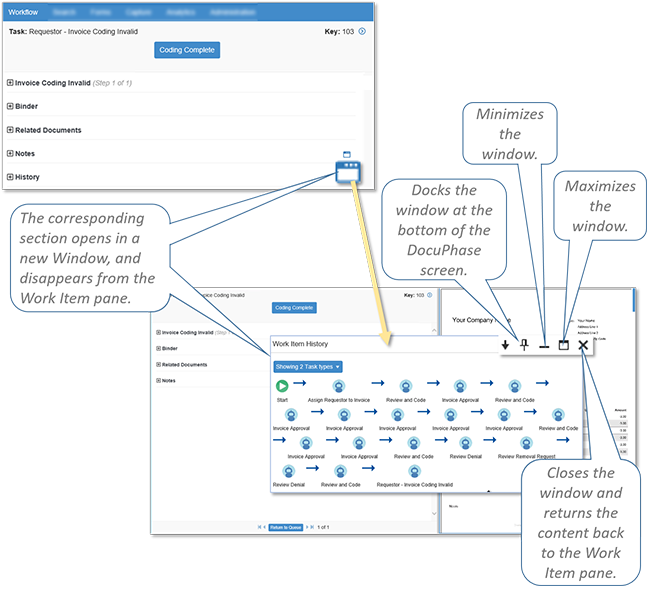
The Window Mode the corresponding section (Binder, Related Documents, Notes, and/or History) of the screen in a new window that appears on top of the Work Item panes.
TIP
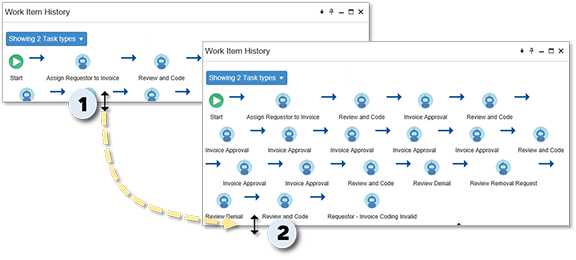
You can click and drag to move the window(s) anywhere within the DocuPhase screen.
More Windows Functionality
In addition to moving the window around in the DocuPhase screen, once you activate the Window Mode you can do the following:
To Resize the Window(s)
On the newly opened window:
1) Move the cursor over the right or bottom edge of the window until it changes to ![]() .
.
2) Click and drag the ![]() cursor to resize the window, as needed to show more or less of the content.
cursor to resize the window, as needed to show more or less of the content.
AND/OR
To Dock, Minimize, Maximize, and Close the Window ( ,
,  ,
,  ,
,  )
)
These options offer additional ways to display the window, as well as how to close it and return it to the Work Item pane as a section.
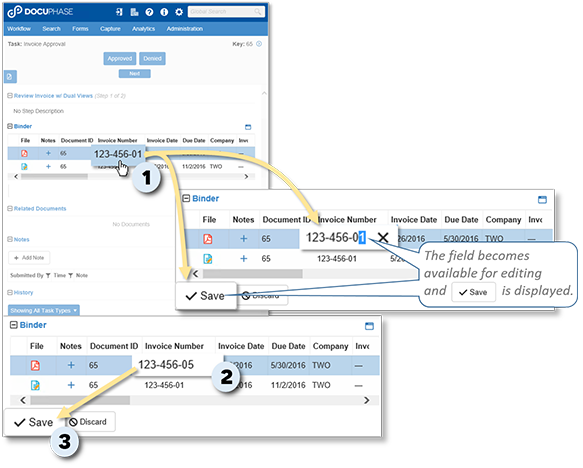
You can easily change and save values in the columns that appear in a Work Item.
NOTES
- You can make multiple changes in a section before Saving.
- This feature is also available in the Window Mode (as described above).
In any column and row of a list of Work Items in the Binder:
1) Click once on an item in the Work Item Viewer to make it available for editing, and display the  button to the bottom of the section.
2) Make the necessary changes to the item.
Repeat steps 1 and 2 for items in the same section, as needed.
3) Click to store the changes.
TIP
Click  to undo the unsaved change and restore the Index to its previous value.
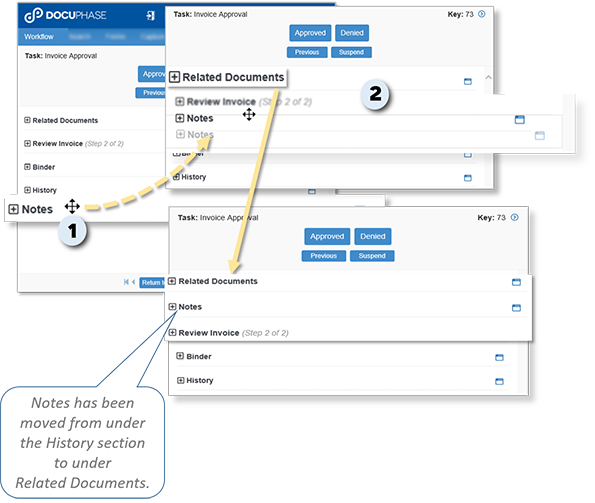
You can quickly and easily change the order in which the different sections appear in Work Items.
NOTES
When you change the order of sections in one Work Item:
- the order is changed in ALL Work Items.
- the change is browser-based: if you always use the same browser and don't clear cache, the order of the sections remains the same.
- the sections revert to the default order if/when you change browsers (e.g., from Chrome to IE) or clear cache in the current browser.
BEST PRACTICE
While you can change the order of the sections while they are open, it's a good idea to close all of the sections (but not required) to make it easier to see exactly where you are placing the designated section.
1) Move the cursor over the section you want to move until it changes to  .
.
2) Click and drag that section up or down to its new location.
Repeat the above for each section you want to move.
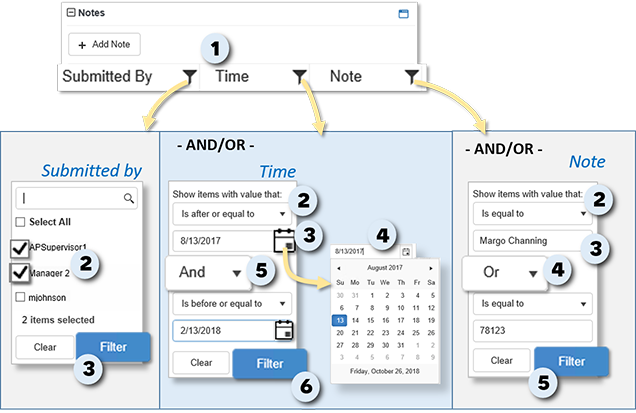
You can use the Notes Filter to sort and refine the Notes associated with a particular Work Item. This can be done by using any or all of the following:
- Author (who submitted the Note)
- Date (when was the Note submitted)
- Content (what is in the Note)
In the Notes section of a specific Work Item:
1) Click ![]() to display Filter options for the Work Item based on the designated column (i.e., Submitted by, Time, Note):
to display Filter options for the Work Item based on the designated column (i.e., Submitted by, Time, Note):
To Filter by the Submitting User(s):
2) Select (![]() ) the name(s) of the person or persons associated with the Note(s) you want to review.
) the name(s) of the person or persons associated with the Note(s) you want to review.
- You can search for a specific User by entering a letter or name into the Filter search field, then clicking
 to display matching results. You can then select (
 ) one or more Users from that list.
 - You can use the Select All option in combination with the Note content filter to include all Users who have submitted notes matching the Filter criteria you have entered/selected (as described below).
TIP
3) Click  to display Notes submitted by the selected User(s) name(s).
AND/OR
To filter by Date:
2) Select values in relation to the beginning and/or end date (e.g., after or equal to).
3) Click ![]() to display the calendar.
to display the calendar.
4) Select dates as they relate to the designated values and Notes you want to see.
Repeat steps 2-5 in the second set of values to set a range of dates or alternate dates)
5) Select the Operator (i.e., And or Or) that determines whether Notes are filtered by both (And) dates and values or by either (Or) set values and dates.
EXAMPLE
Let's say you want to find notes that were submitted between August 13, 2017 and February 13, 2018, you would select a value of Is after or equal to, then select 8/13/2017 from the calendar; select the operation as And, then select the next Value of Is before or equal to, then select 2/13/2018 from the calendar.
6) Click to display Notes submitted by the specified date(s).
AND/OR
To filter by Note Content:
2) Select values for content you want to find within Notes.
3) Enter an alphanumeric value in one or both of the value fields.
4) Select the Operator (i.e., And or Or) that determines whether Notes are filtered by both (And) alphanumeric values or by either (Or) of the set alphanumeric values.
EXAMPLE
In an HR Process, there might be the need to find notes on a specific employee. However, in the notes, the employee may have been referenced by his/her name or employee number.
You could filter the notes to look for either their name (i.e., Margo Channing) or employee number (i.e., 78123) you would select a value of Is equal to, then enter "Margo Channing" in the value text field; select the operation as Or, then select the next value of Is equal to, then enter "78123" in the second value text field.
5) Click to display Notes submitted by the specified content values.
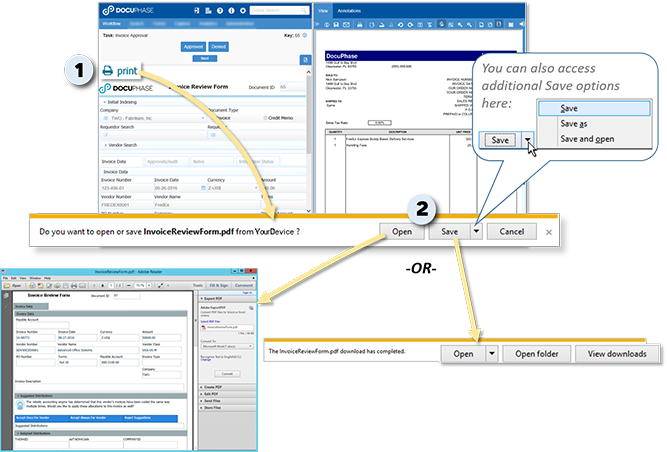
You have the options to open a Form and/or save a Form in PDF format.
In the Left-side Form area:
1) Click ![]() to display options at the bottom of the window.
to display options at the bottom of the window.
2) Click  to display the Form in Adobe Reader (you can also print and save the Form from there).
OR
Click  to download the document as a PDF, and display additional options to open the file, open the folder containing the downloaded file, or view a list of this and other downloads from this session.
TIP
You can click ![]() next to to display a list of additional Save options: Save, Save As, and Save and Open.
next to to display a list of additional Save options: Save, Save As, and Save and Open.
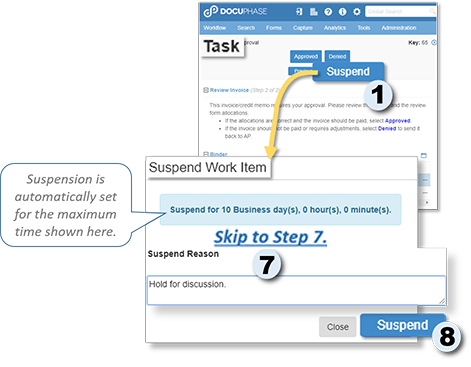
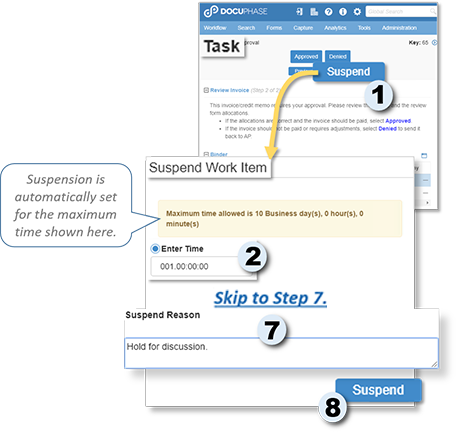
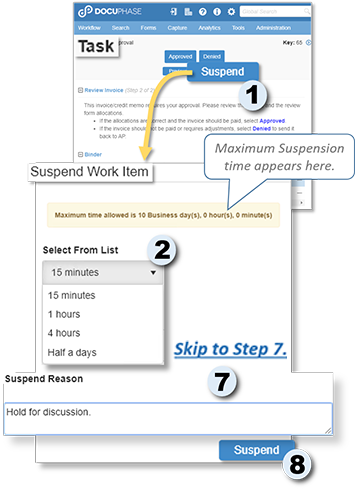
If you see the , you can use it to put that item "on hold" until a more appropriate time. The maximum length of time an item can be suspended is pre-configured. The options you see once you click , depend upon the way the Task is configured within Progression (the Workflow). Once you click to display the corresponding dialog, you may see one or more options for setting the suspension time:
- Pre-set time: if this appears, it allows you to suspend the item, but only by a pre-configured amount of time (e.g., 1 hour).
- Select from List: gives you a drop-down list of specific time intervals (e.g., 15 mins, 1 hour, 4 hours, half a day, etc.)
- Set Time: you can use this option to enter the number of days, hours, minutes, and/or seconds you want to suspend the item.
- Calendar: if this option appears, you can set a specific date and time (within the pre-set maximum time).
EXAMPLES
There are a variety of reasons you may need to suspend an item such as suspending approvals for any of the following:
- vacation request until the employee completes certain requirements
- invoice payment when there is any question as to its validity
- resumes to be approved and forwarded to the hiring manager until more information about the candidate is received
Of course, these are only a few examples. If you have the permission to suspend items, you can do so for whatever valid reason there is.
NOTES
-
Whether or not you see the button on any item you see in the Work Item Viewer depends on pre-confirgured permissions. Some items may offer it, some may not. If you believe that you should have the ability to suspend an item, but don't see the button; or if you believe that you should have more options for suspension (e.g., calendar or Set Time, etc. - as described below), contact your System Administrator for assistance.
- You can not set suspensions for any longer than the maximum time shown in the Suspend Work Item dialog.
In the Work Item Viewer:
1) Click to display the Suspend Work Item dialog.
In the Suspect Reason field of the Work Item Viewer dialog:
If using a Pre-set time
Skip to step 7.
OR
If using the EnterTime Option
In the Enter Time field:
2) Click on the Enter Time option to select it, then enter the appropriate time in Days, Hours, Minutes, and/or Seconds.
Skip to step 7.
OR
If Selecting a Time
In the Select from List field:
2) Click ![]() , then select a time from the drop-down list.
, then select a time from the drop-down list.
Skip to step 7.
OR
If Selecting a Date and Time from the Calendar
2) Click on the Select option to select it.
3) click ![]() to display the calendar.
to display the calendar.
In the Calendar:
4) Click on a date to select it, and add it to the field.
AND/OR
5) Click ![]() to display a drop-down list of times.
to display a drop-down list of times.
6) Select the appropriate time.

Once all items have been added:
In the Suspend Reason field:
7) Enter a concise and clear reason that the item is being suspected (e.g., "Waiting for more information from Vendor", "Suspending until project is complete", etc.).
At the bottom of the dialog:
8) Click to apply the suspension setting(s) to the Work Item.