
In order for a Data Sync Task to use an ODBC connection to retrieve and/or update information in an external database as an automated task within a Progression workflow process, you must first define the following:
The Data Link Provider – Identify the type of OBDC connection (e.g., Microsoft OLE DB Provider for SQL Server) is needed to communicate with the database you will be using (i.e., SQL Server).
The Data Link Server – identify the Server that supports the SQL Server Database you will be using and what user name and password is required to automatically gain access to it for our Data Sync Task.
The External Database -- Identify the specific Database that contains the Tables and Data Fields of information you will need to access and/or update with this Data Sync Task. Once this is established, you will want to click a Test Connection button to verify that our connection is properly defined and working.
The initial steps required to configure a Data Sync Task definition are illustrated in the following diagram. The Task Editor window for a Data Sync Task’s Data Fields Tab is provided for you to enter the: Data Fields Request’s Name, Description and use the Ellipse button for the Connection Field to launch the Data Connection window to assist you in completing and testing the ODBC connection string used to exchange data with the external database of your choice, as shown below.
Note: DSN (Data Source Name) objects are predefined using the Windows Control Panel to identify the external database sources and destinations for exchanging data allowing the Progression designer to easily select the DSN needed to provide the ODBC connections needed by a Data Sync task.
Now that the desired ODBC Connection string is defined in the Connection field, the Schema, Table and the Table Attribute fields can be optionally selected for use in this new OBDC Data Fields Request query and tested, as illustrated below.
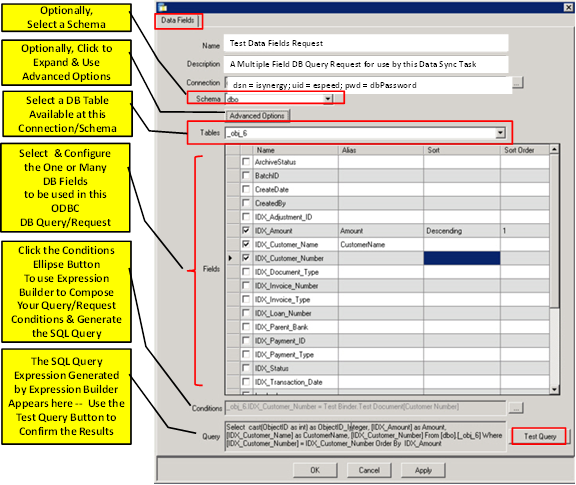
The Test Query button allows you to enter parameter values and test the generated SQL Query and view the retrieved data to confirm the validity of the configured ODBC Data Fields request.
The above diagram illustrates how to configure the new example “Test Data Fields Request” definition which can be saved by clicking the Apply button or the OK button.
The following table details the various component elements used in creating and maintaining a named Data Fields Request query definition.
|
Element |
ODBC Data Fields Request Tab Description |
|
Name |
Enter the name of the Data Fields Request definition you are creating or maintaining to support ODBC exchange with an external database. |
|
Description |
Optionally, enter a description of the purpose for this named definition. |
|
Connection |
The ODBC connection string expression that is used to establish a connection to the desired external database. |
|
Schema |
Once the ODBC connection string is established and the connection is operational, the available Schema selections can be retrieved from the source database allowing you to make these selections from the Schema-field’s drop-down list or select <None>.
In this example, the selected Schema name is “dbo” so the Tables and the Fields in the dbo-schema are listed in the Fields panel for selection and may be influenced by Advanced Options settings, as shown above. |
|
Advanced Options:
|
The Advanced Options button will expand the area around it and refresh the display of the form to allow you to optionally select or de-select its available options listed as checkboxes.
The three groups of Advanced Options: Wrap Type, Types and Row Count are described below. |
|
§ Wrap Type |
The Wrap Type options are used to indicate how data field names should be delimited as they appear in the expression syntax. § Square Brackets (e.g., [IDX_Customer_Name]) § Double Quotes (e.g., “IDX_Customer_Name”) § None (e.g., IDX_Customer_Name) Only a single selection is allowed for Wrap Type. The default setting is Square Brackets. |
|
§ Types |
The Types option acts as a filter for the list of choices for data fields in Tables or Views that are presented as data sources or destinations (i.e., From or To) for selection. The list of Types filter options are: § User Tables § User Views § System Tables § System Views One or any combination of multiple option selections may be combined. User Tables and User Views are the default setting. |
|
§ Row Count |
This option allows the designer to establish a limit on the number of rows that are obtained by the query for this ODBC Data Fields Request definition. |
|
§ Tables |
Once the ODBC connection string is established, the connection is operational and optionally a Schema is selected, the available Table selections can be retrieved from the source database allowing you to make these selections from the Tables-field’s drop-down list. |
|
§ Fields - Grid |
This matrix of rows allows you to select which database Table Attribute fields will be used in the web services SQL query request that will be generated. The matrix columns allow you to select and configure the selected database fields you wish to query with this web service request definition, explained below.
Note: the selected field not only has an Alias alternate name specified, but the database name also has a function wrapped around it so that it will be returned by the query as an integer value (i.e., the Cast function is able to convert between data types). |
|
§ Checkbox - Column |
Use the row checkbox to select (i.e., checkmark) the database field rows that are to be incorporated into the generated SQL query. |
|
§ Name - Column |
The database names that are present and available for your selection from the selected Table are listed here automatically. |
|
§ Alias - Column |
Optionally, you may prefer to have the selected field information named differently than its actual name in the selected database table. The Alias entry allows you to specify your preferred name in the selected field row in the table returned by the SQL query. Note: An Alias name is specified
in the SQL Query syntax by an |
|
§ Sort - Column |
The selected fields for the database records returned by the generated query when tested or executed may be sorted in the indicated sequence on their value as: Ascending or Descending or the entry may be left blank (i.e., no ordering imposed). |
|
§ Sort Order - Column |
Since multiple field rows may be selected as well as with a specified sort sequence the sorting priority from most-significant to least-significant may be indicated by numbering the sort fields for 1 to n where 1 is the most-significant. |
|
Ellipse Button – Conditions
Field |
Clicking this button launches the Expression Builder wizard that will allow you to compose a Query Condition that will restrict the data records that will be retrieved by the generated SQL Query request expression.
In other words, this conditional is used to automatically generate an SQL Where Clause for the query request. |
|
Conditions Field |
The conditional expression is entered into this field or it is placed here by the Expression Builder when its results are returned. Expression Builder is opened by clicking the Ellipse Button, shown below.
The Conditions Field entry provides the conditional expression that is converted into the SQL WHERE Clause in the generated Query which is used to restrict and select table rows that match its conditions. Note: The Advanced Option feature Rows can contain a maximum returned rows limit that will further restrict the number of selected rows that are returned by this WHERE-condition. |
|
Query |
Each time a change is made to these specifications, the Query field is updated with the latest generated SQL Query expression which can be tested with the Test Query or Saved by clicking the Apply or OK buttons.
|
|
Test Query Button |
Clicking this button activates the Query Request Test Features which allow you input key values and see the Query test results information to confirm that your web service request is working properly, as shown below.
This allows you to view and verify that the generated SQL Query operates properly over the network and returns the resultant data fields formatted as you expect. |
|
Cancel Button |
The Cancel button allows you to abort the entries and changes you have made prior to saving them. |
|
Apply Button |
The Apply button allows you to Save your entries and changes, without exiting this form. |
|
OK Button |
The OK button allows you to Save your entries and changes, but you also exit this form. |


